Difference between revisions of "Chat"
| Line 18: | Line 18: | ||
*Host/Server/Domain: LAN or WAN IP address of the PBX, depending on whether the chat client is on the LAN or coming in from remote. | *Host/Server/Domain: LAN or WAN IP address of the PBX, depending on whether the chat client is on the LAN or coming in from remote. | ||
| − | ==Configuring Bria XMPP for Chat== | + | == Configuring Bria XMPP for Chat == |
*Step 1 - Create an extension on the system. If you have set up your Bria already, use that extension and create an XMPP Account on your Accounts tab. | *Step 1 - Create an extension on the system. If you have set up your Bria already, use that extension and create an XMPP Account on your Accounts tab. | ||
*Step 2 - Enter you ext number as the username and PIN as the password. | *Step 2 - Enter you ext number as the username and PIN as the password. | ||
*Step 3 - Enter the word localhost for domain | *Step 3 - Enter the word localhost for domain | ||
| + | |||
| + | [[File:Photo 1.PNG|File:Photo 1.PNG]] | ||
| + | |||
*Step 4 - Click the advanced tab | *Step 4 - Click the advanced tab | ||
| − | *Step 5 - Enter in the IP address of the IPitomy PBX System. If you are using 3/4g you will need to use the external static IP address or Domain name. If using local wifi, you can use the inter LAN address. | + | *Step 5 - Enter in the IP address of the IPitomy PBX System. If you are using 3/4g you will need to use the external static IP address or Domain name. If using local wifi, you can use the inter LAN address. |
| − | *Step 6 - It is best to set this up on the external address so it will work while outside of the | + | *Step 6 - It is best to set this up on the external address so it will work while outside of the building. To complete the connection, you will need to forward port 5222 to the internal IP address of the IPitomy PBX System in the Router/Firewall. |
| + | |||
| + | [[File:Photo 2.PNG|File:Photo 2.PNG]] | ||
| + | |||
*Step 7 - Assign a Qmanager Account to this extension in PBX Setup - Services | *Step 7 - Assign a Qmanager Account to this extension in PBX Setup - Services | ||
*Step 8 - Log into Qmanager using the extension and pin for this extension and enable chat. After enabling the chat account you can log out of the Qmanager account for this extension. | *Step 8 - Log into Qmanager using the extension and pin for this extension and enable chat. After enabling the chat account you can log out of the Qmanager account for this extension. | ||
You should now see this extension in Qmanager with the Blue text messaging icon. Your Bria should be ready to send/receive chat messages to your colleagues desktops from your mobile smart phone as well as receive presence status updates. | You should now see this extension in Qmanager with the Blue text messaging icon. Your Bria should be ready to send/receive chat messages to your colleagues desktops from your mobile smart phone as well as receive presence status updates. | ||
Revision as of 19:03, 23 July 2014

Chat
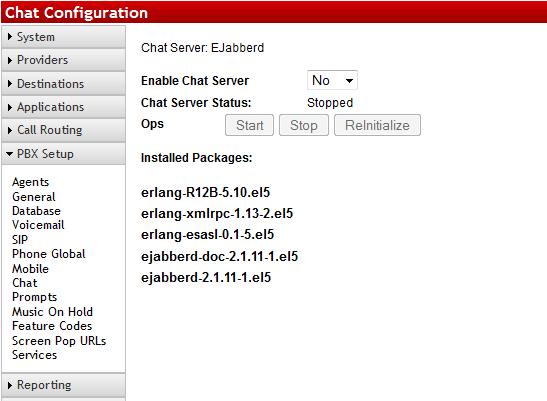
The PBX has a built in jabber/XMPP chat client found under PBX Setup=>Chat. This allows you to configure DCM, QManager, and other chat clients that support jabber/XMPP.
In order to use this feature, you must ensure that Enable Chat Server is set to YES and Chat Server Status should say Running. Once this is done, Apply Changes and you will be able to start using the built in chat feature on your XMPP ready devices and programs.
Configuring Chat
If you are configuring Chat on your own XMPP/Jabber client to work with the PBX you will need to know the following:
- Port: 5222
- UserName: Extension Number
- Password: Voicemail PIN
- Host/Server/Domain: LAN or WAN IP address of the PBX, depending on whether the chat client is on the LAN or coming in from remote.
Configuring Bria XMPP for Chat
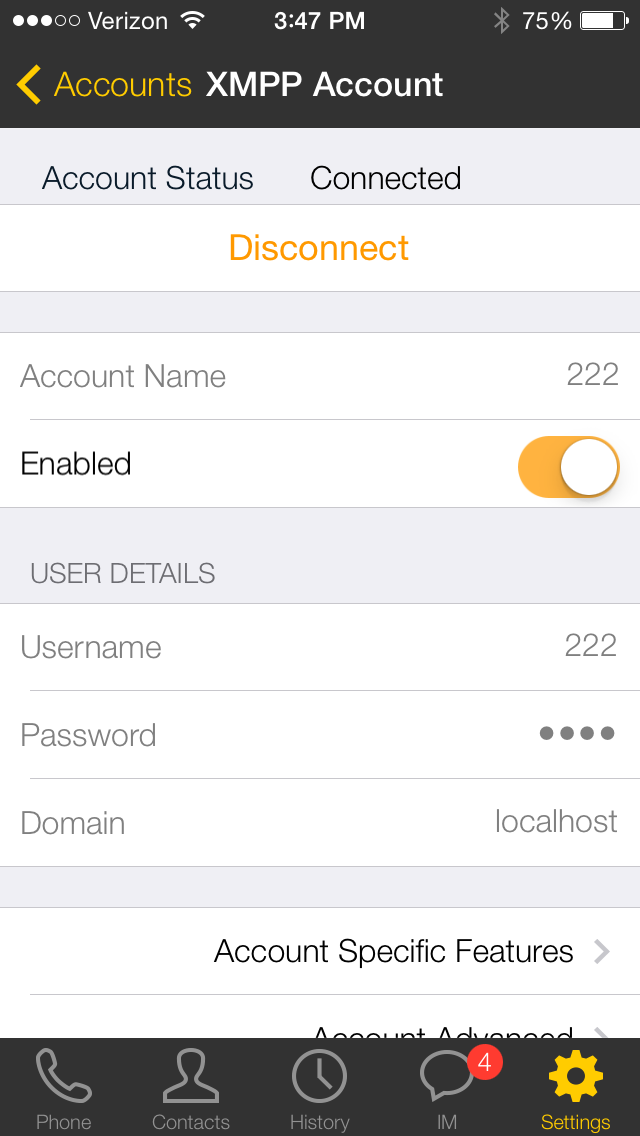
- Step 1 - Create an extension on the system. If you have set up your Bria already, use that extension and create an XMPP Account on your Accounts tab.
- Step 2 - Enter you ext number as the username and PIN as the password.
- Step 3 - Enter the word localhost for domain
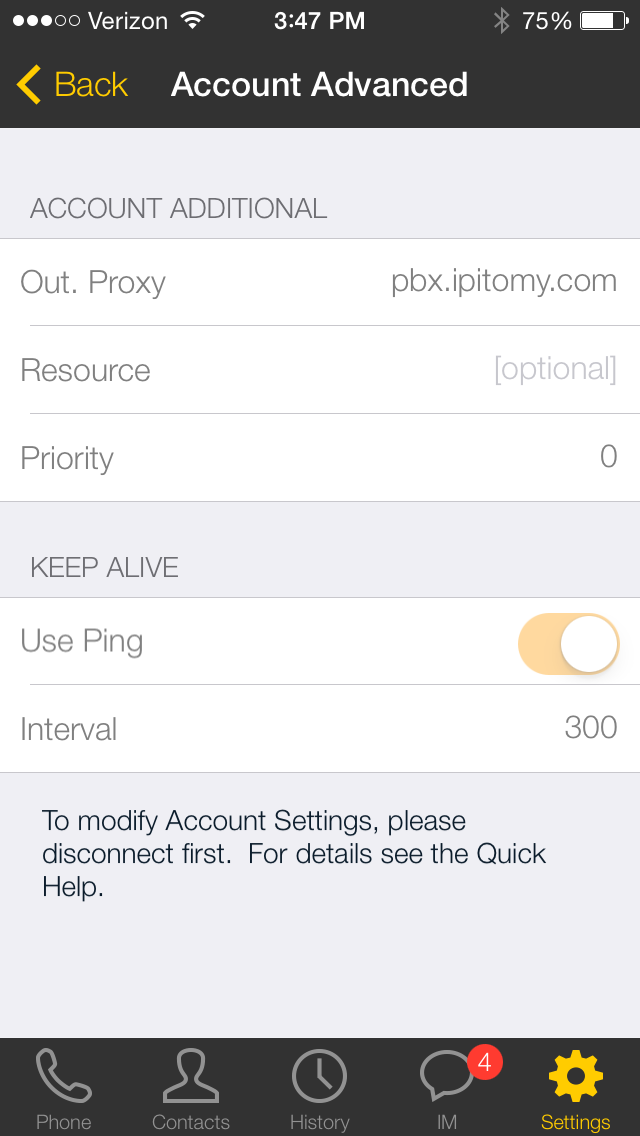
- Step 4 - Click the advanced tab
- Step 5 - Enter in the IP address of the IPitomy PBX System. If you are using 3/4g you will need to use the external static IP address or Domain name. If using local wifi, you can use the inter LAN address.
- Step 6 - It is best to set this up on the external address so it will work while outside of the building. To complete the connection, you will need to forward port 5222 to the internal IP address of the IPitomy PBX System in the Router/Firewall.
- Step 7 - Assign a Qmanager Account to this extension in PBX Setup - Services
- Step 8 - Log into Qmanager using the extension and pin for this extension and enable chat. After enabling the chat account you can log out of the Qmanager account for this extension.
You should now see this extension in Qmanager with the Blue text messaging icon. Your Bria should be ready to send/receive chat messages to your colleagues desktops from your mobile smart phone as well as receive presence status updates.


