Difference between revisions of "Room Management System"
| Line 102: | Line 102: | ||
The RMS Applet displays the guest room extensions and enables you to check in and check out guests, edit guest information, set wakeup calls, and change room flags. It is accessed by browsing to <b><PBX IP address>/ippbx/RMSApplet.php</b>. The default username to log in is <b>roomadmin</b>, and the password is <b>roomadmin</b>. | The RMS Applet displays the guest room extensions and enables you to check in and check out guests, edit guest information, set wakeup calls, and change room flags. It is accessed by browsing to <b><PBX IP address>/ippbx/RMSApplet.php</b>. The default username to log in is <b>roomadmin</b>, and the password is <b>roomadmin</b>. | ||
| − | [[File:Rms_2. | + | [[File:Rms_2.png]] |
Revision as of 11:39, 20 October 2016
Room Management System
The Room Management System (RMS) is a licensed feature which allows you to specify PBX extensions as hotel guest room extensions, and manage the rooms associated with them. The application is found under Applications->Room Mgmt.
You must Enable the application to access the RMA Applet GUI, which is found by browsing to <PBX IP address>/ippbx/RMSApplet.php. The username to log in is roomadmin, and the password is roomadmin.
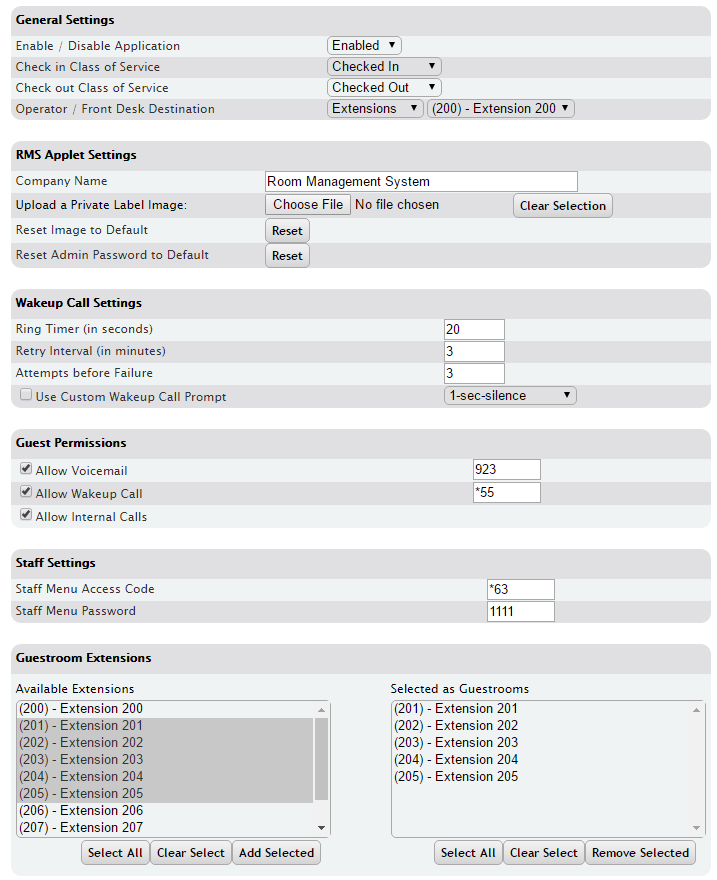
General Settings
| Enable/Disable Application |
When disabled, any settings set on this page will not have an effect. |
| Check in Class of Service |
Class of service to apply to guests that are checked in. |
| Check out Class of Service |
Class of service to apply to vacant rooms. |
| Operator / Front Desk Destination |
Destination that will be dialed when pressing 0 from a guest room. |
RMS Applet Settings
| Company Name |
Company Name to be displayed on the RMS Applet GUI. |
| Upload a Private Label Image |
Upload an image of the company logo. |
| Reset Admin Password to Default |
Resets the RMSApplet login to roomadmin/roomadmin. |
Wakeup Call Settings
| Ring Timer |
Amount of time in seconds for a wakeup call to ring the guest extension during each wakeup call attempt. |
| Retry Interval |
Amount of time in minutes for a wakeup call to wait before ringing the guest extension again, if the previous wakeup call attempt failed. |
| Attempts before Failure |
Number of times a wakeup call will attempt to ring the guest extension before failing. |
| Use Custom Wakeup Call Prompt |
Set a custom wakeup call prompt to play for the guest picking up the wakeup call. You will need to upload the file to PBX Setup->Prompts. |
Guest Permissions
| Allow Voicemail |
When checked, allows voicemail to be left at guest extensions. Here you can also set the feature code for accessing a guest extension’s personal voicemail. The default is 923. |
| Allow Wakeup Call |
When checked, allows guest extensions to set a wakeup call by dialing the feature code (the default is *55). |
| Allow Internal Calls |
When checked, allows guest extensions to make calls to other guest extensions. |
Staff Settings
| Staff Menu Access Code |
The access code that staff members can dial to access the Staff menu and use staff access codes to change room flags. You will be prompted for the password set below. |
| Staff Menu Password |
Password used to access the staff menu. |
Guestroom Extensions
Here you can select PBX extensions from the Available Extensions list and add them to the Selected as Guestrooms list. These selected extensions will be the guest extensions. Once the RMS Application is set to Enabled, these guest extensions will automatically be assigned the Checked Out Class of Service that you specified above.
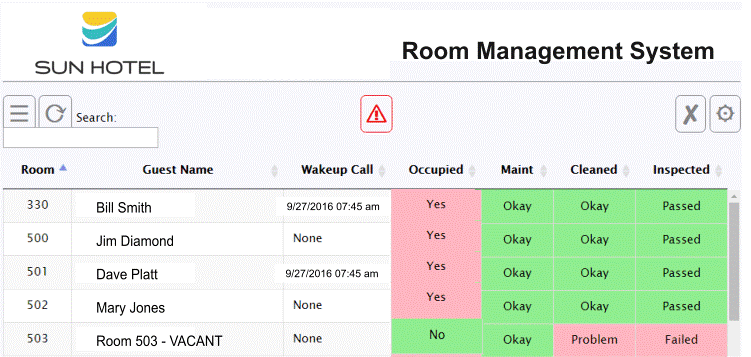
Room Management System Applet
The RMS Applet displays the guest room extensions and enables you to check in and check out guests, edit guest information, set wakeup calls, and change room flags. It is accessed by browsing to <PBX IP address>/ippbx/RMSApplet.php. The default username to log in is roomadmin, and the password is roomadmin.
Configuring Office 1
STEPS:
- Click on Destinations->Branch Offices. The Branch Offices page is displayed.
- Click on the ADD office button. The Edit Branch Office page appears.
- Give a unique NAME for the connection. The name should only contain alpha-numeric characters and no spaces. It should be ONE WORD ONLY.
- Enter the External IP of the PBX in the Host field.
- Enter a unique DIALING PREFIX of an asterisk followed by two numbers.
- Give a unique PASSWORD for the connection.
- Select NO for REGISTER (Note: that registration is not required if host is known).
- Configure Enable Trunking as needed.
- Configure Enable Multisite Manager Connection as needed.
- Set QUALIFY at 0.
- Configure Enable IAX2 Trunking as needed.
- Click the
 button to save the changes.
 - Click the Apply Changes link located at the top right hand corner of the page, to commit the changes to the database
Configuring Office 2
STEPS:
- Click on Destinations->Branch Offices. The Branch Offices page is displayed.
- Click on the ADD Office button. The Edit Branch Office page appears.
- Enter a name in the NAME field that matches that given to the Office 1 PBX. The name should only contain alpha-numeric characters and no spaces. It should be ONE WORD ONLY.
- Enter an external IP address or domain corresponding to the IP of the main office PBX in the HOST field.
- Enter a UNIQUE dialing prefix for the extensions connected to the Office 2 PBX.
- The PASSWORD for Branch Office 2 needs to be the same as the one assigned in the Branch Office 1 PBX.
- Select NO for REGISTER.
- Configure Enable Trunking as needed.
- Configure Enable Multisite Manager Connection as needed.
- Set QUALIFY at 0.
- Configure Enable IAX2 Trunking as needed.
- Click the
 button to save the changes.
 - Click the Apply Changes link located at the top right hand corner of the page, to commit the changes to the database
To setup additional Branch Offices in the PBX, use the steps outlined above. Keep in mind to use the same logic (pattern) and make sure that the dialing prefix is unique to each office.
Edit Branch Office
STEPS:
- From the Destinations->Branch Office page, locate the schedule name that you want to edit.
- Click on
 icon to the right of the Name of the Branch Office you want to update. The Edit Branch Office page appears.
 - Edit the necessary parameters to configure the branch office.
- Click the
 button to save the changes.
 - Click the Apply Changes link located at the top right hand corner of the page, to commit the changes to the database
Delete Branch Office
STEPS:
- From the Destinations->Branch Offices page, locate to the Name from the Branch Office listing that you want to remove.
- Click on
 icon to the right of the Name of the Branch Office you want to delete. The Branch Office is removed from the listing page.
 - Click the
 button to save the changes.
 - Click the Apply Changes link located at the top right hand corner of the page, to commit the changes to the database
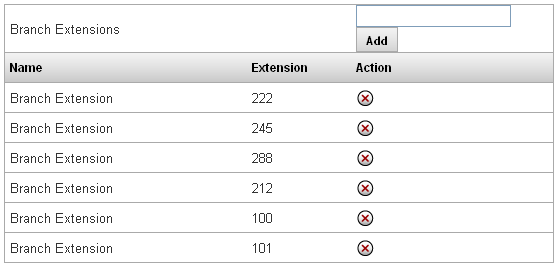
Branch Extensions
Branch Extensions are created through the add extension field at the bottom of the branch office edit page. Branch extensions can be dialed directly without a prefix, provided that these extensions are properly configured on the PBX for which the branch extensions are defined. Branch extensions will appear in call routing drop down lists throughout the system after they are created. If needed, you can add Ring Group and Menu numbers as Branch Extensions.
Configuring Office 2 with Branch Extensions
- Click on Destinations->Branch Offices. The Branch Offices page appears.
- Click on the Branch Office connection (Name) assigned to Office 1.
- Assuming Office 1 has extension numbers 100 thru 110, enter the numbers 100 to 110 in the field above the Add button then click ADD. You will enter (add) each extension one at a time. Note: Using the format X-Y will add all extensions in the specified range.
- If the extension number is valid (not already in use), the new extension will appear in the list of Branch Extensions.
- Click the
 button to save the changes.
 - Click the Apply Changes link located at the top right hand corner of the page, to commit the changes to the database.
- Verify the new extension by calling the number from phones located (registered) at Branch Office 2.
To place a call from one Branch Office to another simply dial the prefix that was assigned to that locations PBX + the extension of the user trying to be reached at the other office. This same easy concept works for transferring calls from one Branch Office to another. Or, if you have the extension configured as a Branch Extension on your PBX, you can simply dial the extension number and it will be automatically routed to the branch.
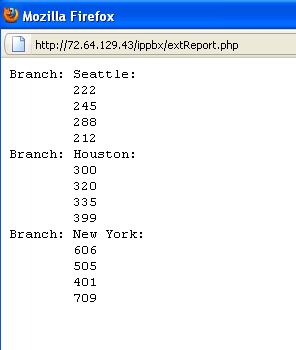
View Branch Office Extensions
- From the Destinations->Branch Office page, click on the Show Extensions button located at the top of the Branch Office list page.
- A popup window appears displaying all the extension information for each Branch Office that is currently in the system.
- Click on the “X” to close the popup window.
Parking at a Branch
In order to Park and retrieve parked calls at a Branch Office, you will have to do a little bit of programming.
Parking
- Create a Phantom Extension at the remote end PBX
- Add this as a Branch Extension in the local PBX
- Unconditionally Forward this ext to PSTN number ##700#
- When a user wants to park a call at the Branch Office, have them transfer the call to the Branch Extension
Retrieving Park
- Note the Branch Prefix Code
- To retrieve a call Parked at a branch, dial the prefix code plus the slot the call is parked in
- eg. With a Branch Prefix Code of *28 and a call Parked in 702, the user will dial *28702 to retrieve the call


