Difference between revisions of "Room Management System"
| (11 intermediate revisions by the same user not shown) | |||
| Line 1: | Line 1: | ||
== Room Management System == | == Room Management System == | ||
| − | The '''Room Management System (RMS)''' is a licensed feature which allows you to specify PBX extensions as hotel guest room extensions, and manage the rooms associated with them. The application is found under '''Applications->Room Mgmt'''.<br/>You must Enable the application to access the | + | The '''Room Management System (RMS)''' is a licensed feature which allows you to specify PBX extensions as hotel guest room extensions, and manage the rooms associated with them. The application is found under '''Applications->Room Mgmt'''.<br/>You must Enable the application to access the RMS Applet GUI, which is found by browsing to '''<PBX IP address>/ippbx/RMSApplet.php'''. The default username to log in is '''roomadmin''', and the password is '''roomadmin'''. |
[[File:Rms.PNG]] | [[File:Rms.PNG]] | ||
| Line 70: | Line 70: | ||
|- | |- | ||
| style="text-align: center" | '''Allow Voicemail'''<br/> | | style="text-align: center" | '''Allow Voicemail'''<br/> | ||
| − | | When checked, allows voicemail to be left at guest extensions. Here you can also set the feature code for accessing a guest extension’s personal voicemail. The default is 923. | + | | When checked, allows voicemail to be left at guest extensions. Here you can also set the feature code for accessing a guest extension’s personal voicemail. The default is 923. If disabled, voicemail cannot be left for guest extensions, and if a guest extension does not answer, the call fails over to the operator. |
|- | |- | ||
| style="text-align: center" | '''Allow Wakeup Call'''<br/> | | style="text-align: center" | '''Allow Wakeup Call'''<br/> | ||
| Line 76: | Line 76: | ||
|- | |- | ||
| style="text-align: center" | '''Allow Internal Calls'''<br/> | | style="text-align: center" | '''Allow Internal Calls'''<br/> | ||
| − | | When checked, allows guest extensions to make calls to other guest extensions. | + | | When checked, allows guest extensions to make calls to other guest extensions. When unchecked, guest extensions cannot dial other guest extensions, but they can still dial 0 for the operator. |
|} | |} | ||
| Line 102: | Line 102: | ||
The RMS Applet displays the guest room extensions and enables you to check in and check out guests, edit guest information, set wakeup calls, and change room flags. It is accessed by browsing to <b><PBX IP address>/ippbx/RMSApplet.php</b>. The default username to log in is <b>roomadmin</b>, and the password is <b>roomadmin</b>. | The RMS Applet displays the guest room extensions and enables you to check in and check out guests, edit guest information, set wakeup calls, and change room flags. It is accessed by browsing to <b><PBX IP address>/ippbx/RMSApplet.php</b>. The default username to log in is <b>roomadmin</b>, and the password is <b>roomadmin</b>. | ||
| − | [[File:Rms_2. | + | [[File:Rms_2.png]] |
| + | === Checking In === | ||
| + | To check in a guest, click on the room you would like to check in. A pop up will appear allowing you to enter the guest’s information. Here you can also set and update the flags for the room, if you need them to be different from the default, and you can set the wakeup call. Click the Check In button to check the guest in. A checked in guest will then have the Checked in Class of Service which you specified on the PBX under Application->Room Mgmt. | ||
| + | [[File:Rms_3_2.png]] | ||
| + | === Checking Out === | ||
| + | To check out a guest, click on the guest you wish to check out and click on the Check Out Button. The extension’s class of service will now be changed to the Checked out Class of Service. | ||
| + | [[File:Rms_4_2.png]] | ||
| + | === Move Guest === | ||
| − | + | To move a guest to another room, click on the guest that you wish to move, and click on the Move Guest Button. You can then select the vacant room you wish to move the guest to. This is essentially a check out event followed by a check in event. The wakeup call will be moved along with the guest, and the flags on the new room will change to reflect that the room has been checked in. | |
| − | + | === Wakeup Calls === | |
| − | + | Wakeup calls can be set for a guest room in two ways. The RMS admin can set a wakeup call by clicking on the room needing the call, clicking on Wakeup Call, and setting the time, date, and frequency of the call. | |
| − | + | Alternatively, a guest can set a wakeup call themselves by dialing the Wakeup Call access code configured on the PBX Room Mgmt page (default is *55). The guest will then be prompted to press 1 for a one-time wakeup call, 2 for a daily recurring wakeup call, or 3 to cancel an existing wakeup call. | |
| − | + | When the guest receives the wakeup call, they will be prompted to press 1 to accept the wakeup call, or 2 to snooze for 10 minutes. Snoozing causes the current number of call attempts to be reset to zero. When the configured number of call attempts have been executed and have not been answered, the wakeup call is considered as being failed. An alert in the form of an exclamation mark inside a triangle will then appear on the top of the RMSApplet page. Clicking on this alert image will display all failed wakeup calls. | |
| − | |||
| − | |||
| − | |||
| − | |||
| − | |||
| − | |||
| − | |||
| − | |||
| − | |||
| − | |||
| − | + | [[File:Rms_10_2.png]] | |
| − | + | == RM System Configuration == | |
| − | + | Click on the gear symbol in the top right hand corner of the RMSApplet page to access the RM System Configuration page. Here you can create Alert Groups, set Alert Flags, create Check In/Check Out events, and create users for accessing the RMSApplet. | |
| − | |||
| − | |||
| − | |||
| − | |||
| − | |||
| − | |||
| − | |||
| − | |||
| − | |||
| − | |||
| − | |||
| − | |||
| − | + | [[File:Rms_5_2.png]] | |
| − | === | + | === Create Alert Flags === |
| − | + | [[File:Rms_6_2.png]] | |
| − | + | To create a new alert, click on the Add Alert button. Give the alert a name, description, and staff code. The staff code is used when a person dials into the staff menu to toggle the alert on or off. The Default Status of the alert is the status that the alert will take on before anyone checks into the room. <b>Red</b> means the alert is <b>off</b>, and <b>green</b> means that it is <b>on</b>. For example, in the above screenshot, the ‘restocked beverages’ alert is set to be turned ON by default to indicate that the room has had the beverages restocked. | |
| − | |||
| − | |||
| − | |||
| − | |||
| − | === | + | === Create Alert Groups === |
| − | + | The default alert groups are Cleaned, Inspected, and Maintenance. To add a new alert group, click the Add Group button. | |
| − | + | [[File:Rms_7_2.png]] | |
| − | |||
| − | |||
| − | |||
| − | + | Give the group a name, and add alert flags to the group from the list of Available Flags. Set an alert status for each flag. The status will determine when the alert group is turned on (green) or off (red) on the RMSApplet page. The <b>“All Flags must match”</b> checkbox determines whether all of the selected flags must match the chosen status for the flag in order for the alert group to be turned on. If this box is unchecked, then so long as at least one alert flag matches the status set for it, then the whole alert group will be turned on. If you want ALL of the alert flags to match the status in order for the alert group to be turned on, you must check this box. | |
| + | <br> | ||
| + | For example, the above ‘restocked’ alert group will turn ON (green) on the RMSApplet page when BOTH ‘restocked cups’ and ‘restocked beverages’ are turned on, since “All Flags must match” is checked. When the alert group is turned ON, this indicates that the room has been ‘restocked’, and the OFF setting indicates that there is a ‘restock needed’. When a staff member changes either the ‘cups’ or ‘beverages’ alert to red (off), the alert group will turn red on the RMSApplet page. | ||
| − | + | === Check in / Check Out Events === | |
| − | + | Here you can decide if you want the system to automatically toggle flags to match a certain on/off pattern when a guest is checked in or out. | |
| − | [[File: | + | [[File:Rms_8_2.png]] |
| − | + | Click on the event you wish to modify, and select which flags you want the system to automatically change for that event. In the above example, a Check In event causes the above four flags to be toggled ON to indicate that the room has been cleaned, inspected, and restocked. | |
| − | |||
| − | |||
| − | |||
| − | |||
| − | |||
| − | |||
| − | + | === Create Users === | |
| − | + | [[File:Rms_9_2.png]] | |
| − | + | In this section you can add RMS users and edit the usernames/passwords. Click on Add User to add a new user. The Admin checkbox determines whether the new user has admin rights, indicated as “Admin” under the Admin column, or non-admin rights, indicated by “User” under the Admin column. Non-admin users are able to access the RMSApplet page and change basic settings such as guest information, schedule wakeup calls, and toggle alert groups on or off. Non-admin users cannot access the RM System configuration page. | |
| − | |||
| − | |||
| − | |||
| − | |||
| − | |||
| − | |||
| − | |||
| − | |||
| − | |||
| − | |||
| − | |||
| − | |||
| − | |||
| − | |||
| − | |||
| − | |||
| − | |||
| − | |||
| − | |||
| − | |||
| − | |||
Latest revision as of 12:29, 20 October 2016
Room Management System
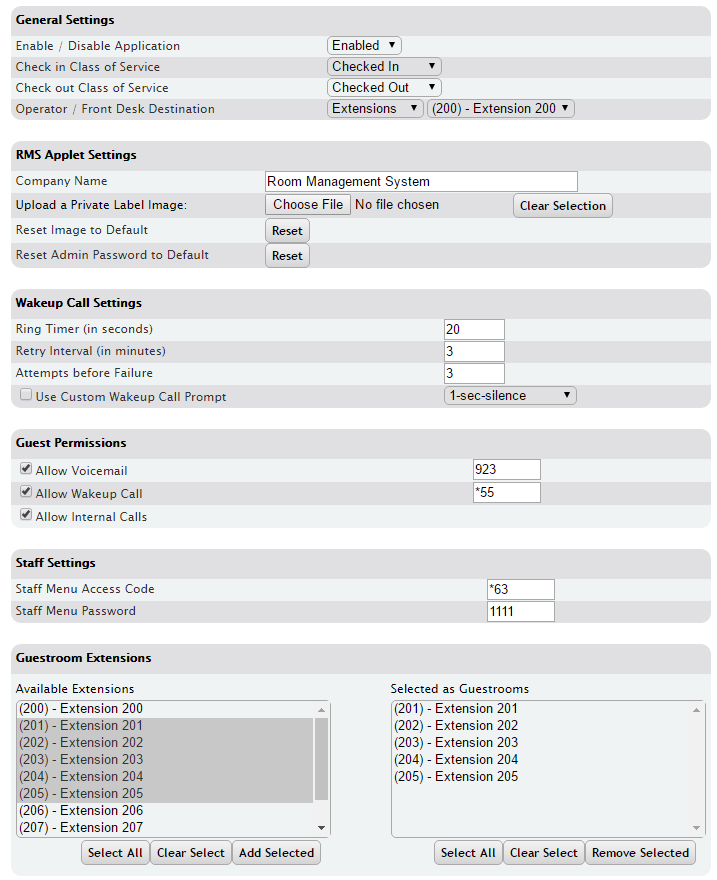
The Room Management System (RMS) is a licensed feature which allows you to specify PBX extensions as hotel guest room extensions, and manage the rooms associated with them. The application is found under Applications->Room Mgmt.
You must Enable the application to access the RMS Applet GUI, which is found by browsing to <PBX IP address>/ippbx/RMSApplet.php. The default username to log in is roomadmin, and the password is roomadmin.
General Settings
| Enable/Disable Application |
When disabled, any settings set on this page will not have an effect. |
| Check in Class of Service |
Class of service to apply to guests that are checked in. |
| Check out Class of Service |
Class of service to apply to vacant rooms. |
| Operator / Front Desk Destination |
Destination that will be dialed when pressing 0 from a guest room. |
RMS Applet Settings
| Company Name |
Company Name to be displayed on the RMS Applet GUI. |
| Upload a Private Label Image |
Upload an image of the company logo. |
| Reset Admin Password to Default |
Resets the RMSApplet login to roomadmin/roomadmin. |
Wakeup Call Settings
| Ring Timer |
Amount of time in seconds for a wakeup call to ring the guest extension during each wakeup call attempt. |
| Retry Interval |
Amount of time in minutes for a wakeup call to wait before ringing the guest extension again, if the previous wakeup call attempt failed. |
| Attempts before Failure |
Number of times a wakeup call will attempt to ring the guest extension before failing. |
| Use Custom Wakeup Call Prompt |
Set a custom wakeup call prompt to play for the guest picking up the wakeup call. You will need to upload the file to PBX Setup->Prompts. |
Guest Permissions
| Allow Voicemail |
When checked, allows voicemail to be left at guest extensions. Here you can also set the feature code for accessing a guest extension’s personal voicemail. The default is 923. If disabled, voicemail cannot be left for guest extensions, and if a guest extension does not answer, the call fails over to the operator. |
| Allow Wakeup Call |
When checked, allows guest extensions to set a wakeup call by dialing the feature code (the default is *55). |
| Allow Internal Calls |
When checked, allows guest extensions to make calls to other guest extensions. When unchecked, guest extensions cannot dial other guest extensions, but they can still dial 0 for the operator. |
Staff Settings
| Staff Menu Access Code |
The access code that staff members can dial to access the Staff menu and use staff access codes to change room flags. You will be prompted for the password set below. |
| Staff Menu Password |
Password used to access the staff menu. |
Guestroom Extensions
Here you can select PBX extensions from the Available Extensions list and add them to the Selected as Guestrooms list. These selected extensions will be the guest extensions. Once the RMS Application is set to Enabled, these guest extensions will automatically be assigned the Checked Out Class of Service that you specified above.
Room Management System Applet
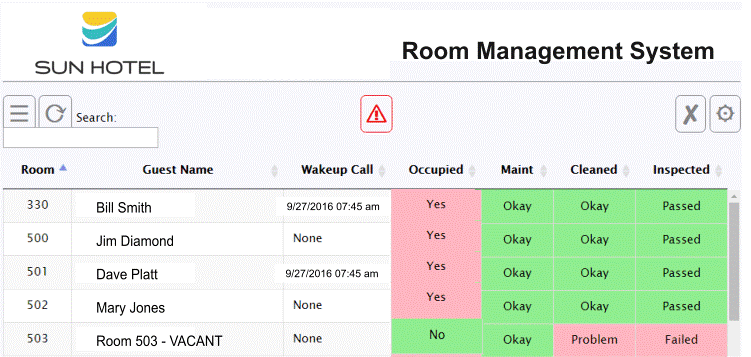
The RMS Applet displays the guest room extensions and enables you to check in and check out guests, edit guest information, set wakeup calls, and change room flags. It is accessed by browsing to <PBX IP address>/ippbx/RMSApplet.php. The default username to log in is roomadmin, and the password is roomadmin.
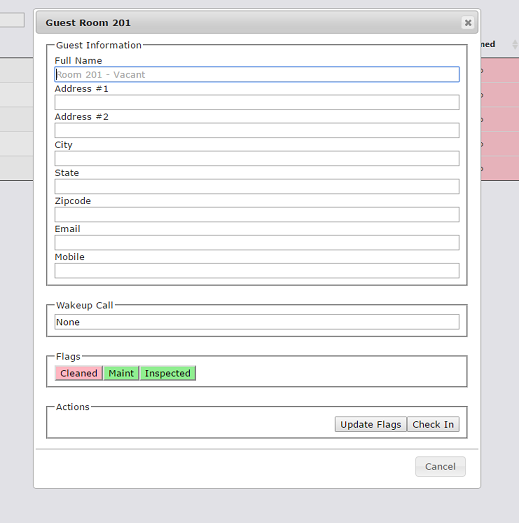
Checking In
To check in a guest, click on the room you would like to check in. A pop up will appear allowing you to enter the guest’s information. Here you can also set and update the flags for the room, if you need them to be different from the default, and you can set the wakeup call. Click the Check In button to check the guest in. A checked in guest will then have the Checked in Class of Service which you specified on the PBX under Application->Room Mgmt.
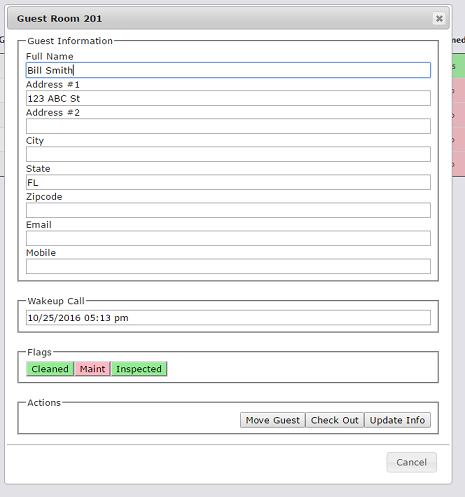
Checking Out
To check out a guest, click on the guest you wish to check out and click on the Check Out Button. The extension’s class of service will now be changed to the Checked out Class of Service.
Move Guest
To move a guest to another room, click on the guest that you wish to move, and click on the Move Guest Button. You can then select the vacant room you wish to move the guest to. This is essentially a check out event followed by a check in event. The wakeup call will be moved along with the guest, and the flags on the new room will change to reflect that the room has been checked in.
Wakeup Calls
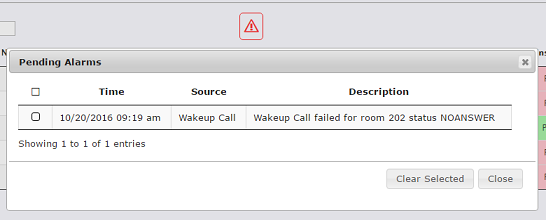
Wakeup calls can be set for a guest room in two ways. The RMS admin can set a wakeup call by clicking on the room needing the call, clicking on Wakeup Call, and setting the time, date, and frequency of the call. Alternatively, a guest can set a wakeup call themselves by dialing the Wakeup Call access code configured on the PBX Room Mgmt page (default is *55). The guest will then be prompted to press 1 for a one-time wakeup call, 2 for a daily recurring wakeup call, or 3 to cancel an existing wakeup call. When the guest receives the wakeup call, they will be prompted to press 1 to accept the wakeup call, or 2 to snooze for 10 minutes. Snoozing causes the current number of call attempts to be reset to zero. When the configured number of call attempts have been executed and have not been answered, the wakeup call is considered as being failed. An alert in the form of an exclamation mark inside a triangle will then appear on the top of the RMSApplet page. Clicking on this alert image will display all failed wakeup calls.
RM System Configuration
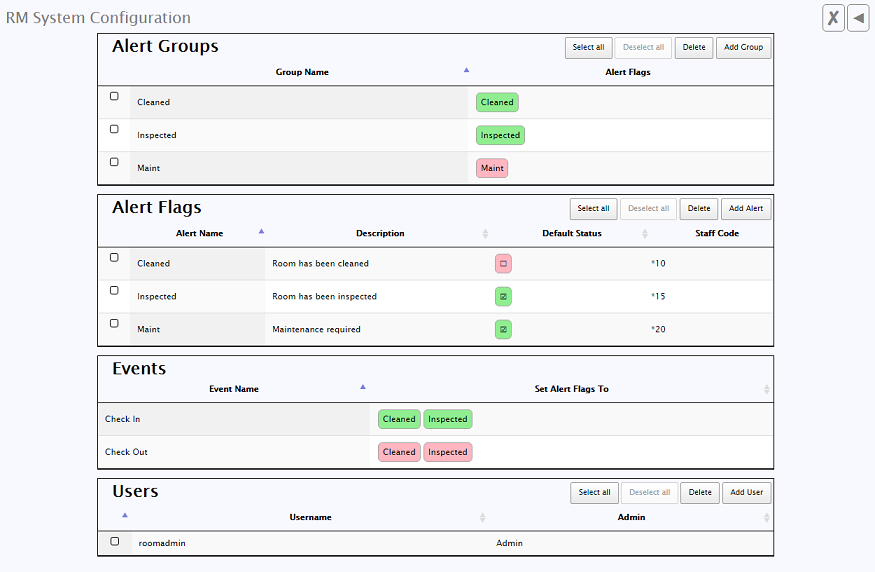
Click on the gear symbol in the top right hand corner of the RMSApplet page to access the RM System Configuration page. Here you can create Alert Groups, set Alert Flags, create Check In/Check Out events, and create users for accessing the RMSApplet.
Create Alert Flags
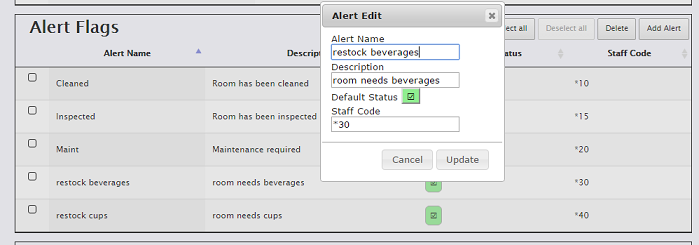
To create a new alert, click on the Add Alert button. Give the alert a name, description, and staff code. The staff code is used when a person dials into the staff menu to toggle the alert on or off. The Default Status of the alert is the status that the alert will take on before anyone checks into the room. Red means the alert is off, and green means that it is on. For example, in the above screenshot, the ‘restocked beverages’ alert is set to be turned ON by default to indicate that the room has had the beverages restocked.
Create Alert Groups
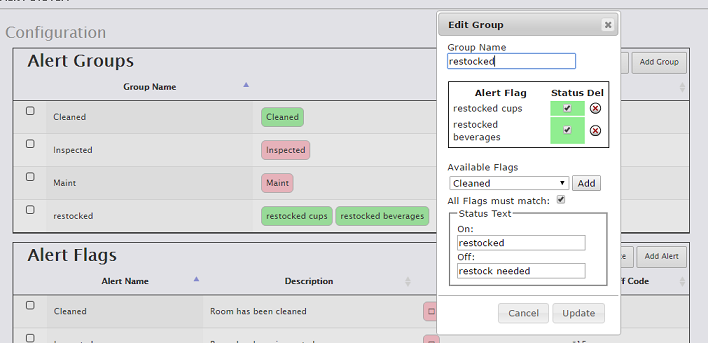
The default alert groups are Cleaned, Inspected, and Maintenance. To add a new alert group, click the Add Group button.
Give the group a name, and add alert flags to the group from the list of Available Flags. Set an alert status for each flag. The status will determine when the alert group is turned on (green) or off (red) on the RMSApplet page. The “All Flags must match” checkbox determines whether all of the selected flags must match the chosen status for the flag in order for the alert group to be turned on. If this box is unchecked, then so long as at least one alert flag matches the status set for it, then the whole alert group will be turned on. If you want ALL of the alert flags to match the status in order for the alert group to be turned on, you must check this box.
For example, the above ‘restocked’ alert group will turn ON (green) on the RMSApplet page when BOTH ‘restocked cups’ and ‘restocked beverages’ are turned on, since “All Flags must match” is checked. When the alert group is turned ON, this indicates that the room has been ‘restocked’, and the OFF setting indicates that there is a ‘restock needed’. When a staff member changes either the ‘cups’ or ‘beverages’ alert to red (off), the alert group will turn red on the RMSApplet page.
Check in / Check Out Events
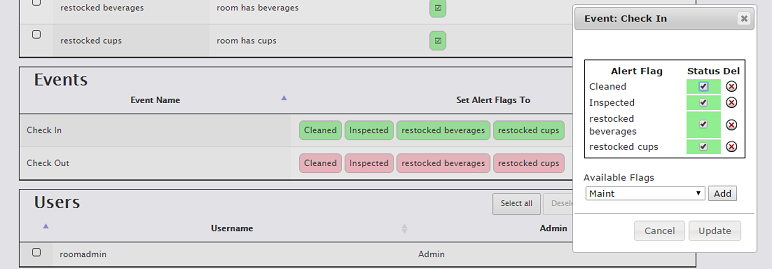
Here you can decide if you want the system to automatically toggle flags to match a certain on/off pattern when a guest is checked in or out.
Click on the event you wish to modify, and select which flags you want the system to automatically change for that event. In the above example, a Check In event causes the above four flags to be toggled ON to indicate that the room has been cleaned, inspected, and restocked.
Create Users
In this section you can add RMS users and edit the usernames/passwords. Click on Add User to add a new user. The Admin checkbox determines whether the new user has admin rights, indicated as “Admin” under the Admin column, or non-admin rights, indicated by “User” under the Admin column. Non-admin users are able to access the RMSApplet page and change basic settings such as guest information, schedule wakeup calls, and toggle alert groups on or off. Non-admin users cannot access the RM System configuration page.
