Difference between revisions of "Smart Personal Console"
Paul Falanga (talk | contribs) |
Paul Falanga (talk | contribs) |
||
| Line 238: | Line 238: | ||
Follow-Me Call Forward is a powerful feature of the IPitomy IP-PBX. Follow-Me Call Forward: | Follow-Me Call Forward is a powerful feature of the IPitomy IP-PBX. Follow-Me Call Forward: | ||
| − | *Define single/multiple destinations where calls to this forward will be directed | + | *Define single/multiple destinations where calls to this forward will be directed |
| − | |||
| − | |||
**Up to 20 Destinations may be assigned per page. | **Up to 20 Destinations may be assigned per page. | ||
| − | *Follow-Me Forward destinations are programmed by clicking on the Numbers & Settings button. | + | **Follow-Me Forward destinations are programmed by clicking on the Numbers & Settings button. |
| − | |||
| − | |||
<br/>[[File:SPC Follow Me button.gif|none|SPC Follow Me button.gif]] | <br/>[[File:SPC Follow Me button.gif|none|SPC Follow Me button.gif]] | ||
Revision as of 19:36, 17 September 2012
Smart Personal Console
The IPitomy telephone user experience is greatly enhanced by an integrated graphical user interface available via a web browser. This interface is called the Smart Personal Console or SPC. SPC allows the user to:
- Change phone settings
- Program phone Programmable Buttons
- Administer Voice Mail
- Listen to Voice Mail messages
- Download Voice Mail messages
- Upload Voice Mail Box Greetings
The information here is derived from the IPitomy HD telephone User Manuals which can be found at: https://skydrive.live.com/?cid=a31a942025b325ce&id=A31A942025B325CE%21104#cid=A31A942025B325CE&id=A31A942025B325CE%21124
Power Point Slide Shows have been developed as well as user aids, these slide shows are available at:
https://skydrive.live.com/?cid=a31a942025b325ce#cid=A31A942025B325CE&id=A31A942025B325CE%21117
Use these materials to train yourself, and then to train the users. Since they are located online, they can be accessed any time by your users when they need a refresher. Please make your customer’s aware of these resources. You may want to Bookmark these resources on your user’s computer web browser for easier future access.
SPC – Access
As mentioned, SPC is a web-based application and is accessed at the user desktop via a web browser. To access SPC:
- Open a web browser (e.g. Firefox, Microsoft Internet Explorer)
- Navigate to the IPitomy IP-PBX by entering the IP-Address of the PBX in the Address Bar. The suffix “/ippbx” must be included. At default the address is 192.168.1.249/ippbx
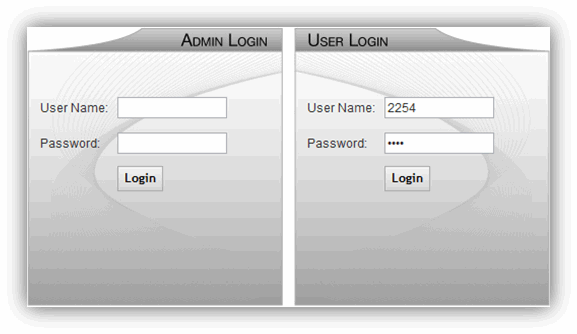
The following login screen is presented:
- Input the user name and password associated to your telephone.
User Name = the telephone extension number
Password = the voice mail box password for this extension (at default this is the same as the extension number) - Click the LOGIN button. The SPC – Home screen appears
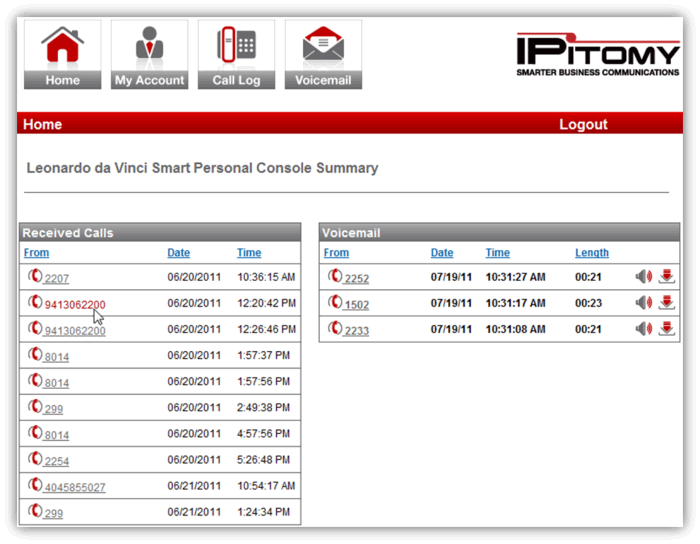
SPC – Home
On the SPC – Home screen you can:
- See a short Call Log of Received calls
- See New Voice mail messages
- Return calls from the call log – Click &
- Listen to voice mail messages
- Download voicemail messages
SPC – My Account
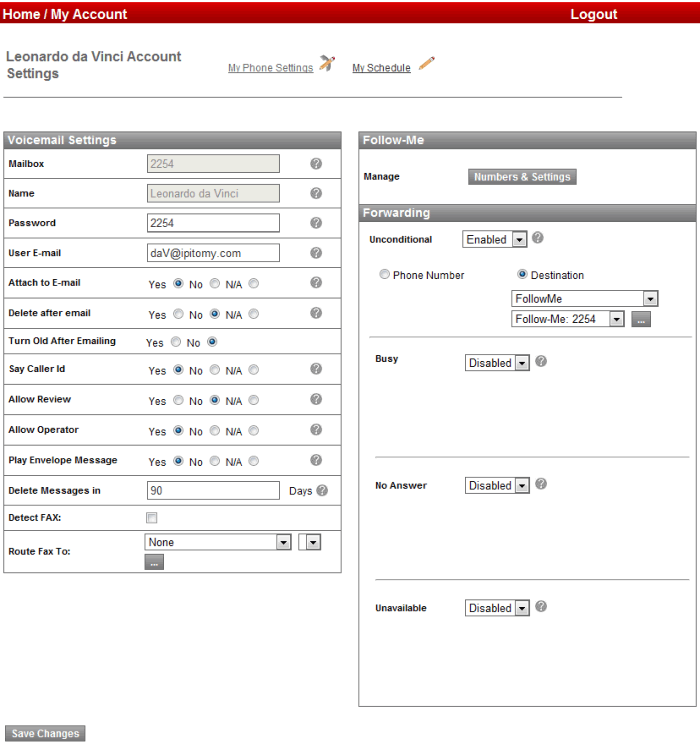
My Account allows the user to set most features of your telephone.
My Account field descriptions
|
Field |
Description |
|
Mailbox |
The mailbox associated to this extension. This cannot be changed in SPC |
|
Name |
The name associated to this extension. This cannot be changed in SPC |
|
Password |
Password – enter only digits to access this mailbox from a telephone |
|
User E-mail |
Email Address that is associated to this voice mail box |
|
Attach to E-mail |
Set this to yes to send a copy (.wav file) of voice messages to your email |
|
Delete after email |
Set to yes to delete voice messages that are sent to email. Caution should be taken when using this feature. Email delivery of voice mail is not monitored for success through your email provider. IPitomy sends an email and its successful delivery is subject to internet email delivery conditions. |
|
Turn Old after Emailing |
This places a voice message into the “Old Messages” folder after it has been emailed. |
|
Say Caller ID |
This plays the caller ID name/number received from the caller who left this message |
|
Allow Review |
This allows the caller to make changes to their recording prior to committing to leave the message |
|
Allow Operator |
This allows the caller to exit your voice mail box and be routed to the designated attendant. |
|
Play Envelope Message |
Envelop information is the statistical information about the message that will be played (time and date of call) |
|
Delete Message in |
This determines how ling messages will be retained after being recorded |
|
Detect FAX |
Set to yes to detect a fax being sent by a caller. The performance of this feature is subject to line conditions and circuits. Some VoIP circuits do not support legacy fax functions. |
|
Route Fax To: |
This is the extension on the PBX to which a fax server is connected Use the MORE button (...) to insert digits specific to the fax server that will identify this fax as a fax directed to your extension. |
|
Follow-Me – Manage |
Select the Numbers and Settings button to determine Follow-Me Forward destination(s) and forward characteristics |
|
Forward – Unconditional |
PBX Forward destination for all calls regardless of the telephone status The example shows an extension that is Unconditional Call Forwarded to a Follow-Me destination. (Follow Me 2254) |
|
Forward – Busy |
PBX Forward destination for calls to this extension while it is busy |
|
Forward – No Answer |
PBX Forward destination for calls to this extension that go unanswered |
|
Forward – Unavailable |
PBX Forward destination for calls to this extension while it is determined unavailable. Unavailable is when a phone is:
|
SPC – Follow-Me Forward – Numbers and Settings
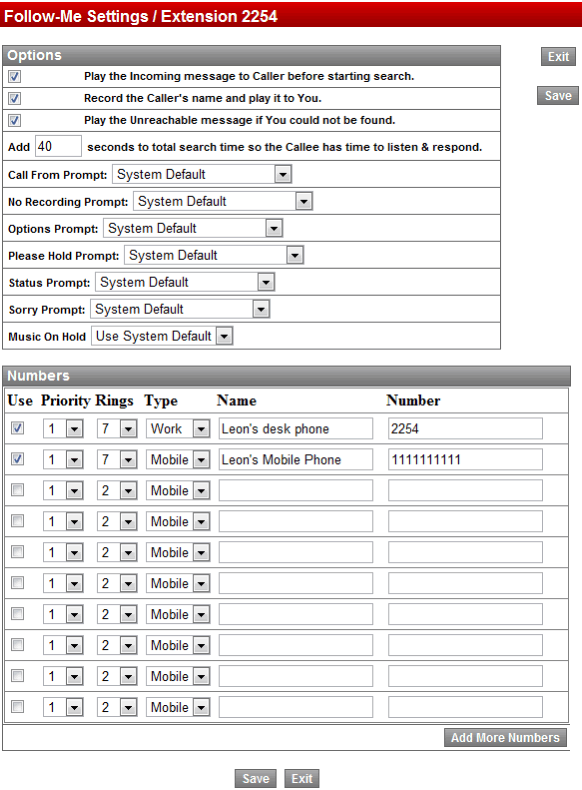
Follow-Me Call Forward is a powerful feature of the IPitomy IP-PBX. Follow-Me Call Forward:
- Define single/multiple destinations where calls to this forward will be directed
- Up to 20 Destinations may be assigned per page.
- Follow-Me Forward destinations are programmed by clicking on the Numbers & Settings button.
- May be any destination (extension, menu, call group or telephone network number)
- Destinations can be prioritized
- Destinations are assigned a number of ring attempts before continuing to the next destination
- A “Type” field and “Name” field are available to organization of those destinations entered.
- Destinations (Numbers) may be programmed and disabled to allow use only while desired without having to erase and reenter specific data (“Use” check box in Numbers & Settings page)
Numbers & Settings page:
Numbers and Settings field descriptions
|
Field |
Description |
|
Play the Incoming Message to Caller before Starting Search |
When Enabled (checked), the system plays the Status Prompt to the caller. |
|
Record the Caller’s Name and Play it to You |
When Enabled (checked), the caller will be asked to record their name, and will announce that recorded name prior to prompting the called party to accept or reject the call. |
|
Play the Unreachable Message if You Could Not Be Found |
When Enabled (checked), this will play the Sorry Prompt if the call is not answered, otherwise it goes right to the voicemail greeting. |
|
Number of Seconds to Total Search Time so Caller Has Time to Listen & Record |
This allows you to configure how many seconds the system will spend searching for the called party. Default is 12 seconds. |
|
Call From Prompt |
This plays when Record the Caller‟s Name and Play it to You is enabled (checked). The system default message is “Incoming Call From” followed by the recording the caller made of their name. |
|
No Recording Prompt |
This plays when Record the Caller‟s Name and Play it to You is disabled (not checked). The system default message of “You have an incoming call”followed by the Options Prompt. |
|
Options Prompt |
This plays after you have answered the call and prompts you to press either “1” to accept the call or “2” to reject the call. The system default message can be changed, but the options remain the same. |
|
Please Hold Prompt |
This plays to the caller alerting them that the system is going to find the user they are trying to reach. The system default message of “Please hold while I try to locate the person you are calling”will play during the search process. |
|
Status Prompt |
This plays the system default message of “The person you are calling is not at their desk, I will try to locate them for you”. |
|
Sorry Prompt |
This plays if the person could not be reached or they reject the call. The system default message of “I’m sorry, but I was unable to locate the person you were calling”. |
|
Music On Hold |
This allows you to specify a particular Music On Hold playlist to play to the caller during the search process. The system default Music on Hold (set at PBX SetupèMusic on Hold) will play when this parameter is set to system default. |
|
Numbers |
If selected (checked), the Follow Me feature will try to either simultaneously or in sequence of priority to try and locate you by using this call list. |
SPC – My Account – My Phone Settings:
On the My Accounts page there is a link to. This link directs the user to options that can be set on the telephone. Depending on the model of telephone, this interface may be different. The interface shown is that of a HD IPitomy telephone.
Settings possible in My Phone Settings are:
|
It is important to note that making changes to telephone settings via SPC is the preferred technique since changes made via SPC are retained by the PBX for upgrades and backup operations. |
Note: click the Back to Smart Personal Console link to return to SPC.
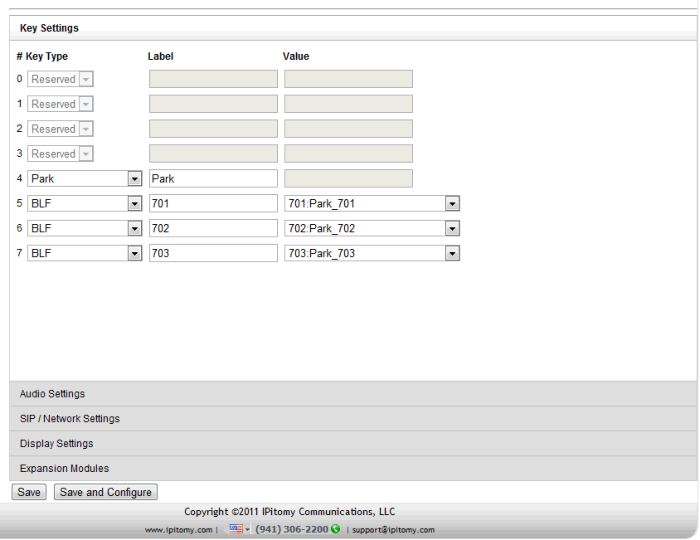
SPC – My Phone Settings – Key Settings
The Programmable Buttons of the HD telephone are available for assignment. In the picture (IP620), the first four buttons (0-3) are “Reserved”. This means that they have been assigned in database administration as Line buttons and are not available for user programming options through SPC. All other buttons can be programmed.
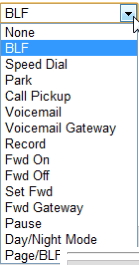
Key Settings – Button Functions
</div>
When programming buttons, the user can select from the available options and program the contents if required – for instance, when programming a BLF (Busy Lamp Field) you must program the extension that is covered with this BLF.
Use the table as a guide to what data is required.
|
Button Function |
Data Required |
|
BLF |
Extension Number |
|
Speed Dial |
Number to dial |
|
Park |
700, 701-720 |
|
Call Pickup |
99 |
|
Voicemail |
923 |
|
Voicemail Gateway |
924 |
|
Record |
*# |
|
Fwd On |
*91 |
|
Fwd Off |
*90 |
|
Set Fwd |
*92 |
|
Fwd Gateway |
*9 |
|
Pause |
ABC<ext#> |
|
Day/Night |
ff |
|
Page/BLF |
** + Ext |
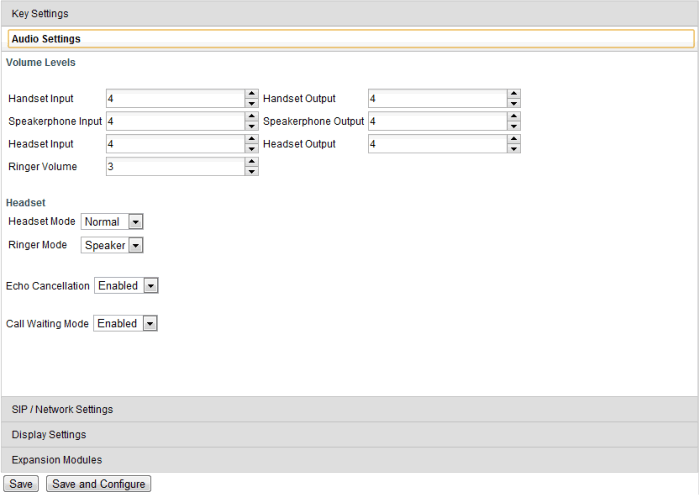
SPC – My Phone Settings – Audio Settings
Audio Settings
|
Volume Level – Input |
Associated device Transmit level |
|
Volume Level – Output |
Associated device Receive level |
|
Ringer Volume |
ring tone level over the speaker of an idle telephone |
|
Headset – Headset Mode |
Normal = user operation via buttons Headset = fixed headset operation |
|
Headset – Ringer Mode |
Speaker = while using Headset ringing will be over the speaker |
|
Echo Cancellation |
Enable/Disable echo cancellation function in phone |
|
Call Waiting Mode |
Enable/Disable ringing of calls while busy on a call |
Note: click the Back to Smart Personal Console link to return to SPC.
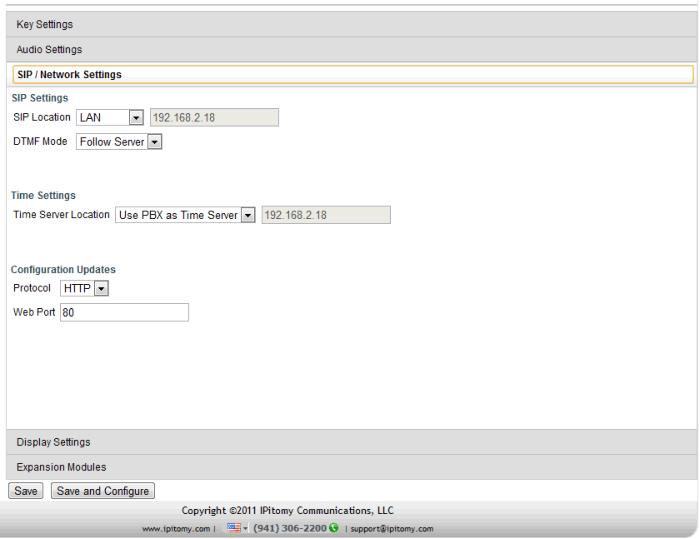
SPC – My Phone Settings – SIP / Network Settings
SIP / Network Settings
|
SIP Settings – SIP Location |
LAN = Local Area Network located telephone, no unauthorized security measures required (LAN IP Address of the IPPBX will be shown) WAN = Wide Area Network located telephone, unauthorized security measures apply (WAN interface – Public IP Address is shown) |
|
SIP Settings – DTMF Mode |
Follow Server – follows settings stored in PBX settings for this phone RFC2833 – use RFC2833 (regardless of PBX settings for phone) SIP Info – use SIP Info (regardless of PBX settings for phone)(SIP Info is SIP Header information included in SIP Packets) Inband – use Inband (regardless of PBX settings for phone) Auto – use Auto Detect (regardless of PBX settings for phone) |
|
Time Settings – Time Server Location |
Use PBX as Time Server – uses the PBX clock for sync Use PBX Time Server – use the same timer server as defined in the PBX Custom – identify the time server to be used |
|
Configuration Updates – Protocol |
TFTP – Trivial File Transfer Protocol (used for LAN phones) HTTP – Hypertext Transfer Protocol (used for WAN phones) |
|
Configuration Updates – Web Port |
When HTTP is used the Port assignment will usually be 80, however any valid port number can be assigned in this field. |
Note: click the Back to Smart Personal Console link to return to SPC.
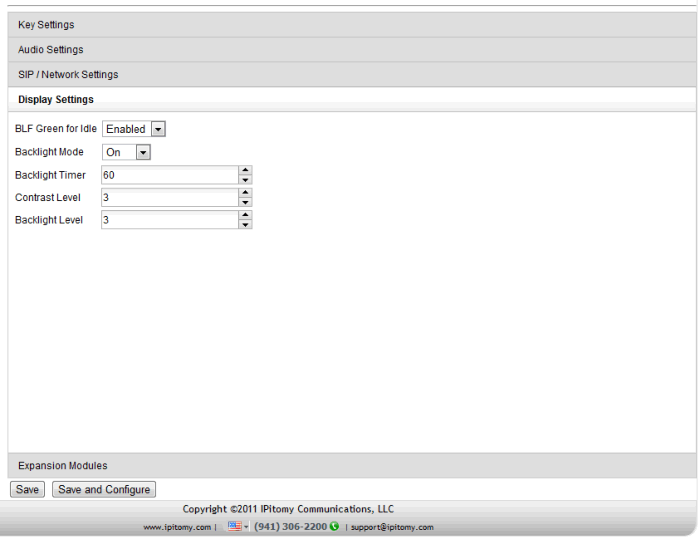
SPC – My Phone Settings – Display Settings
Settings in this area affect the operation of the display for both:
- Color graphic display
- BLF lamp operation
Display Settings
|
BLF Green for Idle |
Enable / Disable idle lamp condition when programmable buttons are programmed as BLF buttons. (When Disabled the lamps are grey [not lit] when the monitored extension is idle.) |
|
Backlight Mode |
On / Off / Timer = On/Off or follow the time set |
|
Backlight Timer |
0-60 seconds |
|
Contrast Level |
Contrast can be set using Levels 1 – 5 |
|
Backlight Level |
Brightness of the backlight Level 1 - 5 |
Note: click the Back to Smart Personal Console link to return to SPC.
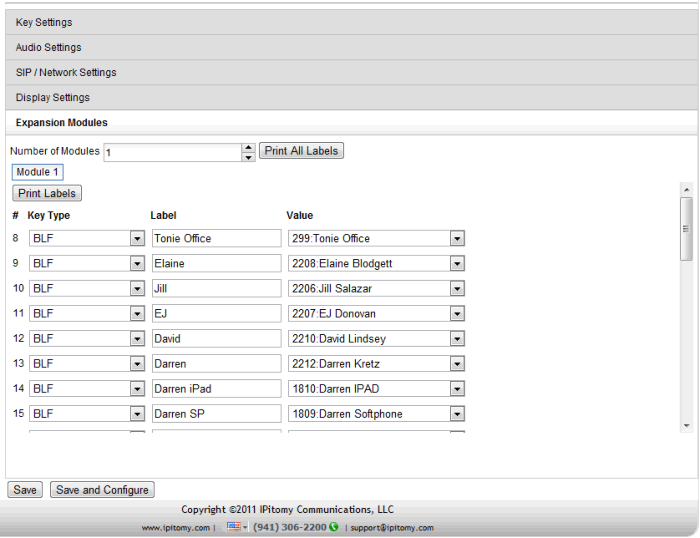
SPC – My Phone Settings – Expansion Modules
Expansion Modules – HD Telephone Button Expansion
When an Expansion Module is installed the user can program buttons and print labels from SPC. Expansion Modules have 32 buttons on each unit and six (6) modules can be installed at any HD telephone. Buttons are identified by continuing the numbering from those on the telephone. Since there are a varied number of buttons on phone models that support the Expansion Module, the Expansion Module button numbering will be different based on the phone to which it is connected.
|
Phone Model: |
IP330 |
IP410 |
IP620 |
|
Buttons on Phone |
0-11 |
0 – 7 |
0 – 7 |
|
Buttons on Module 1 |
12 – 43 |
8 – 39 |
8 – 39 |
|
Buttons on Module 2 |
44 – 75 |
40 – 71 |
40 – 71 |
|
Buttons on Module 3 |
76 – 107 |
72 – 103 |
72 – 103 |
|
Buttons on Module 4 |
108 – 139 |
104 – 135 |
104 – 135 |
|
Buttons on Module 5 |
140 – 171 |
136 – 167 |
136 – 167 |
|
Buttons on Module 6 |
172 – 203 |
168 – 199 |
168 – 199 |
Note: click the Back to Smart Personal Console link to return to SPC.
SPC – My Schedule
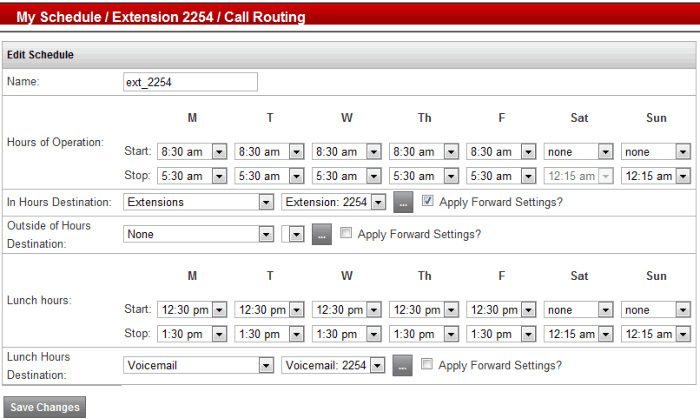
Toward the top of the My Accounts page is the My Schedule link. There is a schedule table for each extension which allows the user to set call routing of calls to your extension based on the time of day and day of week.
In the example above the Name is set to “ext_2254” – this is the name of this schedule. It can be changed but will not be displayed in any other location that affects phone usage.
Time is broken into three categories (modes of operation):
- Hours of Operation
- Outside of Hours
- Lunch Hours
Use the various entries to set destinations and time periods for each mode. Use the MORE (...) icon to input additional call handling digits whenever required.
Notice that “Apply Forward Settings” is checked yes for Hours of Operation and not Outside of Hours. This will have the effect of following the Follow-Me forward programming that is set on the extension only during office hours.
Notice too that at lunch hours we are directing calls to this extension to the extension’s voice mailbox directly. No need to ring the phone during this time.
Destination Extension: input digits to include
Call group:
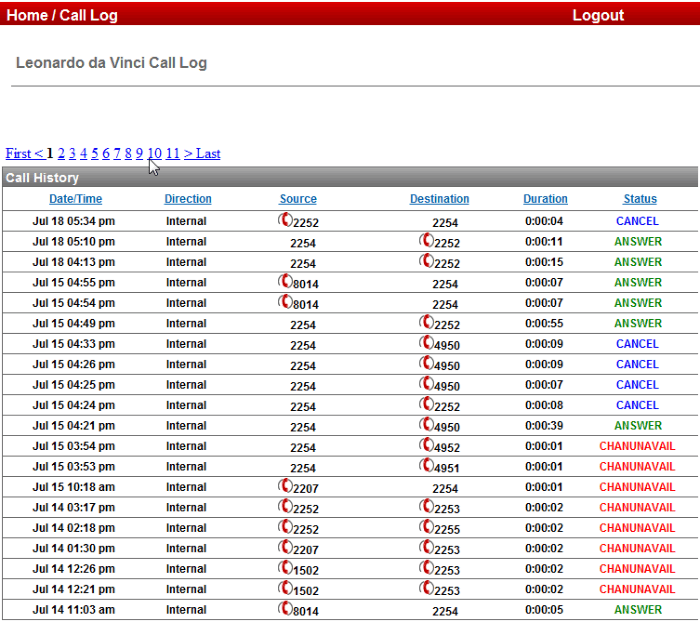
SPC – Call Log
In SPC Call Log it is possible to review all of the calls in the log that have been received and placed. From the log information about the call can be found… internal/external, direction of the call etc.
It is also possible to place calls from this list.
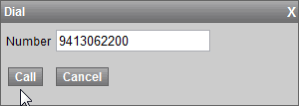
When a call is displayed and you’d like to place a call to that number, click on the icon HANDSET next to the number and a Dial dialog box will open allowing you to make that call.
When making a call in this way:
- Click Dial
- Your telephone will ring
- Answer your telephone
- You will hear ringing after you answer – as the call to the call log number is now in progress.
SPC – Voice Mail
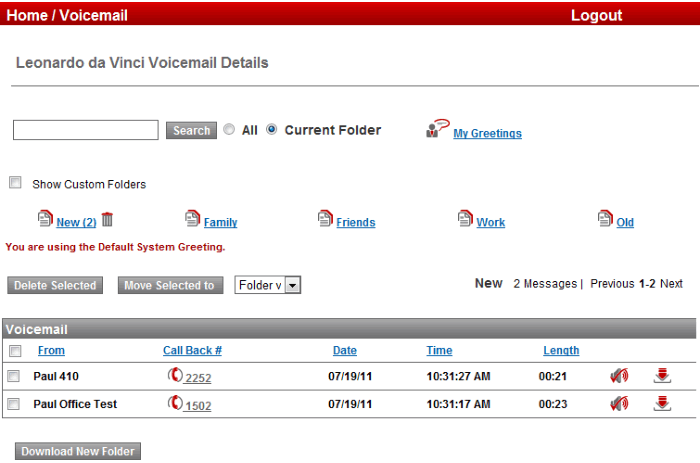
When you select Voice Mail in SPC, you enter into the New Messages folder. There are five categorized folders and five custom folders available as part of standard voice mail. The New folder is where all voice messages are kept automatically. Once they are heard they can be stored in any of the available folders for organized replay later.
Use the checkboxes to select message and move them to folders as you wish. You can also play messages and download messages to your PC. Callback is also possible from Voice Mail….
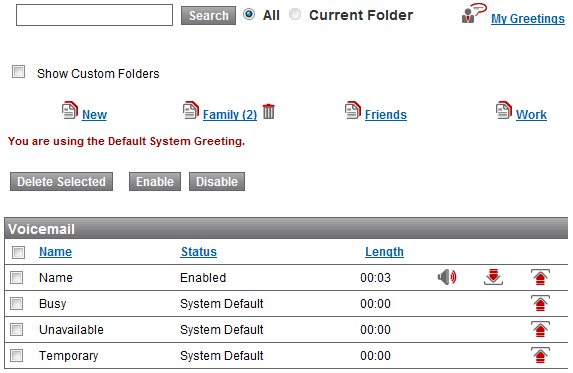
SPC – Voice Mail – My Greetings
Voice Mailbox Greeting can be programmed from either a telephone or by uploading a file that is prerecorded. Recording your greetings via you telephone is the most common technique and is covered in the section Voice Mail Setup and Voice Mail Menus – Mailbox Options. However it is possible to make your greeting extraordinary by prerecording the greeting and splicing it with music. This adds a very dynamic quality to your greeting.
If you have the ability to make such a recording great, if not, consider having one done professionally.
When it is prepared, upload it to the system for the greeting appropriate (Name, Busy, Unavailable, or Temporary). You must be familiar with standard file upload operations to succeed in this endeavor. If not seek the help of a helpful geek.

