Difference between revisions of "IP PBX Manual Destinations Menus"
Jump to navigation
Jump to search
Paul Falanga (talk | contribs) (Created page with "== Menus == Menus direct callers to destinations within a business. A menu can route a caller to a destination once a number on a key-pad has been pressed. The menu prompt tel...") |
|||
| (14 intermediate revisions by 4 users not shown) | |||
| Line 2: | Line 2: | ||
Menus direct callers to destinations within a business. A menu can route a caller to a destination once a number on a key-pad has been pressed. The menu prompt tells a caller what number to press to get to a desired destination. Menus can also be used to provide information to callers like driving directions, etc. | Menus direct callers to destinations within a business. A menu can route a caller to a destination once a number on a key-pad has been pressed. The menu prompt tells a caller what number to press to get to a desired destination. Menus can also be used to provide information to callers like driving directions, etc. | ||
| + | *Menu training Video - [https://www.youtube.com/watch?v=XjRzyUEpOfI&feature=c4-overview&list=UU1cwHaNWU97sdZm3yEBqNeg] | ||
| + | |||
| + | [[File:menuspage.png]] | ||
=== Edit Menu === | === Edit Menu === | ||
| − | + | [[File:Editmenupage.png]] | |
| − | |||
| − | |||
| + | {| style="border-spacing: 0px" class="wikitable" | ||
|- | |- | ||
| − | | colspan="2 | + | | '''Sections/Fields''' |
| − | + | | colspan="2" | '''Description''' | |
| − | | style=" | + | |- |
| − | + | | colspan="2" style="text-align: center" | '''Name''' | |
| + | | Enter a name for the menu. | ||
|- | |- | ||
| − | | colspan="2" | + | | colspan="2" style="text-align: center" | '''Menu Number (dial to go to menu)''' |
| − | + | | This is the number of the menu. This number is used to access the menu from extensionsif necessary. The number must be a unique 3 or 4 digit number. | |
| − | |||
| − | |||
|- | |- | ||
| − | | colspan="2" | + | | colspan="2" style="text-align: center" | '''Default Menu Prompt ''' |
| − | + | | This is the recording that is active for callers who reach this menu when the Menu Prompt is set to default. | |
| − | |||
| − | |||
|- | |- | ||
| − | | colspan="2" | + | | colspan="2" style="text-align: center" | '''Active Menu Prompt''' |
| − | + | | This function is enhanced in version 3.4.1. (Previously “Menu Prompt”.) As it indicates, this selection determines what prompt recording is heard by callers who reach this menu. | |
| − | |||
| − | |||
Record this first under PBX SetupPrompts. | Record this first under PBX SetupPrompts. | ||
|- | |- | ||
| − | | colspan="2" | + | | colspan="2" | <p style="text-align: center">'''Control Menu Prompt:'''</p><p style="text-align: center">'''Copy To'''</p> |
| − | + | | The Copy To function allows you to place pre-recorded (and previously uploaded, see: PBX SetupPrompts) prompts into the available Prompts to be associated to this menu. Available “slots” are 1-5 where the user may then select 0-5, 0 being the default and 1-5 being those that are loaded. The user also has the ability to rerecord the prompts 1-5 via DTMF Administration access. | |
| − | |||
| − | |||
| − | |||
Note: uploaded prompts are “copied” to the menu; therefore rerecorded prompts do not overwrite the original uploaded file. | Note: uploaded prompts are “copied” to the menu; therefore rerecorded prompts do not overwrite the original uploaded file. | ||
|- | |- | ||
| − | | colspan="2" | + | | colspan="2" style="text-align: center" | '''Fail Over''' |
| − | + | | This is the destination that the menu will fail over to if the user does not press a digit in the allotted Response Time. | |
| − | + | |- | |
| − | + | | colspan="2" style="text-align: center" | '''Override Hold Musc''' | |
| + | | If set to yes, the Hold Music set here will play whenever this call goes on hold. This ensures the same message is played, even if the extension that puts the call on hold has its own custom MOH set. If set to no, the Hold Music set in the Menu will not override another hold music.<br/> | ||
| + | |- | ||
| + | | colspan="2" style="text-align: center" | '''Hold Music'''<br/> | ||
| + | | Set this to the Music on Hold play list you want heard for callers in this Menu.<br/> | ||
|- | |- | ||
| − | | colspan="3" | + | | colspan="3" style="border: 0.0069in solid rgb(0, 0, 255); padding: 0in 0.075in; text-align: center" | '''Assign Menu Destinations''' |
| − | |||
|- | |- | ||
| − | | colspan="2" | + | | colspan="2" style="text-align:" | '''Menu Destinations ''' |
| + | | This list represents the destinations callers are routed to when pressing 0-9,*, <nowiki>#, and FAX. </nowiki>If a destination is set for FAX, the PBX will detect if a call inbound over an Analog or T1/PRI card is a fax while the prompt is playing, and will route calls to this destination if fax tone is detected. | ||
| + | |} | ||
| − | + | ==== Add Menu Settings ==== | |
| − | |||
| − | |||
'''STEPS:''' | '''STEPS:''' | ||
| − | # From the '''Destinations''' | + | #From the '''Destinations'''=>'''Menus '''page, click the '''ADD''' menu button. The '''Edit Menu''' page appears. |
| − | # Enter the information for the new Menu item and make necessary destination assignments. | + | #Enter the information for the new Menu item and make necessary destination assignments. |
| − | # Click button to save the changes. | + | #Click button the [[File:Savechanges.png]]to save the changes. |
| − | # Click the '''Apply Changes''' link located at the top right hand corner of the page, to commit the changes to the database | + | #Click the '''Apply Changes''' link located at the top right hand corner of the page, to commit the changes to the database |
==== Edit Menu Settings ==== | ==== Edit Menu Settings ==== | ||
| + | |||
'''STEPS:''' | '''STEPS:''' | ||
| − | # From the '''Destinations''' | + | #From the '''Destinations'''=>'''Menus '''page, locate the name of the Menu item you want to edit. |
| − | # Click on icon to the right of the '''Name '''of the menu you want to update. The '''Edit Menu''' page appears. | + | #Click on [[File:Penciledit.png]] icon to the right of the '''Name '''of the menu you want to update. The '''Edit Menu''' page appears. |
| − | # Make the necessary updates to the menu setting then click button. | + | #Make the necessary updates to the menu setting then click [[File:Savechanges.png]] button. |
| − | # Click the '''Apply Changes''' link located at the top right hand corner of the page, to commit the changes to the database | + | #Click the '''Apply Changes''' link located at the top right hand corner of the page, to commit the changes to the database |
==== Delete Menu Settings ==== | ==== Delete Menu Settings ==== | ||
| + | |||
'''STEPS:''' | '''STEPS:''' | ||
| − | # From the '''Destinations''' | + | #From the '''Destinations'''=>'''Menus '''page, locate the name of the Menu item you want to edit. |
| − | # Click on icon to the right of the '''Name '''of the menu you want to delete. The Menu name is removed from the Menu listing. | + | #Click on {File:deleteselected.png]] icon to the right of the '''Name '''of the menu you want to delete. The Menu name is removed from the Menu listing. |
| − | # Click button. | + | #Click [[File:Savechanges.png]] button. |
| − | # Click the '''Apply Changes''' link located at the top right hand corner of the page, to commit the changes to the database. | + | #Click the '''Apply Changes''' link located at the top right hand corner of the page, to commit the changes to the database. |
==== Advanced Menu Settings ==== | ==== Advanced Menu Settings ==== | ||
| − | {| style="border-spacing:0 | + | {| style="border-spacing:0" |
| − | | style="background-color:#b8cce4;border-top:0.0069in solid #0000ff;border-bottom:0.0069in solid #0000ff;border-left:0.0069in solid #0000ff;border-right:none;padding-top:0in;padding-bottom:0in;padding-left:0.075in;padding-right:0.075in | + | |- |
| − | | style="background-color:#b8cce4;border:0.0069in solid #0000ff;padding-top:0in;padding-bottom:0in;padding-left:0.075in;padding-right:0.075in | + | | style="background-color:#b8cce4; border-top:0.0069in solid #0000ff; border-bottom:0.0069in solid #0000ff; border-left:0.0069in solid #0000ff; border-right:none; padding-top:0in; padding-bottom:0in; padding-left:0.075in; padding-right:0.075in" | <center>'''Sections/Fields'''</center> |
| − | + | | style="background-color:#b8cce4; border:0.0069in solid #0000ff; padding-top:0in; padding-bottom:0in; padding-left:0.075in; padding-right:0.075in" | <center>'''Description'''</center> | |
|- | |- | ||
| − | | style="border-top:0.0069in solid #0000ff;border-bottom:0.0069in solid #0000ff;border-left:0.0069in solid #0000ff;border-right:none;padding-top:0in;padding-bottom:0in;padding-left:0.075in;padding-right:0.075in | + | | style="border-top:0.0069in solid #0000ff; border-bottom:0.0069in solid #0000ff; border-left:0.0069in solid #0000ff; border-right:none; padding-top:0in; padding-bottom:0in; padding-left:0.075in; padding-right:0.075in" | Response Timeout |
| − | + | | style="border:0.0069in solid #0000ff; padding-top:0in; padding-bottom:0in; padding-left:0.5in; padding-right:0.075in" | This is the number of seconds (0-60) the PBX will wait for digits to be dialed. If nothing is dialed in the allotted time, the menu will route the call to the Failover Destination. The minimum and default value is '''4'''. | |
| − | | style="border:0.0069in solid #0000ff;padding-top:0in;padding-bottom:0in;padding-left:0. | ||
| − | |||
|- | |- | ||
| − | | style="border-top:0.0069in solid #0000ff;border-bottom:0.0069in solid #0000ff;border-left:0.0069in solid #0000ff;border-right:none;padding-top:0in;padding-bottom:0in;padding-left:0.075in;padding-right:0.075in | + | | style="border-top:0.0069in solid #0000ff; border-bottom:0.0069in solid #0000ff; border-left:0.0069in solid #0000ff; border-right:none; padding-top:0in; padding-bottom:0in; padding-left:0.075in; padding-right:0.075in" | Digit Timeout |
| − | + | | style="border:0.0069in solid #0000ff; padding-top:0in; padding-bottom:0in; padding-left:0.5in; padding-right:0.075in" | While entering digits, the PBX will wait this many seconds (1-20) after the last digit was entered to take any actions. Single decimal digits are permitted. The default value is '''2'''. | |
| − | | style="border:0.0069in solid #0000ff;padding-top:0in;padding-bottom:0in;padding-left:0. | ||
| − | |||
|- | |- | ||
| − | | style="border-top:0.0069in solid #0000ff;border-bottom:0.0069in solid #0000ff;border-left:0.0069in solid #0000ff;border-right:none;padding-top:0in;padding-bottom:0in;padding-left:0.075in;padding-right:0.075in | + | | style="border-top:0.0069in solid #0000ff; border-bottom:0.0069in solid #0000ff; border-left:0.0069in solid #0000ff; border-right:none; padding-top:0in; padding-bottom:0in; padding-left:0.075in; padding-right:0.075in" | Play the Greeting |
| − | + | | style="border:0.0069in solid #0000ff; padding-top:0in; padding-bottom:0in; padding-left:0.5in; padding-right:0.075in" | This is the number of times the greeting will be played before the call is sent to the fail over destination. Default and minimum value is '''1'''. | |
| − | | style="border:0.0069in solid #0000ff;padding-top:0in;padding-bottom:0in;padding-left:0. | ||
| − | |||
|- | |- | ||
| − | | style="border-top:0.0069in solid #0000ff;border-bottom:0.0069in solid #0000ff;border-left:0.0069in solid #0000ff;border-right:none;padding-top:0in;padding-bottom:0in;padding-left:0.075in;padding-right:0.075in | + | | style="border-top:0.0069in solid #0000ff; border-bottom:0.0069in solid #0000ff; border-left:0.0069in solid #0000ff; border-right:none; padding-top:0in; padding-bottom:0in; padding-left:0.075in; padding-right:0.075in" | Local extension dialing |
| − | + | | style="border:0.0069in solid #0000ff; padding-top:0in; padding-bottom:0in; padding-left:0.5in; padding-right:0.075in" | This indicates whether you are able to dial local extensions from the menu. Default value is '''YES.''' | |
| − | | style="border:0.0069in solid #0000ff;padding-top:0in;padding-bottom:0in;padding-left:0. | ||
| − | |||
Note: It is not necessary to designate leading digits for extensions. This setting alone indicates when digits collected should be compared to the available list of extensions. | Note: It is not necessary to designate leading digits for extensions. This setting alone indicates when digits collected should be compared to the available list of extensions. | ||
|- | |- | ||
| − | | style="border-top:0.0069in solid #0000ff;border-bottom:0.0069in solid #0000ff;border-left:0.0069in solid #0000ff;border-right:none;padding-top:0in;padding-bottom:0in;padding-left:0.075in;padding-right:0.075in | + | | style="border-top:0.0069in solid #0000ff; border-bottom:0.0069in solid #0000ff; border-left:0.0069in solid #0000ff; border-right:none; padding-top:0in; padding-bottom:0in; padding-left:0.075in; padding-right:0.075in" | Prompt Padding |
| + | | style="border:0.0069in solid #0000ff; padding-top:0in; padding-bottom:0in; padding-left:0.5in; padding-right:0.075in" | This is the time in seconds that the PBX will wait when entering the menu before playing the prompt. The default is set to '''2''' seconds. | ||
| + | |- | ||
| + | | style="border-top:0.0069in solid #0000ff; border-bottom:0.0069in solid #0000ff; border-left:0.0069in solid #0000ff; border-right:none; padding-top:0in; padding-bottom:0in; padding-left:0.075in; padding-right:0.075in" | Enable Admin PIN | ||
| + | | style="border:0.0069in solid #0000ff; padding-top:0in; padding-bottom:0in; padding-left:0.5in; padding-right:0.075in" | This enables the use of DTMF Menu Prompt Administration. When enabled the user may access the menu from a DTMF-enabled device and input the PIN to enter into Menu Prompt Administration Default value is '''No'''. | ||
| + | |- | ||
| + | | style="border-top:0.0069in solid #0000ff; border-bottom:0.0069in solid #0000ff; border-left:0.0069in solid #0000ff; border-right:none; padding-top:0in; padding-bottom:0in; padding-left:0.075in; padding-right:0.075in" | Admin PIN | ||
| + | | style="border:0.0069in solid #0000ff; padding-top:0in; padding-bottom:0in; padding-left:0.5in; padding-right:0.075in" | <nowiki>This is the PIN used to access DTMF Menu Prompt Administration, and must be a 5 or 6 digit number. Default value is: <empty>.</nowiki> | ||
| + | |} | ||
| − | + | == Recording prompts remotely == | |
| − | + | * Enable the Admin Pin | |
| − | + | * Create a 5 or 6 digit pin | |
| − | + | [[File:Menu1.jpg|none|frame]] | |
| − | + | * Create up to 5 prompts that can be used. The default menu prompt is 0 and can not be edited when calling in to the menu. | |
| − | + | * Click on Control Menu Prompts and change the To setting to 1 - 5. Then Submit. | |
| + | * Once this is done you will have prompts that can be edited remotely. | ||
| − | | | + | [[File:Menu2.jpg|thumb|600x600px|alt=|none]] |
| − | + | [[File:Menu3.jpg|none|thumb|600x600px]] | |
| − | | | ||
Latest revision as of 16:41, 15 February 2022
Menus
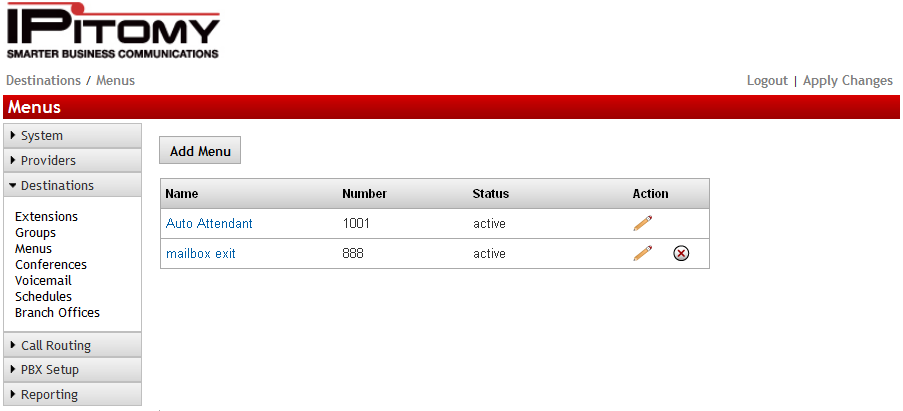
Menus direct callers to destinations within a business. A menu can route a caller to a destination once a number on a key-pad has been pressed. The menu prompt tells a caller what number to press to get to a desired destination. Menus can also be used to provide information to callers like driving directions, etc.
- Menu training Video - [1]
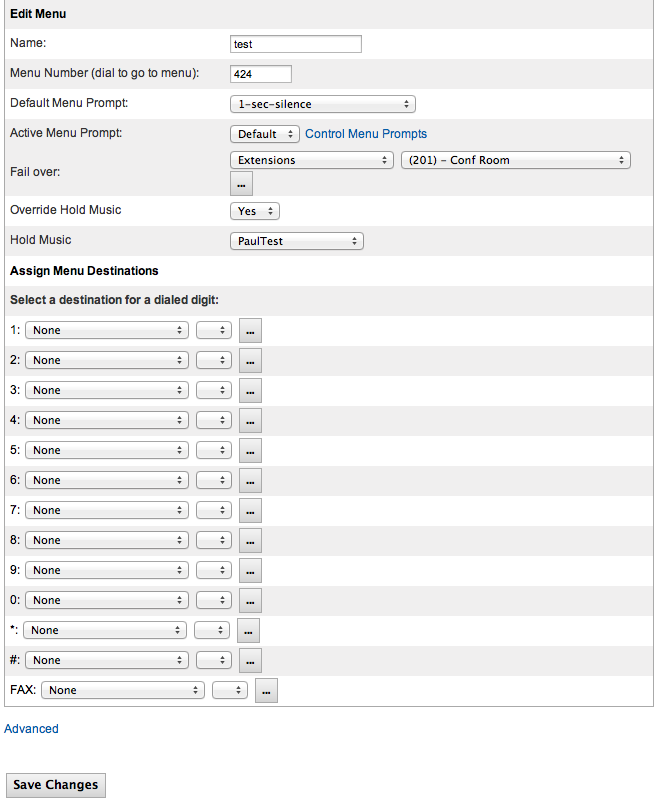
Edit Menu
| Sections/Fields | Description | |
| Name | Enter a name for the menu. | |
| Menu Number (dial to go to menu) | This is the number of the menu. This number is used to access the menu from extensionsif necessary. The number must be a unique 3 or 4 digit number. | |
| Default Menu Prompt | This is the recording that is active for callers who reach this menu when the Menu Prompt is set to default. | |
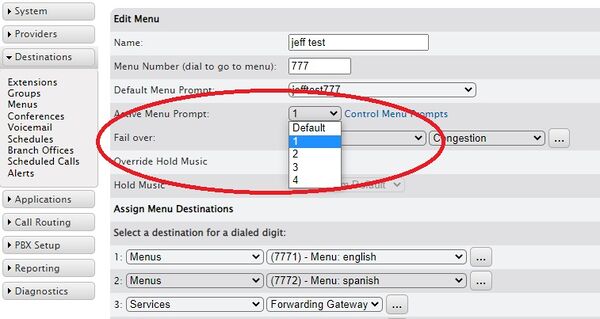
| Active Menu Prompt | This function is enhanced in version 3.4.1. (Previously “Menu Prompt”.) As it indicates, this selection determines what prompt recording is heard by callers who reach this menu.
Record this first under PBX SetupPrompts. | |
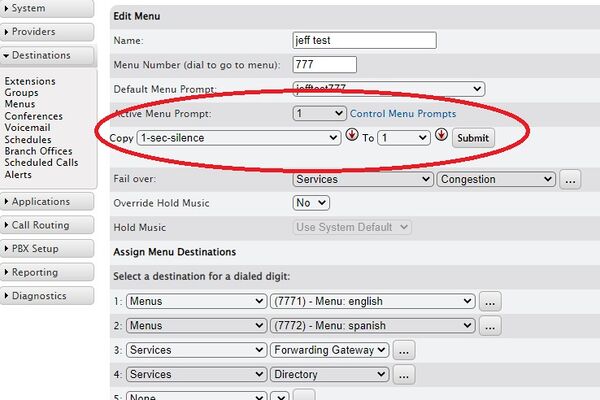
Control Menu Prompt: Copy To |
The Copy To function allows you to place pre-recorded (and previously uploaded, see: PBX SetupPrompts) prompts into the available Prompts to be associated to this menu. Available “slots” are 1-5 where the user may then select 0-5, 0 being the default and 1-5 being those that are loaded. The user also has the ability to rerecord the prompts 1-5 via DTMF Administration access.
Note: uploaded prompts are “copied” to the menu; therefore rerecorded prompts do not overwrite the original uploaded file. | |
| Fail Over | This is the destination that the menu will fail over to if the user does not press a digit in the allotted Response Time. | |
| Override Hold Musc | If set to yes, the Hold Music set here will play whenever this call goes on hold. This ensures the same message is played, even if the extension that puts the call on hold has its own custom MOH set. If set to no, the Hold Music set in the Menu will not override another hold music. | |
| Hold Music |
Set this to the Music on Hold play list you want heard for callers in this Menu. | |
| Assign Menu Destinations | ||
| Menu Destinations | This list represents the destinations callers are routed to when pressing 0-9,*, #, and FAX. If a destination is set for FAX, the PBX will detect if a call inbound over an Analog or T1/PRI card is a fax while the prompt is playing, and will route calls to this destination if fax tone is detected. | |
Add Menu Settings
STEPS:
- From the Destinations=>Menus page, click the ADD menu button. The Edit Menu page appears.
- Enter the information for the new Menu item and make necessary destination assignments.
- Click button the
 to save the changes.
 - Click the Apply Changes link located at the top right hand corner of the page, to commit the changes to the database
Edit Menu Settings
STEPS:
- From the Destinations=>Menus page, locate the name of the Menu item you want to edit.
- Click on
 icon to the right of the Name of the menu you want to update. The Edit Menu page appears.
 - Make the necessary updates to the menu setting then click
 button.
 - Click the Apply Changes link located at the top right hand corner of the page, to commit the changes to the database
Delete Menu Settings
STEPS:
- From the Destinations=>Menus page, locate the name of the Menu item you want to edit.
- Click on {File:deleteselected.png]] icon to the right of the Name of the menu you want to delete. The Menu name is removed from the Menu listing.
- Click
 button.
 - Click the Apply Changes link located at the top right hand corner of the page, to commit the changes to the database.
Advanced Menu Settings
| Response Timeout | This is the number of seconds (0-60) the PBX will wait for digits to be dialed. If nothing is dialed in the allotted time, the menu will route the call to the Failover Destination. The minimum and default value is 4. |
| Digit Timeout | While entering digits, the PBX will wait this many seconds (1-20) after the last digit was entered to take any actions. Single decimal digits are permitted. The default value is 2. |
| Play the Greeting | This is the number of times the greeting will be played before the call is sent to the fail over destination. Default and minimum value is 1. |
| Local extension dialing | This indicates whether you are able to dial local extensions from the menu. Default value is YES.
Note: It is not necessary to designate leading digits for extensions. This setting alone indicates when digits collected should be compared to the available list of extensions. |
| Prompt Padding | This is the time in seconds that the PBX will wait when entering the menu before playing the prompt. The default is set to 2 seconds. |
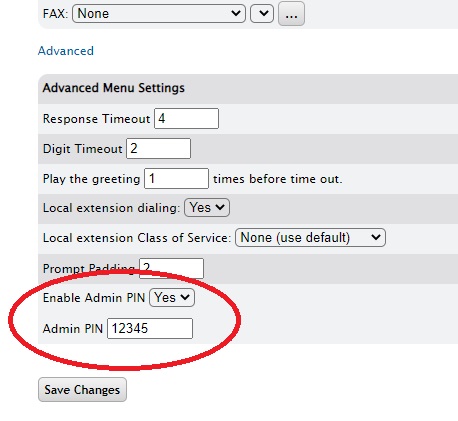
| Enable Admin PIN | This enables the use of DTMF Menu Prompt Administration. When enabled the user may access the menu from a DTMF-enabled device and input the PIN to enter into Menu Prompt Administration Default value is No. |
| Admin PIN | This is the PIN used to access DTMF Menu Prompt Administration, and must be a 5 or 6 digit number. Default value is: <empty>. |
Recording prompts remotely
- Enable the Admin Pin
- Create a 5 or 6 digit pin
- Create up to 5 prompts that can be used. The default menu prompt is 0 and can not be edited when calling in to the menu.
- Click on Control Menu Prompts and change the To setting to 1 - 5. Then Submit.
- Once this is done you will have prompts that can be edited remotely.
