Difference between revisions of "Yealink"
| (126 intermediate revisions by the same user not shown) | |||
| Line 1: | Line 1: | ||
| − | [[ | + | Beginning in PBX software version 5.2.1-10, we have begun including more integrated support for Yealink phones. They can now be found via autodiscovery and assigned to extensions, although they do not currently respond to configure or restart commands. Yealink phones CAN autoprovision from the pbx once assigned, however, by either logging into each phone's webGUI, or using our quick setup utility. The quick setup utility can be downloaded here [https://www.dropbox.com/sh/hsdsk0lr00rnlr5/AAAN_y1742zX3OBJuF8L9Czwa/IPitomy/Util/YeaLink%20Configuration?dl=0&preview=QuickSetup.exe Yealink Quick Setup utility] |
| + | |||
| + | |||
| + | |||
| + | == Auto Provisioning a Yealink Phone == | ||
| + | |||
| + | === PBX ver 6.0.5 or later method === | ||
| + | |||
| + | Starting in version 6.0.5, we have added the ability to configure and restart Yealink phones from the autodiscovery section of the pbx, eliminating much of the process previously needed to set these phones up. | ||
| + | |||
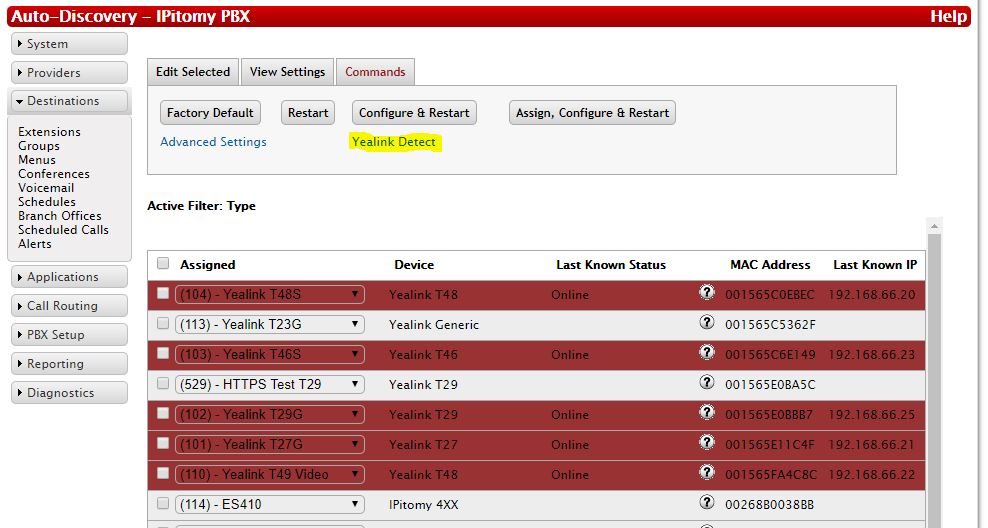
| + | 1) Under Destinations=>Autodiscovery, after scanning the network, go to the commands tab and click the Yealink Detect link: | ||
| + | |||
| + | [[File:Yealink detect.JPG|File:Yealink detect.JPG]] | ||
| + | |||
| + | 2) Press the Start button | ||
| + | |||
| + | [[File:Yealink detect 2.JPG|File:Yealink detect 2.JPG]] | ||
| + | |||
| + | 3) In the list of phones discovered, you can now check the boxes, and assign, configure, and restart them as if they were IPitomy HD phones, using the buttons at the top of the page. | ||
| + | |||
| + | '''Important notes: ''' | ||
| + | |||
| + | '''This only works for FACTORY DEFAULTED Yealink phones. Phones that have been previously provisioned will NOT respond to configure or restart commands from this process.''' | ||
| + | |||
| + | '''The Yealink discovery function will run for about 10 minutes before shutting itself back off. You can restart it by going to the commands tab and hitting start, if it has stopped. If it is running, it will say "Listening" on that page.''' | ||
| + | |||
| + | === PBX ver 5.2 method === | ||
| + | |||
| + | You must assign a phone to an extension either manually or using Auto-Discovery: | ||
| + | |||
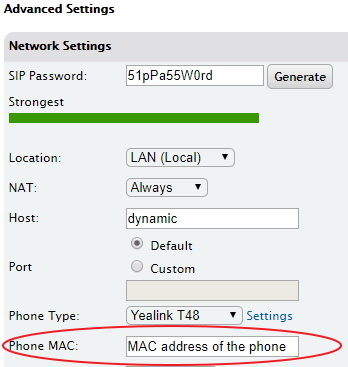
| + | '''Manual''' – Navigate to Destinations -> Extensions -> Edit Extension -> Advanced and enter the MAC address of the phone into the “Phone MAC:” field. SAVE CHANGES then APPLY CHANGES. | ||
| + | |||
| + | [[File:MACfield.jpg]] | ||
| + | |||
| + | |||
| + | |||
| + | |||
| + | |||
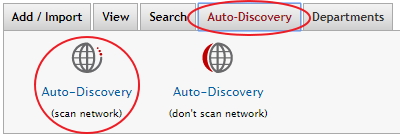
| + | '''Auto Discovery''' - If the phones are on the same LAN as the PBX you can use Auto Discovery. Navigate to Destinations -> Extensions. Click the “Auto-Discovery” tab at the top, and then click “Auto-Discovery (scan network)” | ||
| + | |||
| + | [[File:AutoDiscovery.jpg]] | ||
| + | |||
| + | Once the scan has completed: | ||
| + | |||
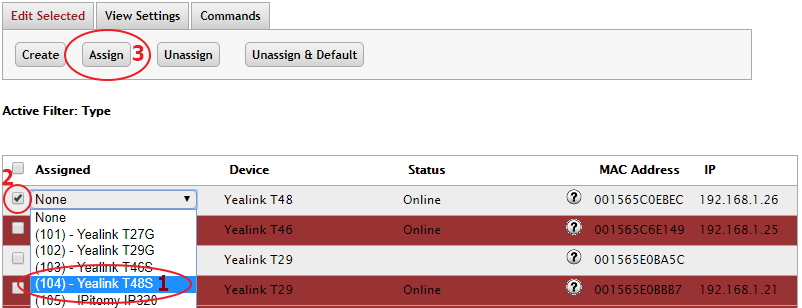
| + | 1. Select the extension you would like to assign to the Yealink phone(s) from the drop down list. | ||
| + | |||
| + | 2. Check the box next to each Yealink phone you are assigning. | ||
| + | |||
| + | 3. Click the Assign button. | ||
| + | |||
| + | [[File:AD Assign.jpg]] | ||
| + | |||
| + | |||
| + | |||
| + | This will automate the process of entering the Yealink phone’s MAC address into each extensions Phone MAC field in it’s advanced settings section. | ||
| + | |||
| + | ►Yealink phones shown in the Auto Discovery section will not show up colored green even though they may well be assigned and using the PBX. The coloring is merely cosmetic and will not affect the operation of the phone. | ||
| + | |||
| + | |||
| + | |||
| + | Once the phones are assigned to extensions they can now be provisioned, either manually or if the phones are on the same LAN as the PBX the Quick Setup utility can be used. | ||
| + | |||
| + | *Log into the GUI interface of phone via its IP Address (user: admin/pass:admin) | ||
| + | *Navigate to Settings=>Auto Provision | ||
| + | *If the phone is local: Set Server URL to<pre>TFTP://<IP address of pbx>/</pre> | ||
| + | *If the phone is remote: Set server URL to<pre>http://<public IP address of pbx>/ippbx/phonecfg/</pre> | ||
| + | *If the phone is remote: Set the username to admin, and the password to (Password is found under PBX Setup > Phone Global > Phone HTTP Download) | ||
| + | *Click Confirm at the bottom of the page | ||
| + | *Click Auto Provision Now | ||
| + | |||
| + | The phone's screen should change to indicate that it is updating its config, and will then register if successful. | ||
| + | |||
| + | |||
| + | |||
| + | NOTE: All Yealink conference phones can use the CP860 phone type for provisioning | ||
| + | |||
| + | NOTE: You can use the Yealink Generic phone type for provisioning a single extension to Yealink DECT Wireless phones W52P & W56P, additional extensions must be manually added. | ||
| + | |||
| + | === Quick Setup Guide === | ||
| + | |||
| + | Use this in conjunction with the quick setup utility | ||
| + | |||
| + | *[https://www.dropbox.com/s/vejpyzfxnx9oqw2/Quick_Setup_Instructions.pdf?dl=0 Yealink Quick Setup Guide] | ||
| + | *[https://www.dropbox.com/sh/hsdsk0lr00rnlr5/AAAN_y1742zX3OBJuF8L9Czwa/IPitomy/Util/YeaLink%20Configuration?dl=0&preview=QuickSetup.exe Yealink Quick Setup utility] | ||
| + | *When using the Quick Setup Utility with remote phones the correct provisioning URL syntax is: | ||
| + | <pre>http://admin:1234@<public IP of PBX>/ippbx/phonecfg</pre> | ||
| + | |||
| + | == Provisioning a Yealink DECT phone == | ||
| + | |||
| + | * Porvisioning a Yealink DECT phone is the same as a regular phone, plus a few setps. | ||
| + | * Set the extension Phone Type in the pbx to Yealink Generic. | ||
| + | * Enter the MAC address of the base. Save and apply changes. | ||
| + | * In base GUI enter in the provisioning URL. HTTP for remote extensions(also requires username and password from PBX Setup > Phone Global > Phone HTTP Download), and TFTP for local(local does not require a username and password. | ||
| + | |||
| + | [[File:Dect4.png|none|thumb|800x800px]] | ||
| + | [[File:Dect6.png|none|frame]] | ||
| + | |||
| + | * Once you have the provisioning filled in go to the bottom of the page and hit Confirm. Then hit Auto Provision Now. | ||
| + | * once the base is provisioned you can add more extensions to the base, or more phones to Account one. | ||
| + | * If you are adding phones to use the same extension see the example below. | ||
| + | |||
| + | [[File:Dect.png|none|frame]] | ||
| + | |||
| + | * If you are adding extensions to the base see the example below. | ||
| + | |||
| + | [[File:Dect2.png|none|frame]] | ||
| + | |||
| + | * You will also need to change the settings in the extension in the pbx if you are adding extensions. See the example below. | ||
| + | |||
| + | [[File:Dect7.png|none|frame]] | ||
| + | |||
| + | * When you are adding handsets tio the base, the password on the phone is 0000. Start Registration on the base and then navigate on the handset by clicking OK, then select settings, and number 6 for registration. Select Register Handset, and then select your base. Once it finds the base, it will ask for the password which is 0000. | ||
| + | |||
| + | [[File:Dect33.jpg|none|frame]] | ||
| + | |||
| + | == Additional programming tips: == | ||
| + | |||
| + | == Updating the Directory Button == | ||
| + | |||
| + | * You can update the Directory button on the phone so it will use the Remote Phonebook from the pbx. | ||
| + | * Also make sure you add the command to allow the phones to use the directory to the global template in the pbx. it is: features.remote_phonebook.enable = 1 | ||
| + | * Program the Programmable Softkey 2 to XML Phonebook and label it Directory | ||
| + | * Make sure you have the URL for the Remote Phonebook for the pbx the phone is registered to. Here is a cloud instance which requires the username and password for HTTP Download which is found under PBX Setup > Phone Global > Phone HTTP Download. example: http://admin:JH5BmmyhqT3ZKk3N@c0060.ec2.ipitomy.com/ippbx/phonecfg//RemotePhonebook.xml | ||
| + | * You can name the Display Name whatever you want. | ||
| + | |||
| + | [[File:Directory button.jpg|frame|alt=|none]] | ||
| + | [[File:Directory.jpg|none|frame]] | ||
| + | |||
| + | * Below is a URL for a local (LAN) phone. | ||
| + | [[File:Local dir2.jpg|none|frame]] | ||
| + | |||
| + | == Keys == | ||
| + | *When configuring the Park key manually, set the type to DTMF, and the value to ##700#. | ||
| + | *When configuring a Record key manually, set the type to DTMF, and the value to *# | ||
| + | *When configuring the Day/Night key manually, set the type to BLF and the value to ff. | ||
| + | |||
| + | *Under the DSS key tab is a link for Line Keys. Be sure to set the Line Keys to Account 1 if you want them to function as a line key, otherwise you can configure them just like any other programmable key. | ||
| + | *<div>Yealink Phones - Blind BLF transfers to voicemail</div><div>Use a prefix key on the Yealink phones to handle blind transfers directly to a BLF extensions voicemail.</div><div>Key Type: Prefix Label: VM Xfer Value: *</div><div>While on the call press: TRANSFER -> VM Xfer -> BLF of the extension -> TRANSFER</div> | ||
| + | *<div>EXP20 Expansion module for Yealink T2 Series phones - Key #1 AND Key #21 must be left blank in order for the Page Switch to work properly.</div> | ||
| + | <div><br/></div> | ||
| + | To Remove/Disable the DND Softkey on Yealink Phones: | ||
| + | |||
| + | Add this line: features.dnd.allow = 0 | ||
| + | |||
| + | to the Yealink Phone Configuration Template found in PBX Setup -> Phone Global. (add the line to the "Options found in the MAC config" section) Save and Apply settings then reboot the phones. | ||
| + | |||
| + | NOTE: Yealink T27 models the DND Softkey remains visible on the phone, but it is disabled so pressing it will not activate DND mode. | ||
| + | |||
| + | ---- | ||
| + | |||
| + | == Multicast == | ||
| + | |||
| + | To set up multicast on your Yealink phone: | ||
| + | |||
| + | *Log into the GUI interface of phone via its IP Address (user: admin/pass:admin) | ||
| + | *Navigate to Contacts=>MulticastIP | ||
| + | *Populate the Listening Address field with the mutlicast IP of the multicast group built in the PBX, followed by a colon and the port configured for the group. | ||
| + | **eg. 225.5.5.5:1235 | ||
| + | *Populate the Label field with a name that will display on the LCD when paged by the multicast group | ||
| + | *Click the Confirm key and your settings will be saved, allowing the phone to receive multicast pages. | ||
| + | |||
| + | A dealer has brought to our attention this link to a Yealink forum that has a firmware for multicast. I know in our testing, the .143 version had the settings needed. But its possible you may need this version as that is what the dealer needed, so we are linking to the information. | ||
| + | |||
| + | [http://forum.yealink.com/forum/showthread.php?tid=189&page=3 http://forum.yealink.com/forum/showthread.php?tid=189&page=3] | ||
| + | |||
| + | ---- | ||
| + | |||
| + | |||
| + | == Tones == | ||
| + | |||
| + | Yealink phones do play a tone when they receive a unicast page, it is tied into the ringer volume, so if it is set too low it is very difficult to hear. There is currently no way to use another tone for this, but we can tweak the tone that does play a little bit so that it can be better heard. Log into the phones web interface, click the "Settings" tab at the top, and then select "Tones" from the menu on the left. | ||
| + | |||
| + | The "Auto Answer" tone is what plays when the phone receives a unicast page. We can adjust the frequency of that tone to be a little bit more noticable then the default. We recommend setting the Auto Answer field to: | ||
| + | |||
| + | 2000/500,0/1000 | ||
| + | |||
| + | then click "Confirm" to save. | ||
| + | |||
| + | [[File:Yealink Tones1.jpg]] | ||
| + | |||
| + | ---- | ||
| + | |||
| + | == Enable and Configure User Access Levels == | ||
| + | |||
| + | Here is what you need to do to implement User Access Levels on Yealink phones. Add the following lines (colored green) to the Common Config section of the Yealink Phone Configuration Template found in PBX Setup -> Phone Global: | ||
| + | |||
| + | To enable user access levels add this line: | ||
| + | |||
| + | <span style="color:#008000;">static.security.var_enable = 1</span> | ||
| + | |||
| + | Set default user access level to user: | ||
| + | |||
| + | <span style="color:#008000;">static.security.default_access_level = 0</span> | ||
| + | |||
| + | URL path for WebItemsLevel.cfg replace IP with what the PBX is set to: | ||
| + | |||
| + | <span style="color:#008000;">static.web_item_level.url = tftp://192.168.1.249/WebItemsLevel.cfg</span> | ||
| + | |||
| + | Set passwords change newpassword for each login level: | ||
| + | |||
| + | <span style="color:#008000;">static.security.user_name.admin = admin</span> | ||
| + | |||
| + | <span style="color:#008000;">static.security.user_password = admin:newpassword</span> | ||
| + | |||
| + | <span style="color:#008000;">static.security.user_name.var = var</span> | ||
| + | |||
| + | <span style="color:#008000;">static.security.user_password = var:newpassword</span> | ||
| + | |||
| + | <span style="color:#008000;">static.security.user_name.user = user</span> | ||
| + | |||
| + | <span style="color:#008000;">static.security.user_password = user:newpassword</span> | ||
| + | |||
| + | Upload the WebItemsLevel.cfg file to the TFTP Files section found in PBX Setup -> Services this is the file that sets level access to every option and setting on the Yealink phones. I already set this one to lock out every setting that could alter the phones operation using the phone menu in any way, however feel free to edit it as needed. | ||
| + | |||
| + | Turning on the user access levels activates a third login "var" we recommend to just set the password for var to be the same as the admin password. | ||
| + | |||
| + | Also when we set the default user level to "user", pressing and holding the OK button for 5 seconds to return the phone to factory defaults will no longer work since that is an admin level function. | ||
| + | |||
| + | Save and Apply Changes, then reboot the phones to download the new configuration. | ||
| + | |||
| + | |||
| + | |||
| + | Here is the WebItemsLevel.cfg file (you will need to un-zip it first) | ||
| + | |||
| + | FILE LINK: [[/images/4/46/WebItemsLevel.zip|WebItemsLevel.zip]] | ||
| + | |||
| + | The numbers after each line entry define the user level needed to access that particular setting/feature. | ||
| + | |||
| + | The settings that relate to accessing settings/features by using the Menu in the phone are found under the [GUI] section. | ||
| + | |||
| + | 0 = User | ||
| + | |||
| + | 1 = Var | ||
| + | |||
| + | 2 = Admin | ||
| + | |||
| + | ---- | ||
| + | |||
| + | == Remote Phonebook files == | ||
| + | |||
| + | Yealink phones use a specific XML format for remote phonebook files. | ||
| + | |||
| + | Here is an example, red text can be changed: | ||
| + | <div><div><?xml version="1.0" encoding="UTF-8"?></div><div><'''<span style="color:#ff0000;">CompanyName</span>'''IPPhoneDirectory></div><div><br/></div><div> <DirectoryEntry></div><div> <Name>'''<span style="color:#ff0000;">Spanky McFarland</span>'''</Name></div><div> <Telephone><span style="color:#ff0000;">'''101'''</span></Telephone></div><div> </DirectoryEntry></div><div><br/></div><div><div> <DirectoryEntry></div><div> <Name>'''<span style="color:#ff0000;">Buckwheat</span>'''</Name></div><div> <Telephone><span style="color:#ff0000;">'''103'''</span></Telephone></div><div> </DirectoryEntry></div></div><div><br/></div><div> <DirectoryEntry></div><div> <Name>'''<span style="color:#ff0000;">Alfalfa Switzer</span>'''</Name></div><div> <Telephone><span style="color:#ff0000;">'''102'''</span></Telephone></div><div> </DirectoryEntry></div><div><br/></div><div></'''<span style="color:#ff0000;">CompanyName</span>'''IPPhoneDirectory></div><div><br/></div><div>save the file with .xml extension</div><div> | ||
| + | ---- | ||
| + | <br/></div></div> | ||
| + | |||
| + | == Enhanced DSS Keys == | ||
| + | |||
| + | <span style="color: rgb(0, 0, 0); font-family: Verdana;">In Yealink V81 and greater firmware version, the phones support a feature called EDK (Enhanced DSS Keys) that can be used to program advanced dial strings.</span> | ||
| + | |||
| + | <span style="color: rgb(0, 0, 0); font-family: Verdana;">1. Modify the Yealink Global Template under PBX Setup -> Phone Global. Enable EDK feature via auto provision by entering the parameter as below:</span> | ||
| + | |||
| + | '''features.enhanced_dss_keys.enable=1''' | ||
| + | |||
| + | Be sure to save and Apply Changes, then reboot the phone. | ||
| + | |||
| + | Now there will be a "Custom" key type added to the phone istelf. Log into the phone and set a key to "Custom" and the set the value by using the EDK commands: | ||
| + | |||
| + | <br/>$C<command>$ | ||
| + | |||
| + | *Hang up (hu) | ||
| + | *hold (h) | ||
| + | *waitconnect (wc) | ||
| + | *pause <number of seconds> (p <num sec>) where the maximum value is 10 | ||
| + | <div> Example: 4411$Cwc$$Cp10$ defines dialing 4411>>waitconnect>>connected and lasts 10 seconds</div><div><br/></div><div><br/></div><div></div><div>$T<type>$</div> | ||
| + | *invite | ||
| + | *dtmf | ||
| + | *refer | ||
| + | |||
| + | Example: *338$Tdtmf$ defines sending the *338 by the type of dtmf | ||
| + | |||
| + | |||
| + | |||
| + | To program a custom key to dial VM pause a moment and then enter the VM PIN 4321: | ||
| + | |||
| + | 923$Cwc$$Cp2$4321$Tdtmf$ | ||
| + | |||
| + | |||
| + | |||
| + | |||
| + | |||
| + | <u>Agent Log IN / Log OUT using a custom key:</u> | ||
| + | |||
| + | Log IN example using agent number 444 and password 777: | ||
| + | |||
| + | 2*$Cwc$<span style="color:#ff0000;">444</span>#$Tdtmf$$Cp2$<span style="color:#ff0000;">777</span>#$Tdtmf$ | ||
| + | |||
| + | Log OUT example: | ||
| + | |||
| + | 3*$Cwc$<span style="color:#ff0000;">444</span>#$Tdtmf$ | ||
| + | |||
| + | == Hot Desking == | ||
| + | |||
| + | Yealink phones support hot desking via DSS key. At the moment, this has to be programmed directly on the yealink phone itself. In a future release we will have a key option on the pbx for autoprovisioning. | ||
| + | |||
| + | [[File:Dss key.JPG|File:Dss key.JPG]] | ||
| + | |||
| + | |||
| + | |||
| + | Pressing this button on the phone will bring up an on-screen prompt asking for the new extension and SIP password (found on destinations->extensions, target extension number, and under the advanced section). | ||
| + | |||
| + | Entering the new extension information will keep your current sip server address (usually the pbx or cloud instance), and all of your current DSS keys, but will use the new extension number. Use the button again to change back to the previous extension as needed. | ||
| + | |||
| + | NOTE: Be sure to avoid having 2 phones programmed with the same extension at the same time, as they will conflict over the registration. It's best to have specially designated "floating" extensions for phones that are expected to be used with hot desking. | ||
| + | |||
| + | As a general tip, it may be advised, as an ease of use for the end user, to change the SIP password to something easier to type on the phones being used, such as an all-numeric password. If you do this, be sure you are also increasing pbx security to compensate, either via log watch & ban, or sip ACL rules, as making the password easier will also make it easier to guess for malicious outside attackers. | ||
| + | |||
| + | == Fixes == | ||
| + | |||
| + | *T38G firmware version fixes an issue with Parked calls bonding with other calls incorrectly. Extract the .rom from the Zip folder and load it into the phone. | ||
| + | |||
| + | [[File:38.70.0.143.zip|File:38.70.0.143.zip]] | ||
| + | |||
| + | == Yealink Documentation == | ||
| + | |||
| + | The T29 guide covers basic usage of the entire T2 series of Yealink phones. The T48 guide covers basic usage of the entire T4 series of Yealink phones. | ||
| + | |||
| + | [[File:Yealink SIP-T29G Quick Start Guide V82 20.pdf|File:Yealink SIP-T29G Quick Start Guide V82 20.pdf]] | ||
| + | |||
| + | [[File:Yealink SIP-T48S Quick Start Guide V82 20.pdf|File:Yealink SIP-T48S Quick Start Guide V82 20.pdf]] | ||
| + | |||
| + | |||
| + | |||
| + | == Yealink Power Usage == | ||
| + | |||
| + | [[File:Yealink PoE.jpg]] | ||
| + | |||
| + | |||
| + | |||
| + | == Yealink Tips, Tricks and Useful Info == | ||
| + | |||
| + | === Webgui login credentials === | ||
| + | The factory default login and password combo is admin/admin | ||
| + | On PBX software version 6.0.5 or later on a provisioned phone, the login is admin and the password is IPitomy956 | ||
| + | |||
| + | === Transfer/Park tips === | ||
| + | |||
| + | When transferring or parking a call, the "End Call" softkey does NOT complete the operation. It cancels it. In this case, it leaves the call on hold instead of moving it where it was intended to go. Complete the transfer with the "Transfer" softkey instead. | ||
| + | |||
| + | <br/>Blind Transfer, Attended Transfer, Semi-Attended Transfer | ||
| + | |||
| + | [[File:Yealink xfers.jpg]] | ||
| + | |||
| + | === Transferring a call to an outside number === | ||
| + | |||
| + | On a Yealink phone, a DSS key can be created to transfer a call to a specific outside number. You can use the DTMF Key Type (Transfer key type is going to be available in a future release) and either a system speed dial, or an arbitrary number, as follows: | ||
| + | |||
| + | Key Type: DTMF Value: ##number# (this does a blind transfer to whatever number you set for it, such as one of the 2 digit system speed dials, or a full 10 or 11 digit number, as required by your provider) Label: An on screen label for this key | ||
| + | |||
| + | This is useful if you frequently transfer calls to the same number. System speed dials can be found under PBX Setup=>Feature Codes, at the bottom of the page. | ||
Latest revision as of 16:45, 9 February 2024
Beginning in PBX software version 5.2.1-10, we have begun including more integrated support for Yealink phones. They can now be found via autodiscovery and assigned to extensions, although they do not currently respond to configure or restart commands. Yealink phones CAN autoprovision from the pbx once assigned, however, by either logging into each phone's webGUI, or using our quick setup utility. The quick setup utility can be downloaded here Yealink Quick Setup utility
Auto Provisioning a Yealink Phone
PBX ver 6.0.5 or later method
Starting in version 6.0.5, we have added the ability to configure and restart Yealink phones from the autodiscovery section of the pbx, eliminating much of the process previously needed to set these phones up.
1) Under Destinations=>Autodiscovery, after scanning the network, go to the commands tab and click the Yealink Detect link:
2) Press the Start button
3) In the list of phones discovered, you can now check the boxes, and assign, configure, and restart them as if they were IPitomy HD phones, using the buttons at the top of the page.
Important notes:
This only works for FACTORY DEFAULTED Yealink phones. Phones that have been previously provisioned will NOT respond to configure or restart commands from this process.
The Yealink discovery function will run for about 10 minutes before shutting itself back off. You can restart it by going to the commands tab and hitting start, if it has stopped. If it is running, it will say "Listening" on that page.
PBX ver 5.2 method
You must assign a phone to an extension either manually or using Auto-Discovery:
Manual – Navigate to Destinations -> Extensions -> Edit Extension -> Advanced and enter the MAC address of the phone into the “Phone MAC:” field. SAVE CHANGES then APPLY CHANGES.
Auto Discovery - If the phones are on the same LAN as the PBX you can use Auto Discovery. Navigate to Destinations -> Extensions. Click the “Auto-Discovery” tab at the top, and then click “Auto-Discovery (scan network)”
Once the scan has completed:
1. Select the extension you would like to assign to the Yealink phone(s) from the drop down list.
2. Check the box next to each Yealink phone you are assigning.
3. Click the Assign button.
This will automate the process of entering the Yealink phone’s MAC address into each extensions Phone MAC field in it’s advanced settings section.
►Yealink phones shown in the Auto Discovery section will not show up colored green even though they may well be assigned and using the PBX. The coloring is merely cosmetic and will not affect the operation of the phone.
Once the phones are assigned to extensions they can now be provisioned, either manually or if the phones are on the same LAN as the PBX the Quick Setup utility can be used.
- Log into the GUI interface of phone via its IP Address (user: admin/pass:admin)
- Navigate to Settings=>Auto Provision
- If the phone is local: Set Server URL to
TFTP://<IP address of pbx>/
- If the phone is remote: Set server URL to
http://<public IP address of pbx>/ippbx/phonecfg/
- If the phone is remote: Set the username to admin, and the password to (Password is found under PBX Setup > Phone Global > Phone HTTP Download)
- Click Confirm at the bottom of the page
- Click Auto Provision Now
The phone's screen should change to indicate that it is updating its config, and will then register if successful.
NOTE: All Yealink conference phones can use the CP860 phone type for provisioning
NOTE: You can use the Yealink Generic phone type for provisioning a single extension to Yealink DECT Wireless phones W52P & W56P, additional extensions must be manually added.
Quick Setup Guide
Use this in conjunction with the quick setup utility
- Yealink Quick Setup Guide
- Yealink Quick Setup utility
- When using the Quick Setup Utility with remote phones the correct provisioning URL syntax is:
http://admin:1234@<public IP of PBX>/ippbx/phonecfg
Provisioning a Yealink DECT phone
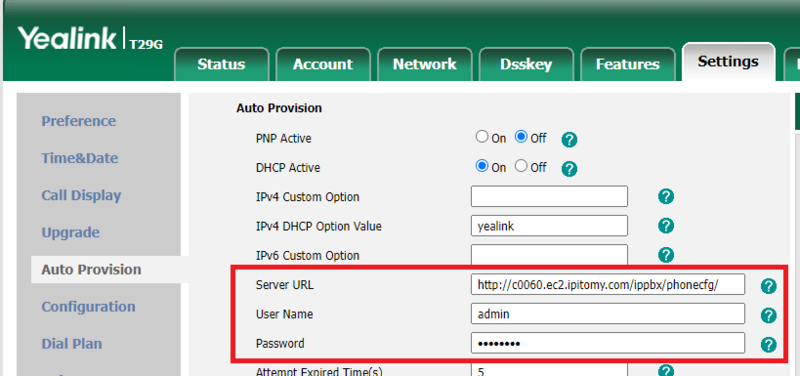
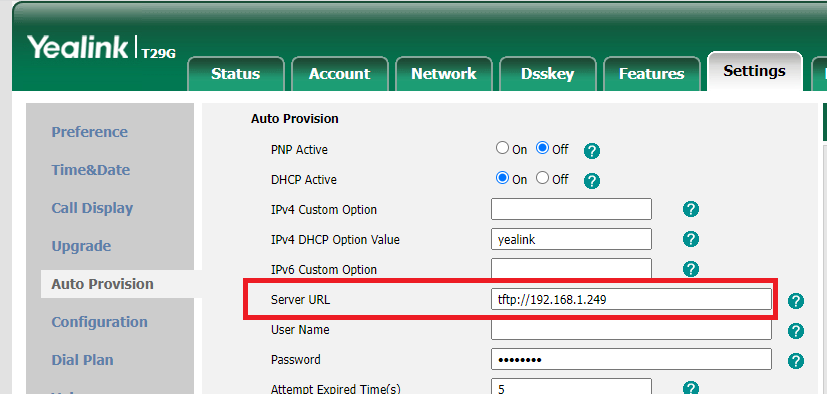
- Porvisioning a Yealink DECT phone is the same as a regular phone, plus a few setps.
- Set the extension Phone Type in the pbx to Yealink Generic.
- Enter the MAC address of the base. Save and apply changes.
- In base GUI enter in the provisioning URL. HTTP for remote extensions(also requires username and password from PBX Setup > Phone Global > Phone HTTP Download), and TFTP for local(local does not require a username and password.
- Once you have the provisioning filled in go to the bottom of the page and hit Confirm. Then hit Auto Provision Now.
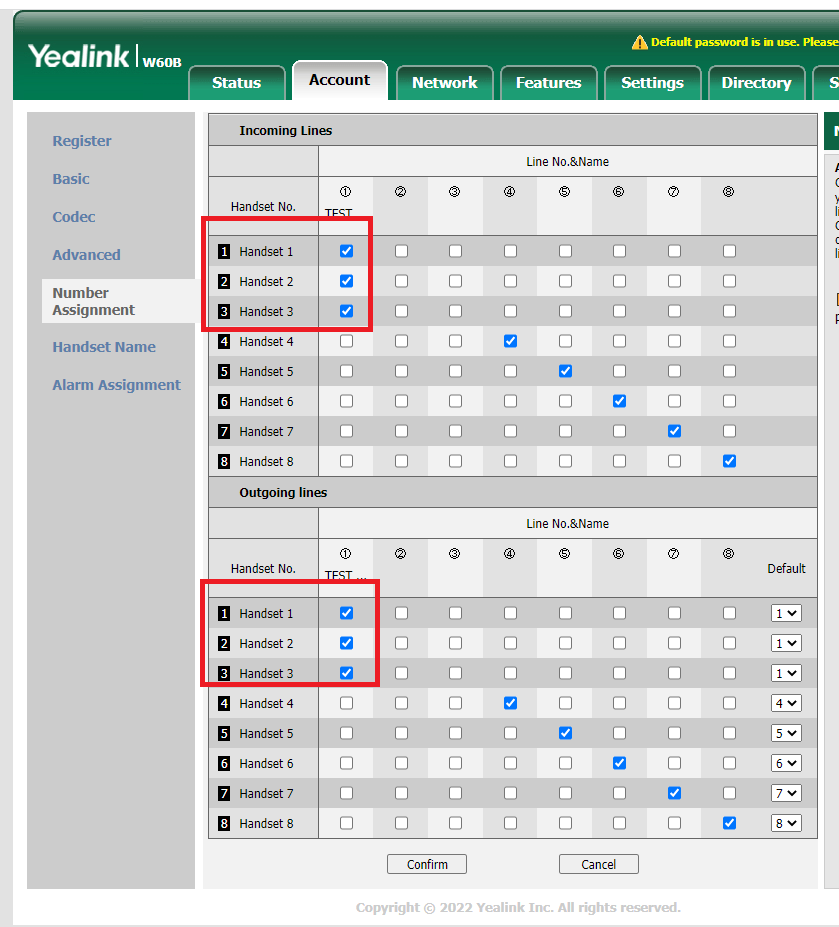
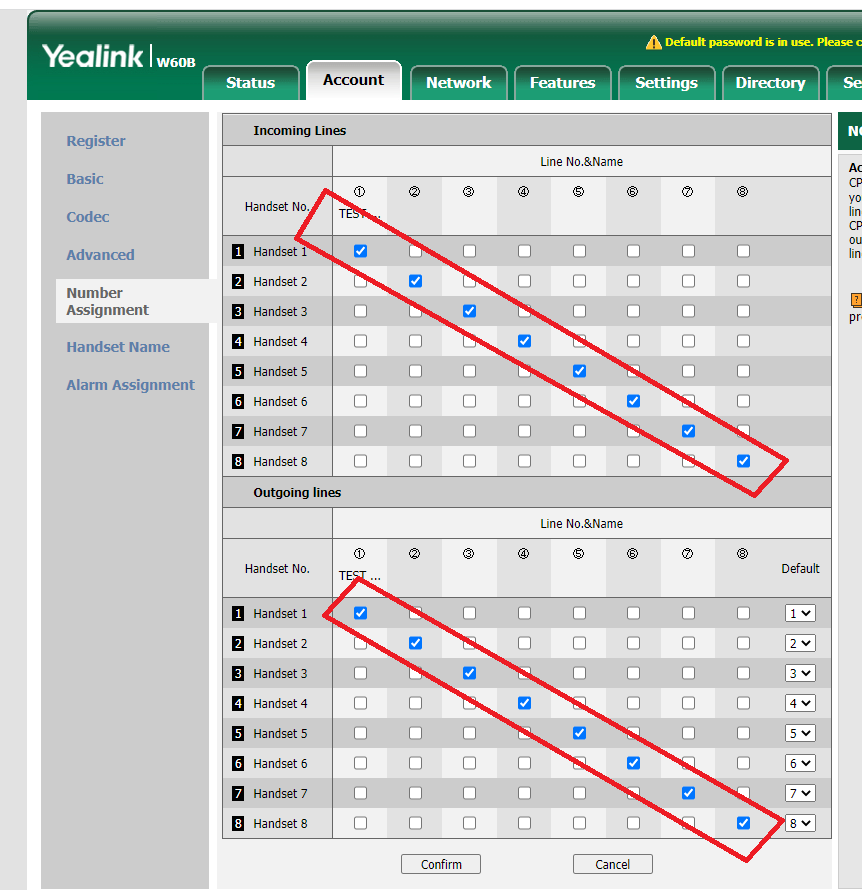
- once the base is provisioned you can add more extensions to the base, or more phones to Account one.
- If you are adding phones to use the same extension see the example below.
- If you are adding extensions to the base see the example below.
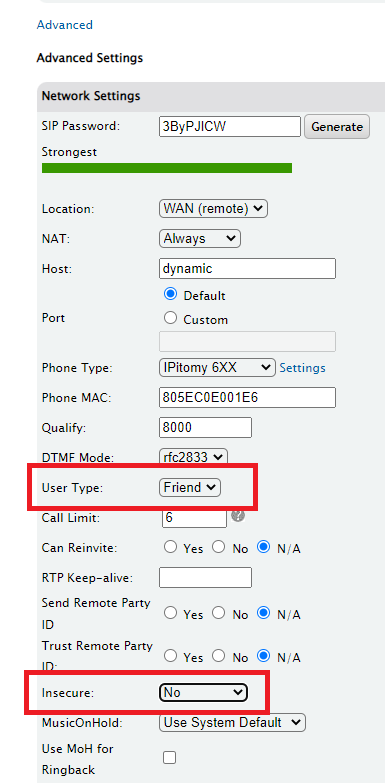
- You will also need to change the settings in the extension in the pbx if you are adding extensions. See the example below.
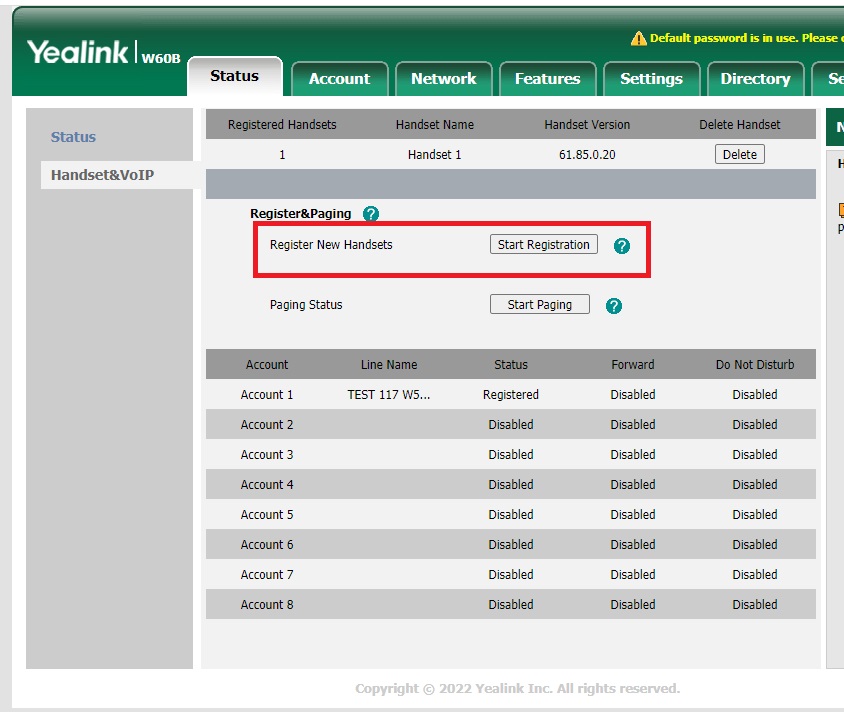
- When you are adding handsets tio the base, the password on the phone is 0000. Start Registration on the base and then navigate on the handset by clicking OK, then select settings, and number 6 for registration. Select Register Handset, and then select your base. Once it finds the base, it will ask for the password which is 0000.
Additional programming tips:
Updating the Directory Button
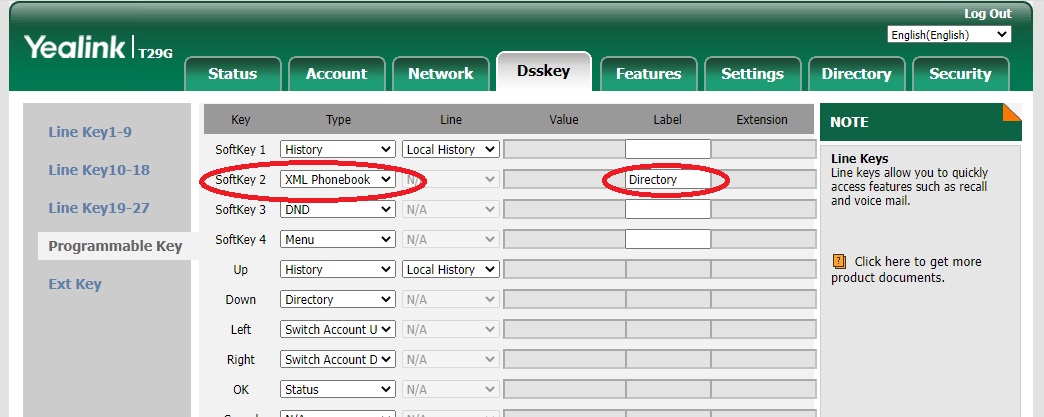
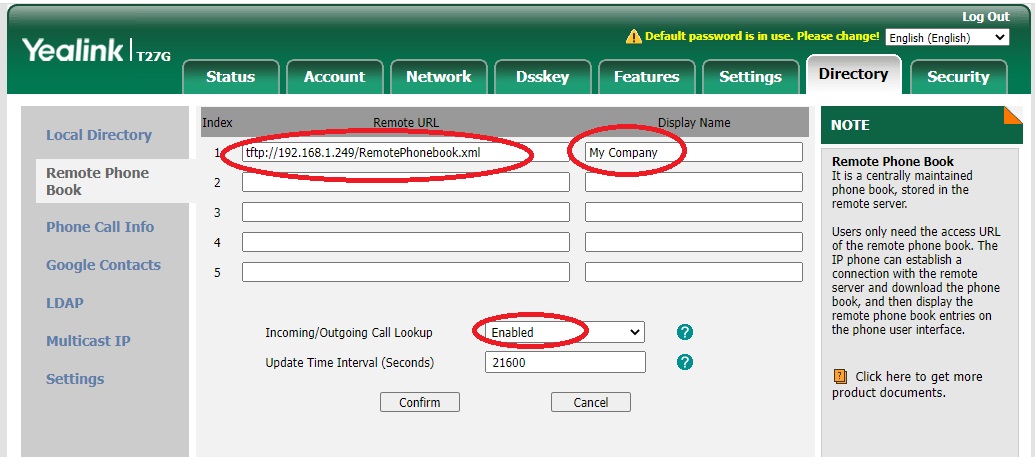
- You can update the Directory button on the phone so it will use the Remote Phonebook from the pbx.
- Also make sure you add the command to allow the phones to use the directory to the global template in the pbx. it is: features.remote_phonebook.enable = 1
- Program the Programmable Softkey 2 to XML Phonebook and label it Directory
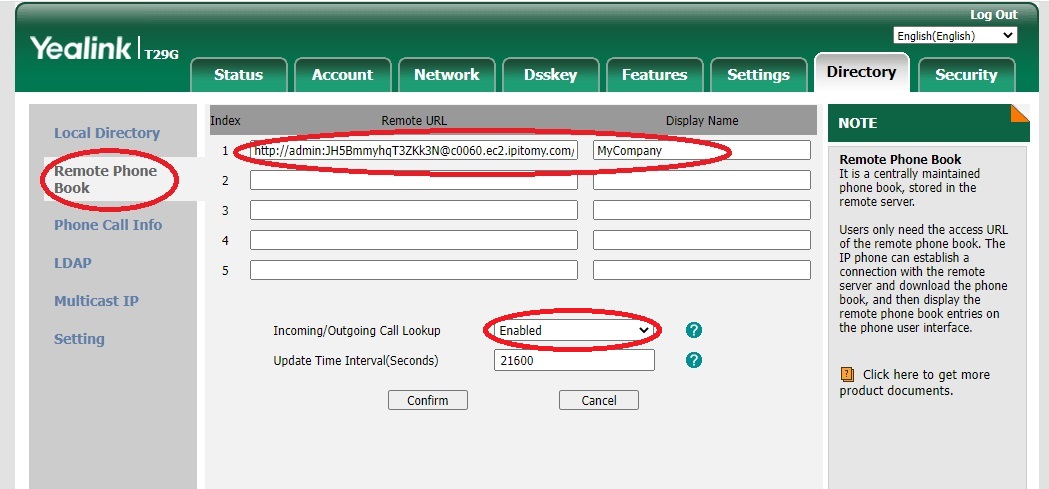
- Make sure you have the URL for the Remote Phonebook for the pbx the phone is registered to. Here is a cloud instance which requires the username and password for HTTP Download which is found under PBX Setup > Phone Global > Phone HTTP Download. example: http://admin:JH5BmmyhqT3ZKk3N@c0060.ec2.ipitomy.com/ippbx/phonecfg//RemotePhonebook.xml
- You can name the Display Name whatever you want.
- Below is a URL for a local (LAN) phone.
Keys
- When configuring the Park key manually, set the type to DTMF, and the value to ##700#.
- When configuring a Record key manually, set the type to DTMF, and the value to *#
- When configuring the Day/Night key manually, set the type to BLF and the value to ff.
- Under the DSS key tab is a link for Line Keys. Be sure to set the Line Keys to Account 1 if you want them to function as a line key, otherwise you can configure them just like any other programmable key.
- Yealink Phones - Blind BLF transfers to voicemailUse a prefix key on the Yealink phones to handle blind transfers directly to a BLF extensions voicemail.Key Type: Prefix Label: VM Xfer Value: *While on the call press: TRANSFER -> VM Xfer -> BLF of the extension -> TRANSFER
- EXP20 Expansion module for Yealink T2 Series phones - Key #1 AND Key #21 must be left blank in order for the Page Switch to work properly.
To Remove/Disable the DND Softkey on Yealink Phones:
Add this line: features.dnd.allow = 0
to the Yealink Phone Configuration Template found in PBX Setup -> Phone Global. (add the line to the "Options found in the MAC config" section) Save and Apply settings then reboot the phones.
NOTE: Yealink T27 models the DND Softkey remains visible on the phone, but it is disabled so pressing it will not activate DND mode.
Multicast
To set up multicast on your Yealink phone:
- Log into the GUI interface of phone via its IP Address (user: admin/pass:admin)
- Navigate to Contacts=>MulticastIP
- Populate the Listening Address field with the mutlicast IP of the multicast group built in the PBX, followed by a colon and the port configured for the group.
- eg. 225.5.5.5:1235
- Populate the Label field with a name that will display on the LCD when paged by the multicast group
- Click the Confirm key and your settings will be saved, allowing the phone to receive multicast pages.
A dealer has brought to our attention this link to a Yealink forum that has a firmware for multicast. I know in our testing, the .143 version had the settings needed. But its possible you may need this version as that is what the dealer needed, so we are linking to the information.
http://forum.yealink.com/forum/showthread.php?tid=189&page=3
Tones
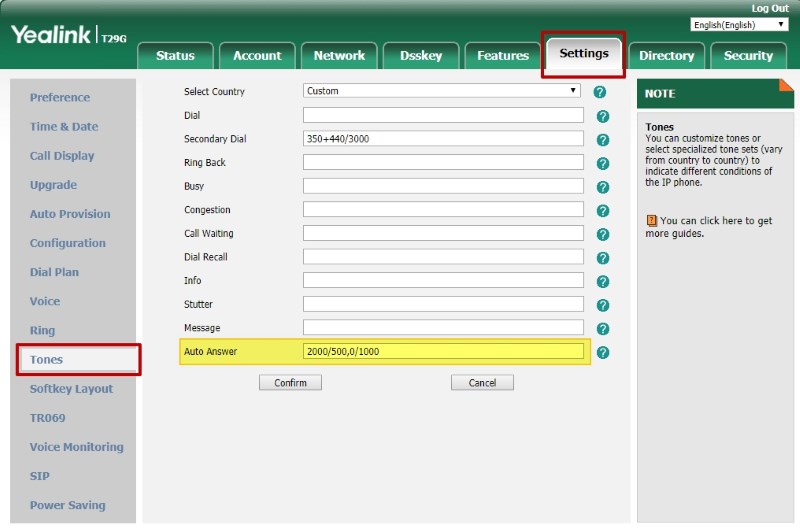
Yealink phones do play a tone when they receive a unicast page, it is tied into the ringer volume, so if it is set too low it is very difficult to hear. There is currently no way to use another tone for this, but we can tweak the tone that does play a little bit so that it can be better heard. Log into the phones web interface, click the "Settings" tab at the top, and then select "Tones" from the menu on the left.
The "Auto Answer" tone is what plays when the phone receives a unicast page. We can adjust the frequency of that tone to be a little bit more noticable then the default. We recommend setting the Auto Answer field to:
2000/500,0/1000
then click "Confirm" to save.
Enable and Configure User Access Levels
Here is what you need to do to implement User Access Levels on Yealink phones. Add the following lines (colored green) to the Common Config section of the Yealink Phone Configuration Template found in PBX Setup -> Phone Global:
To enable user access levels add this line:
static.security.var_enable = 1
Set default user access level to user:
static.security.default_access_level = 0
URL path for WebItemsLevel.cfg replace IP with what the PBX is set to:
static.web_item_level.url = tftp://192.168.1.249/WebItemsLevel.cfg
Set passwords change newpassword for each login level:
static.security.user_name.admin = admin
static.security.user_password = admin:newpassword
static.security.user_name.var = var
static.security.user_password = var:newpassword
static.security.user_name.user = user
static.security.user_password = user:newpassword
Upload the WebItemsLevel.cfg file to the TFTP Files section found in PBX Setup -> Services this is the file that sets level access to every option and setting on the Yealink phones. I already set this one to lock out every setting that could alter the phones operation using the phone menu in any way, however feel free to edit it as needed.
Turning on the user access levels activates a third login "var" we recommend to just set the password for var to be the same as the admin password.
Also when we set the default user level to "user", pressing and holding the OK button for 5 seconds to return the phone to factory defaults will no longer work since that is an admin level function.
Save and Apply Changes, then reboot the phones to download the new configuration.
Here is the WebItemsLevel.cfg file (you will need to un-zip it first)
FILE LINK: WebItemsLevel.zip
The numbers after each line entry define the user level needed to access that particular setting/feature.
The settings that relate to accessing settings/features by using the Menu in the phone are found under the [GUI] section.
0 = User
1 = Var
2 = Admin
Remote Phonebook files
Yealink phones use a specific XML format for remote phonebook files.
Here is an example, red text can be changed:
Enhanced DSS Keys
In Yealink V81 and greater firmware version, the phones support a feature called EDK (Enhanced DSS Keys) that can be used to program advanced dial strings.
1. Modify the Yealink Global Template under PBX Setup -> Phone Global. Enable EDK feature via auto provision by entering the parameter as below:
features.enhanced_dss_keys.enable=1
Be sure to save and Apply Changes, then reboot the phone.
Now there will be a "Custom" key type added to the phone istelf. Log into the phone and set a key to "Custom" and the set the value by using the EDK commands:
$C<command>$
- Hang up (hu)
- hold (h)
- waitconnect (wc)
- pause <number of seconds> (p <num sec>) where the maximum value is 10
- invite
- dtmf
- refer
Example: *338$Tdtmf$ defines sending the *338 by the type of dtmf
To program a custom key to dial VM pause a moment and then enter the VM PIN 4321:
923$Cwc$$Cp2$4321$Tdtmf$
Agent Log IN / Log OUT using a custom key:
Log IN example using agent number 444 and password 777:
2*$Cwc$444#$Tdtmf$$Cp2$777#$Tdtmf$
Log OUT example:
3*$Cwc$444#$Tdtmf$
Hot Desking
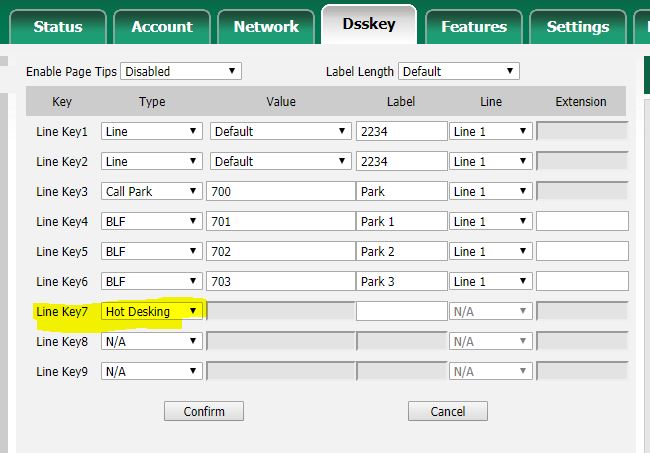
Yealink phones support hot desking via DSS key. At the moment, this has to be programmed directly on the yealink phone itself. In a future release we will have a key option on the pbx for autoprovisioning.
Pressing this button on the phone will bring up an on-screen prompt asking for the new extension and SIP password (found on destinations->extensions, target extension number, and under the advanced section).
Entering the new extension information will keep your current sip server address (usually the pbx or cloud instance), and all of your current DSS keys, but will use the new extension number. Use the button again to change back to the previous extension as needed.
NOTE: Be sure to avoid having 2 phones programmed with the same extension at the same time, as they will conflict over the registration. It's best to have specially designated "floating" extensions for phones that are expected to be used with hot desking.
As a general tip, it may be advised, as an ease of use for the end user, to change the SIP password to something easier to type on the phones being used, such as an all-numeric password. If you do this, be sure you are also increasing pbx security to compensate, either via log watch & ban, or sip ACL rules, as making the password easier will also make it easier to guess for malicious outside attackers.
Fixes
- T38G firmware version fixes an issue with Parked calls bonding with other calls incorrectly. Extract the .rom from the Zip folder and load it into the phone.
Yealink Documentation
The T29 guide covers basic usage of the entire T2 series of Yealink phones. The T48 guide covers basic usage of the entire T4 series of Yealink phones.
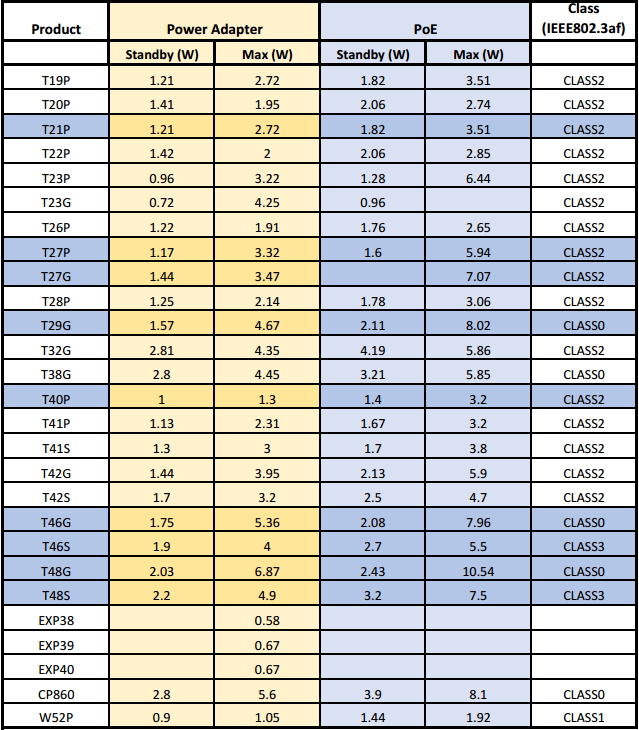
Yealink Power Usage
Yealink Tips, Tricks and Useful Info
Webgui login credentials
The factory default login and password combo is admin/admin On PBX software version 6.0.5 or later on a provisioned phone, the login is admin and the password is IPitomy956
Transfer/Park tips
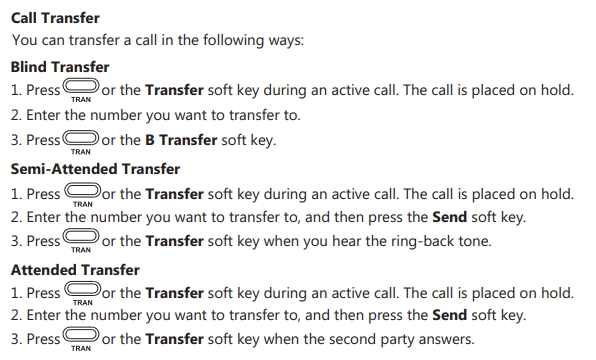
When transferring or parking a call, the "End Call" softkey does NOT complete the operation. It cancels it. In this case, it leaves the call on hold instead of moving it where it was intended to go. Complete the transfer with the "Transfer" softkey instead.
Blind Transfer, Attended Transfer, Semi-Attended Transfer
Transferring a call to an outside number
On a Yealink phone, a DSS key can be created to transfer a call to a specific outside number. You can use the DTMF Key Type (Transfer key type is going to be available in a future release) and either a system speed dial, or an arbitrary number, as follows:
Key Type: DTMF Value: ##number# (this does a blind transfer to whatever number you set for it, such as one of the 2 digit system speed dials, or a full 10 or 11 digit number, as required by your provider) Label: An on screen label for this key
This is useful if you frequently transfer calls to the same number. System speed dials can be found under PBX Setup=>Feature Codes, at the bottom of the page.
