Difference between revisions of "Routing Ops"
(Created page with "Place Holder for New Routing Ops Feature") |
|||
| (40 intermediate revisions by 2 users not shown) | |||
| Line 1: | Line 1: | ||
| − | + | ||
| + | |||
| + | Advanced Call Routing - Routing Ops is a licensed feature that allows inbound calls to route based on any one of the following, to program it is found under Applications=>Routing Ops. | ||
| + | |||
| + | *Inbound CID | ||
| + | *Number Dialed | ||
| + | *Collected Digits | ||
| + | |||
| + | '''Advanced Call Routing''' - Routing Ops can be used in conjunction with a Group as a filter app, or you can set a Routing Op entry as a destination anywhere in the system. A Routing app basically consists of one or more ‘expressions’ that resolve to be either True or False. The Operation evaluates each expression sequentially in the defined order (priority). If an expression resolves as True, the caller is immediately routed to the configured route destination for that expression. If the condition is False, the Operation evaluates the next expression. If all expression evaluate to False, the Operation will perform the default behavior based on how the App was invoked (filter or destination). Note: A disabled Routing Operation skips all expressions and performs the ‘default behavior’ based on how the App was invoked. | ||
| + | |||
| + | The part Number to Purchase this License - <span style="color: rgb(0, 0, 0); font-family: Arial, Helvetica, sans-serif; line-height: 18px; background-color: rgb(219, 229, 241);">advanced_cr</span> | ||
| + | |||
| + | <br/>[[File:Application-Routing Ops-.jpg|File:Application-Routing Ops-.jpg]] | ||
| + | |||
| + | |||
| + | |||
| + | == Group Method == | ||
| + | |||
| + | If the app is invoked as a Filter for a Group, the default behavior is to do nothing (i.e. stay in the group as if the filter was never invoked). Specifically, the ‘Default Destination’ field configured on the Route Operations Edit page is ignored. | ||
| + | |||
| + | |||
| + | |||
| + | == Destination Method == | ||
| + | |||
| + | If the app is invoked as a ‘Destination’, the default behavior is to route to the 'Default Destination’ field configured on the Route Operations Edit page. | ||
| + | |||
| + | |||
| + | |||
| + | == Building a Routing Op == | ||
| + | |||
| + | [[File:Application-Routing Ops-Edit.jpg|File:Application-Routing Ops-Edit.jpg]] | ||
| + | |||
| + | |||
| + | |||
| + | |||
| + | |||
| + | {| style="width: 500px" border="1" cellpadding="1" cellspacing="1" | ||
| + | |- | ||
| + | | '''Field'''<br/> | ||
| + | | '''Function'''<br/> | ||
| + | | '''Default'''<br/> | ||
| + | |- | ||
| + | | Name<br/> | ||
| + | | Name of the Routing Op. You should rename to something clear that explains what the route does.<br/> | ||
| + | | Routing Application<br/> | ||
| + | |- | ||
| + | | Operation Type<br/> | ||
| + | | Can be set to Match List of Numbers (single variable, exact match) or Table Lookup (multivariable, exact match or mathmatical functions). Once set, this cannot be changed.<br/> | ||
| + | | Match List of Numbers.<br/> | ||
| + | |- | ||
| + | | Enabled<br/> | ||
| + | | Toggle the Op ON or OFF<br/> | ||
| + | | No<br/> | ||
| + | |- | ||
| + | | Prompt & Collect Digits<br/> | ||
| + | | Defines if the system will prompt the caller to enter digits before evaluating expressions. When you select Yes, additional fields are displayed.<br/> | ||
| + | | No<br/> | ||
| + | |- | ||
| + | | Default Destination<br/> | ||
| + | | Where a call will go if it does not meet a filtered status. (Destination method only, not needed for Group method)<br/> | ||
| + | | None<br/> | ||
| + | |- | ||
| + | | Prompt to Play<br/> | ||
| + | | Set this to a recorded prompt instructing the caller what digits to enter. Only used when Prompt & Collect Digits is set to Yes.<br/> | ||
| + | | 1-sec-silence<br/> | ||
| + | |- | ||
| + | | Number of Digits to Collect<br/> | ||
| + | | | ||
| + | Total number of digits to collect. Only used when Prompt & Collect Digits is set to Yes. | ||
| + | |||
| + | | 4<br/> | ||
| + | |- | ||
| + | | | ||
| + | Number of seconds to wait if no digits are entered | ||
| + | |||
| + | | How long the system will wait for digits to be entered. Only used when Prompt & Collect Digits is set to Yes.<br/> | ||
| + | | 10<br/> | ||
| + | |- | ||
| + | | | ||
| + | Number of Attempts to Allow Before Routing to the Failover Destination | ||
| + | |||
| + | | How many tries the system will give the caller to enter their digits before routing to the Failover Destination. Only used when Prompt & Collect Digits is set to Yes.<br/> | ||
| + | | 3<br/> | ||
| + | |- | ||
| + | | Failover Destination<br/> | ||
| + | | Where the call routes if the user does not enter digits<br/> | ||
| + | | None<br/> | ||
| + | |- | ||
| + | | Available Group Selections<br/> | ||
| + | | Groups that can be chosen to use the Group method of Routing Ops<br/> | ||
| + | | All Unselected Groups<br/> | ||
| + | |- | ||
| + | | Selected Groups<br/> | ||
| + | | List of Groups that have been added to this Routing Op<br/> | ||
| + | | None<br/> | ||
| + | |} | ||
| + | |||
| + | * Once you have created your Routing Op, you must put it in the Incoming Routes. You will need a routing op for each different destination in incoming routing.[[File:Capture.png|none|frame]] | ||
| + | * If all of the DID's go to the same destination, then you only need one routing op.[[File:Routing.png|none|frame]] <br /> | ||
| + | |||
| + | == Configuring Expressions: Match List Method<br/> == | ||
| + | |||
| + | [[File:Application-Routing Ops-Match List-Add Expression.jpg|File:Application-Routing Ops-Match List-Add Expression.jpg]] | ||
| + | |||
| + | |||
| + | |||
| + | {| style="width: 500px" border="1" cellpadding="1" cellspacing="1" | ||
| + | |- | ||
| + | | '''Field'''<br/> | ||
| + | | '''Function'''<br/> | ||
| + | | '''Default'''<br/> | ||
| + | |- | ||
| + | | Input Type<br/> | ||
| + | | Caller ID: Route by the CID of the caller<br/>Dialed Number: Route by the DID dialed by the caller<br/>Collected Digits: Route by digits entered by the caller after connecting to the PBX<br/> | ||
| + | | Caller ID<br/> | ||
| + | |- | ||
| + | | Use the Right Most<br/> | ||
| + | | Total number of digits to use in the input parameter<br/> | ||
| + | | 10<br/> | ||
| + | |- | ||
| + | | Starting in position X<br/> | ||
| + | | Starting from the left, how many digits to skip before reading to compare to parameter<br/> | ||
| + | | 0<br/> | ||
| + | |- | ||
| + | | Collect X Digits<br/> | ||
| + | | How many digits to read moving right from the starting positition<br/> | ||
| + | | 10<br/> | ||
| + | |- | ||
| + | | Match Input Parameter<br/> | ||
| + | | This is where you will enter the values that will be compared, resulting in a True or False<br/> | ||
| + | | None<br/> | ||
| + | |- | ||
| + | | If the input parameter X matches a member of the list<br/> | ||
| + | | This can be set to Matches or Does Not Match, depending on the functionality you want to result in a re-routing of the call.<br/> | ||
| + | | Matches<br/> | ||
| + | |- | ||
| + | | Route to Destination<br/> | ||
| + | | Set this to any destination on the PBX, and will trigger when the input data matches the parameters configured.<br/> | ||
| + | | None<br/> | ||
| + | |} | ||
| + | |||
| + | <br/> | ||
| + | === Example: Blocking numbers by callerID === | ||
| + | |||
| + | 1) Create the Routing Operation and name it something fitting, such as Block by CallerID | ||
| + | |||
| + | 2) Set operatoin type to match list of numbers | ||
| + | |||
| + | 3) Set enabled to Yes | ||
| + | |||
| + | 4) Set Prompt and Collect Digits to No | ||
| + | |||
| + | 5) Set your default destination to where callers should NORMALLY be directed if they are calling in on that particular DID (such as your auto attendant, schedule, ring group, etc) | ||
| + | |||
| + | [[File:Routing op main.JPG|File:Routing op main.JPG]] | ||
| + | |||
| + | Next you'll need to add an expression to build your list of matching numbers to block. | ||
| + | |||
| + | Click the Add Expression button, and on the new page follow these steps: | ||
| + | |||
| + | 1) Set Input Type to CallerID | ||
| + | |||
| + | 2) Set Use right most digits to 10 | ||
| + | |||
| + | 3) Set starting in position to 0 and collect digits to 10 | ||
| + | |||
| + | 4) In the Match Input box, put in the 10-digit callerID you wish to block and hit Add | ||
| + | |||
| + | 5) Set the input parameter to matches | ||
| + | |||
| + | 6) Set route to destination to how you want to handle blocked numbers, for example service->congestion (to give a fast busy signal) | ||
| + | |||
| + | [[File:Routing op expression.JPG|File:Routing op expression.JPG]] | ||
| + | |||
| + | Finally save changes, and it will return you to the previous page, with your expression listed. The edit button will allow you to add more numbers to be blocked, in the future as you need, without needing to build new operations or expressions each time. | ||
| + | |||
| + | [[File:Routing op final.JPG|File:Routing op final.JPG]] | ||
| + | |||
| + | |||
| + | |||
| + | Next you will need to actually insert this routing operation into your call flow on the Call Routing -> Incoming page | ||
| + | |||
| + | [[File:Routing op incoming routes.JPG|File:Routing op incoming routes.JPG]] | ||
| + | |||
| + | In the future, to change where this DID goes for non-blocked numbers, you will have to edit the routing operation's default destination from step 1 above, instead of the incoming route's destination. | ||
| + | |||
| + | == Configuring Expressions: Table Lookup Method<br/> == | ||
| + | |||
| + | [[File:Application-Routing Ops-Edit-TableLookup.jpg|File:Application-Routing Ops-Edit-TableLookup.jpg]] | ||
| + | |||
| + | |||
| + | |||
| + | *Once the Routing Op has been saved as Table Lookup method, a button reading Manage Data will appear. Click this to access the advanced methods of defining expressions available to the Table Lookup operation. | ||
| + | |||
| + | |||
| + | |||
| + | [[File:Application-Routing Ops-Table-Creation.jpg|File:Application-Routing Ops-Table-Creation.jpg]] | ||
| + | |||
| + | |||
| + | |||
| + | *Clicking Manage Data will bring up options to manually enter data into a new table, or to load a CSV file with the parameters you wish to use. | ||
| + | |||
| + | |||
| + | |||
| + | [[File:Application-Routing Ops-Table-Creation-Manual.jpg|File:Application-Routing Ops-Table-Creation-Manual.jpg]] | ||
| + | |||
| + | |||
| + | |||
| + | *Selecting Manual method will bring you to the next page, allowing you to define if the table created should have 1, 2, or 3 columns. | ||
| + | |||
| + | |||
| + | |||
| + | [[File:Application-Routing Ops-Table-Creation-Manual-Populate.jpg|File:Application-Routing Ops-Table-Creation-Manual-Populate.jpg]] | ||
| + | |||
| + | |||
| + | |||
| + | *Which takes you to the next page, allowing you to define the expressions in each column, as well as the ability to create or remove rows, allowing you to add or delete parameters. | ||
| + | |||
| + | |||
| + | |||
| + | [[File:Application-Routing Ops-Table-Creation-CSV.jpg|File:Application-Routing Ops-Table-Creation-CSV.jpg]] | ||
| + | |||
| + | |||
| + | |||
| + | *If you choose to load a CSV file, the page above will display. With this you get to define how many columns the table will have, where to import each CSV column into the Routing Ops table, and then allowing you to browse to and load the file. | ||
| + | |||
| + | |||
| + | |||
| + | [[File:Application-Routing Ops-Table-Add Expression.jpg|File:Application-Routing Ops-Table-Add Expression.jpg]] | ||
| + | |||
| + | |||
| + | |||
| + | *Regardless of whether the manual or CSV method were used to create the table, the same page will display when you back out to the Edit page for the Routing Op and click Expressions. The unique fields to this page are defined below. | ||
| + | |||
| + | {| style="width: 500px" border="1" cellpadding="1" cellspacing="1" | ||
| + | |- | ||
| + | | '''Field'''<br/> | ||
| + | | '''Function'''<br/> | ||
| + | | '''Default'''<br/> | ||
| + | |- | ||
| + | | Get value in Column X<br/> | ||
| + | | Define what colume to refer to for this comparison. Values can be 1, 2, or 3<br/> | ||
| + | | 1<br/> | ||
| + | |- | ||
| + | | as an X value<br/> | ||
| + | | Are we comparing a Text value or a Number<br/> | ||
| + | | Text<br/> | ||
| + | |- | ||
| + | | Use the Right Most X digits<br/> | ||
| + | | Total number of digits to use in the input parameter<br/> | ||
| + | | 10<br/> | ||
| + | |- | ||
| + | | Starting in position X<br/> | ||
| + | | Starting from the left, how many digits to skip before reading to compare to parameter<br/> | ||
| + | | 0<br/> | ||
| + | |- | ||
| + | | Collect X Digits<br/> | ||
| + | | How many digits to read moving right from the starting positition<br/> | ||
| + | | 10<br/> | ||
| + | |- | ||
| + | | Get value in column X as an Y value for parameter 2<br/> | ||
| + | | Define what column to read, and what type of data it will be reading for comparison of parameter 2. Column can be 1, 2, or 3. Type can be Number or Text.<br/> | ||
| + | | 2, Text<br/> | ||
| + | |- | ||
| + | | Get value in column X as an Y value for parameter 3<br/> | ||
| + | | Define what column to read, and what type of data it will be reading for comparison of parameter 3. Column can be 1, 2, or 3. Type can be Number or Text.<br/> | ||
| + | | 3, Text<br/> | ||
| + | |- | ||
| + | | <span style="display:inline-block; width:11em">If the Caller Input [Dropdown] a value in the Lookup Column And</span><br/> | ||
| + | | Is equal to OR Is not equal to are the options here, defining if you take action when there is or is not a match.<br/> | ||
| + | | Is Equal to<br/> | ||
| + | |- | ||
| + | | Table parameter two [Dropdown] ________<br/> | ||
| + | | Is equal to OR Is not equal to are the options here, defining if you take action when there is or is not a match. The text field is where you enter the expression to compare to.<br/> | ||
| + | | Is Equal to<br/> | ||
| + | |- | ||
| + | | AND/OR<br/> | ||
| + | | Choose either And OR Or. And means both must match, or means either can match.<br/> | ||
| + | | AND<br/> | ||
| + | |- | ||
| + | | Table parameter three [DropDown] ________<br/> | ||
| + | | Is equal to OR Is not equal to are the options for the dropdown, defining if you take action when there is or is not a match. The text field is where you enter the expression to compare to.<br/> | ||
| + | | <br/> | ||
| + | |- | ||
| + | | Route To Destination<br/> | ||
| + | | Where to send the call if all aprameter comparisons match<br/> | ||
| + | | None<br/> | ||
| + | |} | ||
| + | |||
| + | == Blocking Anonymous or Restricted calls == | ||
| + | Using a routing app to collect 1 digit and compare against 1,2,3,4,5,6,7,8,9,0 and if not a match, route to congestion or hangup. | ||
| + | |||
| + | * Operation type: Match List of Numbers | ||
| + | * Enable | ||
| + | * Prompt and | ||
| + | * Default Destination: Send where you want the call to go if it '''IS''' Anonymous or Restricted. | ||
| + | [[File:Routing2.png|none|frame]] | ||
| + | |||
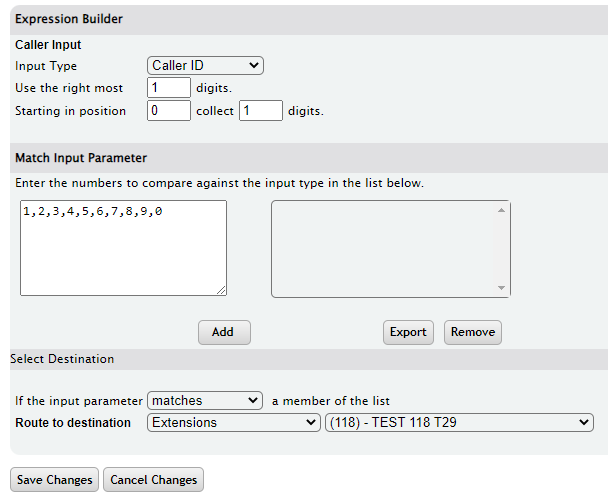
| + | * Create an Expression to collect 1 digit and compare against 1,2,3,4,5,6,7,8,9,0 and add. | ||
| + | * Route to the Destination you want the good call to go to | ||
| + | * See example below | ||
| + | * Be sure to Save Changes twice. Once on this page, and once on the main page. | ||
| + | [[File:Toute4444.png|none|frame]] | ||
| + | |||
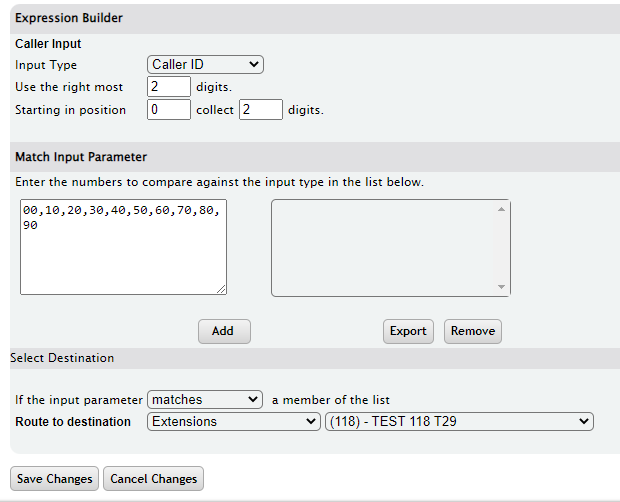
| + | * Create a second expression collecting 2 digits to compare against 00,10,20,30,40,50,60,70,80,90 and add | ||
| + | * Route to the Destination you want the good call to go to | ||
| + | * See example below | ||
| + | * Be sure to Save Changes twice. Once on this page, and once on the main page. | ||
| + | |||
| + | [[File:Routing4.png|none|frame]] | ||
| + | |||
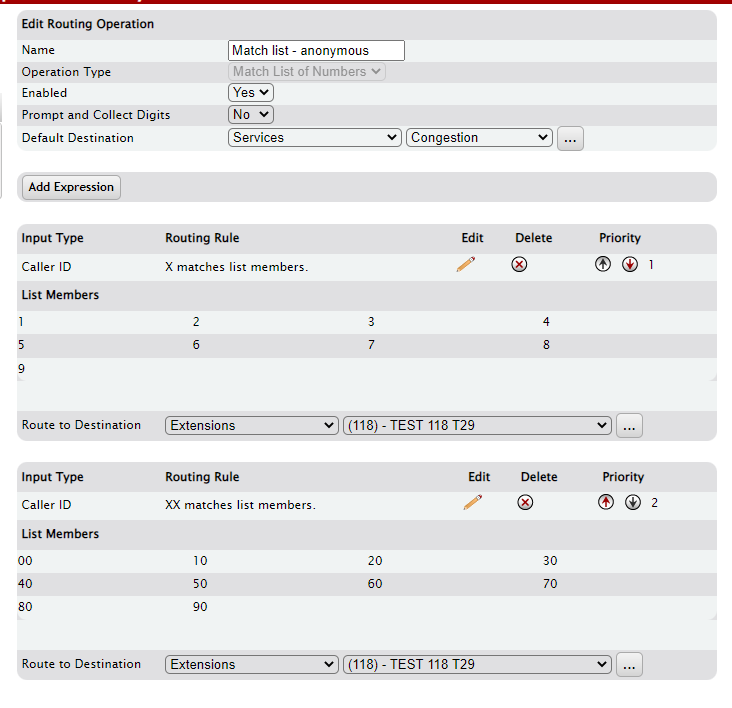
| + | * Once completed it should look like the example below. | ||
| + | * All you need to do next is insert the routing op into Incoming Call Routing on the DID you want to block the nuisance calls. | ||
| + | |||
| + | [[File:Routing5.png|none|frame]] | ||
| + | |||
| + | * Insert into Incoming Call Routing | ||
| + | |||
| + | [[File:Route666.png|none|frame]] | ||
Latest revision as of 17:14, 4 March 2022
Advanced Call Routing - Routing Ops is a licensed feature that allows inbound calls to route based on any one of the following, to program it is found under Applications=>Routing Ops.
- Inbound CID
- Number Dialed
- Collected Digits
Advanced Call Routing - Routing Ops can be used in conjunction with a Group as a filter app, or you can set a Routing Op entry as a destination anywhere in the system. A Routing app basically consists of one or more ‘expressions’ that resolve to be either True or False. The Operation evaluates each expression sequentially in the defined order (priority). If an expression resolves as True, the caller is immediately routed to the configured route destination for that expression. If the condition is False, the Operation evaluates the next expression. If all expression evaluate to False, the Operation will perform the default behavior based on how the App was invoked (filter or destination). Note: A disabled Routing Operation skips all expressions and performs the ‘default behavior’ based on how the App was invoked.
The part Number to Purchase this License - advanced_cr
Group Method
If the app is invoked as a Filter for a Group, the default behavior is to do nothing (i.e. stay in the group as if the filter was never invoked). Specifically, the ‘Default Destination’ field configured on the Route Operations Edit page is ignored.
Destination Method
If the app is invoked as a ‘Destination’, the default behavior is to route to the 'Default Destination’ field configured on the Route Operations Edit page.
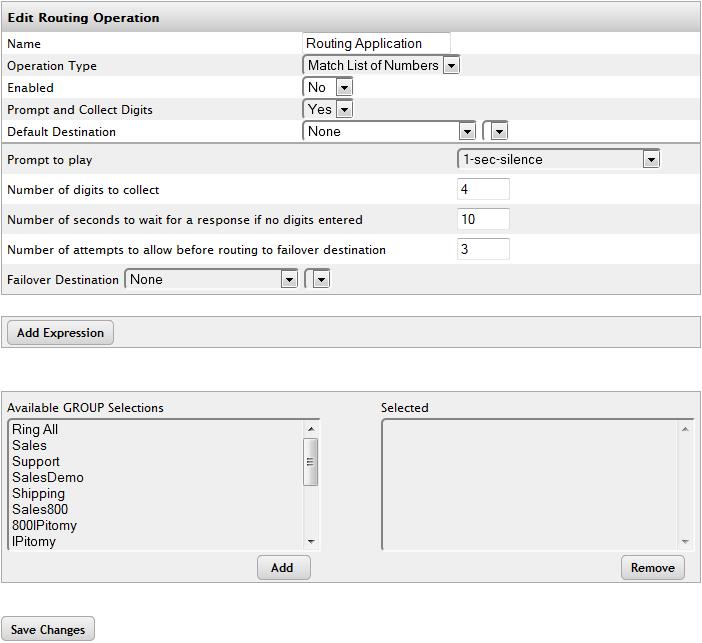
Building a Routing Op
| Field |
Function |
Default |
| Name |
Name of the Routing Op. You should rename to something clear that explains what the route does. |
Routing Application |
| Operation Type |
Can be set to Match List of Numbers (single variable, exact match) or Table Lookup (multivariable, exact match or mathmatical functions). Once set, this cannot be changed. |
Match List of Numbers. |
| Enabled |
Toggle the Op ON or OFF |
No |
| Prompt & Collect Digits |
Defines if the system will prompt the caller to enter digits before evaluating expressions. When you select Yes, additional fields are displayed. |
No |
| Default Destination |
Where a call will go if it does not meet a filtered status. (Destination method only, not needed for Group method) |
None |
| Prompt to Play |
Set this to a recorded prompt instructing the caller what digits to enter. Only used when Prompt & Collect Digits is set to Yes. |
1-sec-silence |
| Number of Digits to Collect |
Total number of digits to collect. Only used when Prompt & Collect Digits is set to Yes. |
4 |
|
Number of seconds to wait if no digits are entered |
How long the system will wait for digits to be entered. Only used when Prompt & Collect Digits is set to Yes. |
10 |
|
Number of Attempts to Allow Before Routing to the Failover Destination |
How many tries the system will give the caller to enter their digits before routing to the Failover Destination. Only used when Prompt & Collect Digits is set to Yes. |
3 |
| Failover Destination |
Where the call routes if the user does not enter digits |
None |
| Available Group Selections |
Groups that can be chosen to use the Group method of Routing Ops |
All Unselected Groups |
| Selected Groups |
List of Groups that have been added to this Routing Op |
None |
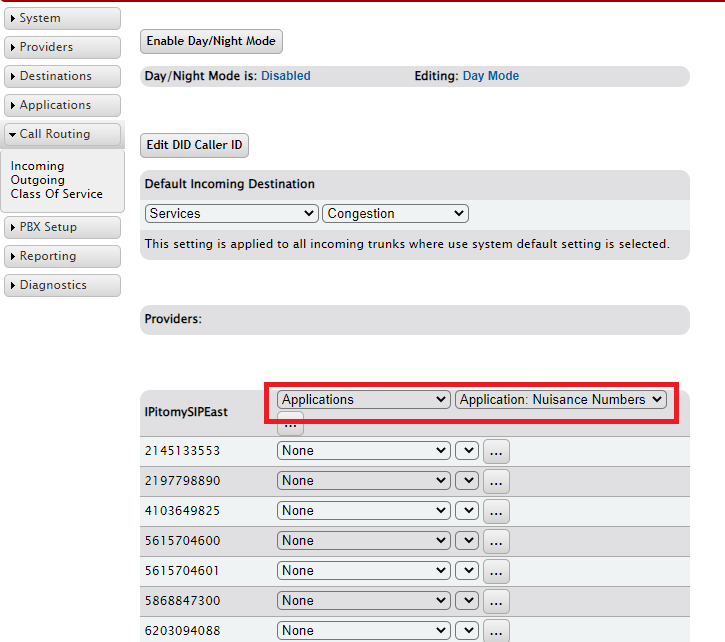
- Once you have created your Routing Op, you must put it in the Incoming Routes. You will need a routing op for each different destination in incoming routing.
- If all of the DID's go to the same destination, then you only need one routing op.
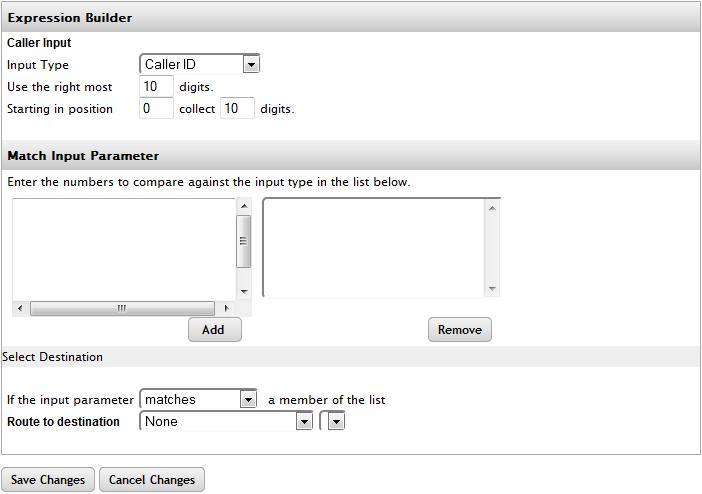
Configuring Expressions: Match List Method
| Field |
Function |
Default |
| Input Type |
Caller ID: Route by the CID of the caller Dialed Number: Route by the DID dialed by the caller Collected Digits: Route by digits entered by the caller after connecting to the PBX |
Caller ID |
| Use the Right Most |
Total number of digits to use in the input parameter |
10 |
| Starting in position X |
Starting from the left, how many digits to skip before reading to compare to parameter |
0 |
| Collect X Digits |
How many digits to read moving right from the starting positition |
10 |
| Match Input Parameter |
This is where you will enter the values that will be compared, resulting in a True or False |
None |
| If the input parameter X matches a member of the list |
This can be set to Matches or Does Not Match, depending on the functionality you want to result in a re-routing of the call. |
Matches |
| Route to Destination |
Set this to any destination on the PBX, and will trigger when the input data matches the parameters configured. |
None |
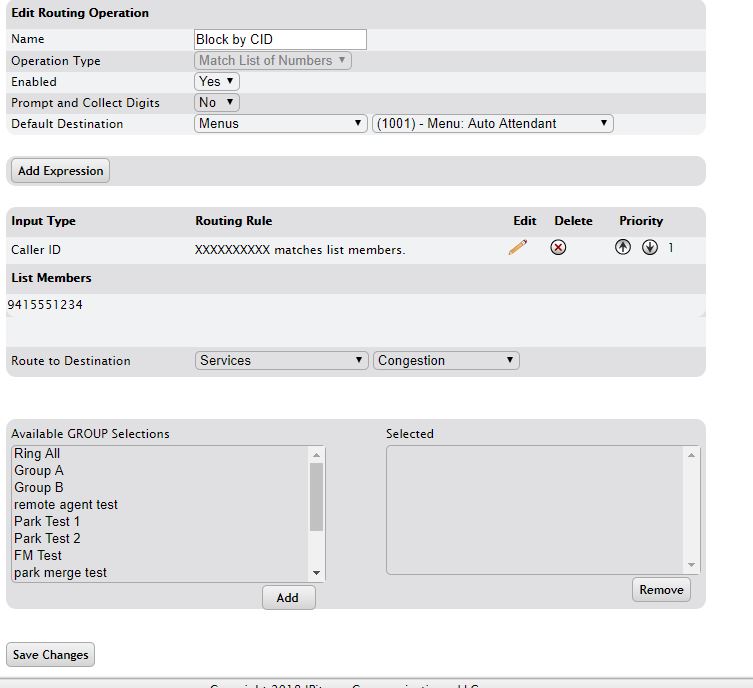
Example: Blocking numbers by callerID
1) Create the Routing Operation and name it something fitting, such as Block by CallerID
2) Set operatoin type to match list of numbers
3) Set enabled to Yes
4) Set Prompt and Collect Digits to No
5) Set your default destination to where callers should NORMALLY be directed if they are calling in on that particular DID (such as your auto attendant, schedule, ring group, etc)
Next you'll need to add an expression to build your list of matching numbers to block.
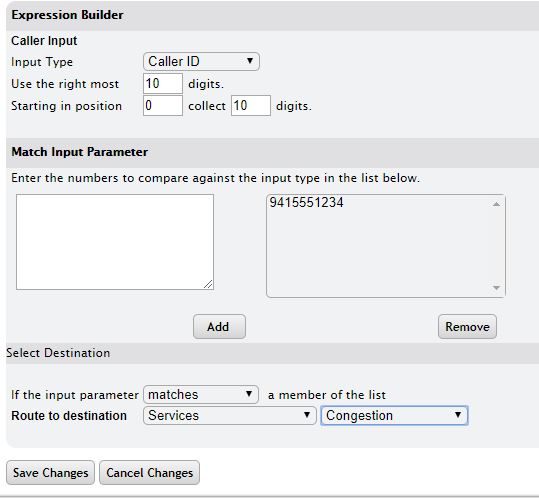
Click the Add Expression button, and on the new page follow these steps:
1) Set Input Type to CallerID
2) Set Use right most digits to 10
3) Set starting in position to 0 and collect digits to 10
4) In the Match Input box, put in the 10-digit callerID you wish to block and hit Add
5) Set the input parameter to matches
6) Set route to destination to how you want to handle blocked numbers, for example service->congestion (to give a fast busy signal)
Finally save changes, and it will return you to the previous page, with your expression listed. The edit button will allow you to add more numbers to be blocked, in the future as you need, without needing to build new operations or expressions each time.
Next you will need to actually insert this routing operation into your call flow on the Call Routing -> Incoming page
In the future, to change where this DID goes for non-blocked numbers, you will have to edit the routing operation's default destination from step 1 above, instead of the incoming route's destination.
Configuring Expressions: Table Lookup Method
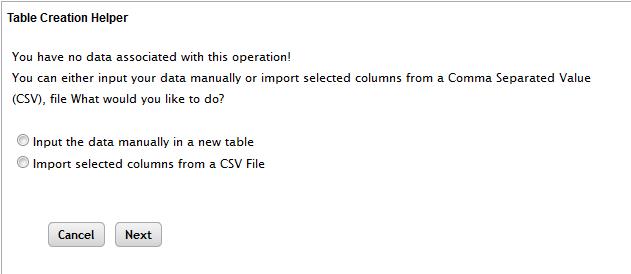
- Once the Routing Op has been saved as Table Lookup method, a button reading Manage Data will appear. Click this to access the advanced methods of defining expressions available to the Table Lookup operation.
- Clicking Manage Data will bring up options to manually enter data into a new table, or to load a CSV file with the parameters you wish to use.
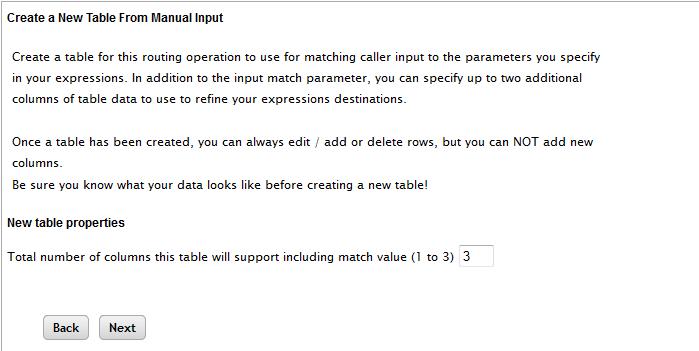
- Selecting Manual method will bring you to the next page, allowing you to define if the table created should have 1, 2, or 3 columns.
- Which takes you to the next page, allowing you to define the expressions in each column, as well as the ability to create or remove rows, allowing you to add or delete parameters.
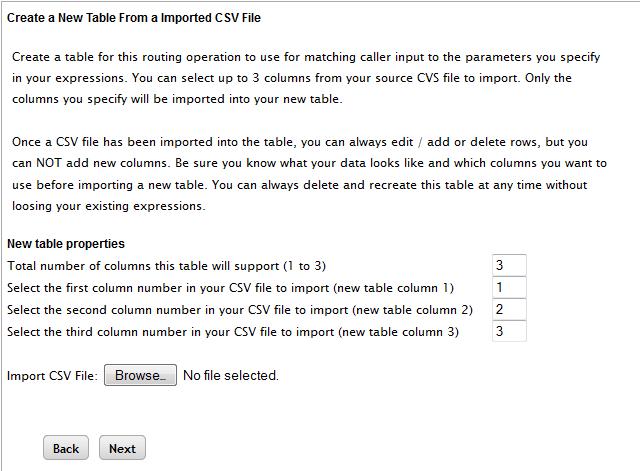
- If you choose to load a CSV file, the page above will display. With this you get to define how many columns the table will have, where to import each CSV column into the Routing Ops table, and then allowing you to browse to and load the file.
- Regardless of whether the manual or CSV method were used to create the table, the same page will display when you back out to the Edit page for the Routing Op and click Expressions. The unique fields to this page are defined below.
| Field |
Function |
Default |
| Get value in Column X |
Define what colume to refer to for this comparison. Values can be 1, 2, or 3 |
1 |
| as an X value |
Are we comparing a Text value or a Number |
Text |
| Use the Right Most X digits |
Total number of digits to use in the input parameter |
10 |
| Starting in position X |
Starting from the left, how many digits to skip before reading to compare to parameter |
0 |
| Collect X Digits |
How many digits to read moving right from the starting positition |
10 |
| Get value in column X as an Y value for parameter 2 |
Define what column to read, and what type of data it will be reading for comparison of parameter 2. Column can be 1, 2, or 3. Type can be Number or Text. |
2, Text |
| Get value in column X as an Y value for parameter 3 |
Define what column to read, and what type of data it will be reading for comparison of parameter 3. Column can be 1, 2, or 3. Type can be Number or Text. |
3, Text |
| If the Caller Input [Dropdown] a value in the Lookup Column And |
Is equal to OR Is not equal to are the options here, defining if you take action when there is or is not a match. |
Is Equal to |
| Table parameter two [Dropdown] ________ |
Is equal to OR Is not equal to are the options here, defining if you take action when there is or is not a match. The text field is where you enter the expression to compare to. |
Is Equal to |
| AND/OR |
Choose either And OR Or. And means both must match, or means either can match. |
AND |
| Table parameter three [DropDown] ________ |
Is equal to OR Is not equal to are the options for the dropdown, defining if you take action when there is or is not a match. The text field is where you enter the expression to compare to. |
|
| Route To Destination |
Where to send the call if all aprameter comparisons match |
None |
Blocking Anonymous or Restricted calls
Using a routing app to collect 1 digit and compare against 1,2,3,4,5,6,7,8,9,0 and if not a match, route to congestion or hangup.
- Operation type: Match List of Numbers
- Enable
- Prompt and
- Default Destination: Send where you want the call to go if it IS Anonymous or Restricted.
- Create an Expression to collect 1 digit and compare against 1,2,3,4,5,6,7,8,9,0 and add.
- Route to the Destination you want the good call to go to
- See example below
- Be sure to Save Changes twice. Once on this page, and once on the main page.
- Create a second expression collecting 2 digits to compare against 00,10,20,30,40,50,60,70,80,90 and add
- Route to the Destination you want the good call to go to
- See example below
- Be sure to Save Changes twice. Once on this page, and once on the main page.
- Once completed it should look like the example below.
- All you need to do next is insert the routing op into Incoming Call Routing on the DID you want to block the nuisance calls.
- Insert into Incoming Call Routing

