Difference between revisions of "IP PBX Manual Destinations Extensions"
Drew Harrell (talk | contribs) |
Drew Harrell (talk | contribs) m |
||
| (4 intermediate revisions by the same user not shown) | |||
| Line 1: | Line 1: | ||
__NOTITLE__ | __NOTITLE__ | ||
| + | {{IP_PBX_Manual|sortkey=Extensions}} | ||
| − | = Extensions Overview< | + | <span style="font-size:x-large">Extensions Overview</span> |
| − | {{:IPPBX IMM SystemAdminDestinationsExtAddDel}} | + | |
| − | {{:IPPBX IMM SystemAdminDestinationsExtProvAutoDiscovery}} | + | |
| + | {{:IPPBX IMM SystemAdminDestinationsExtAddDel}} | ||
| + | {{:IPPBX IMM SystemAdminDestinationsExtProvAutoDiscovery}} | ||
{{:IPPBX IMM SystemAdminDestinationsExtEditPhoneSettings}} | {{:IPPBX IMM SystemAdminDestinationsExtEditPhoneSettings}} | ||
Latest revision as of 20:11, 7 September 2012

Extensions Overview
Extensions
Extensions define where specific people or departments can be reached in an organization. They should be setup first in the system. The following is a list of the various settings/parameters that will can be updated for each extension. The parameters you configure for the extensions will vary based on the customer’s general business practices.
- General Settings
- Forwarding Settings
- Advanced Network Settings
- Advanced Voicemail Settings
- Advanced Allow Codecs Settings
- Advanced Calling Permissions
- Advanced Follow-Me
Add/Import Tab
The Add/Import tab allows you to create new extensions or edit existing extensions.
Use the Setup Worksheet to upload the CSV file and automatically create the Extension information. Please refer to the Setup Worksheet section of this guide for details.
| Sections/Fields | |
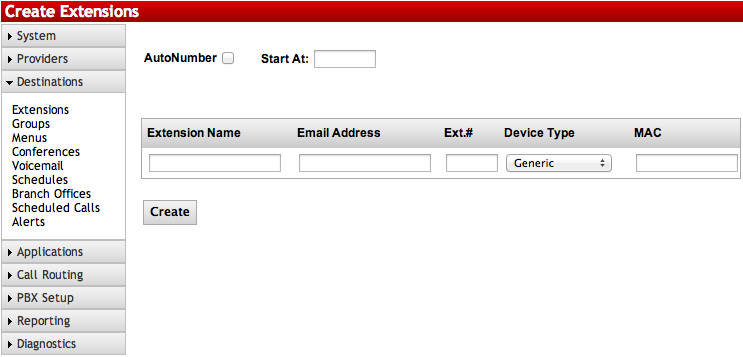
| Extension Name | This is the name of the person that the extension will be assigned to (using this device). |
| Email Address | This is the user’s email address (optional) |
| Ext. # | The extension number that is assigned to this device. |
| Device Type | This is the type of device that will be using this extension (i.e. IP550). |
| MAC | This is the MAC ID of the device (optional). |
| AutoNumber/Start At | Selecting this option allows you to automatically number the extensions that you need to add. To use this feature, simply enter the extension number you want to start with then select (place a checkmark) the AutoNumber option. |
Table 15Create Extension Fields and Descriptions
Add/Create Extensions
This section describes in detail how to create a new extension.
STEPS:
- From any page of the PBX Admin system, click on the button next to the Destinations link to expand the menu. The Destination menu opens and displays the options available.
- Click on the Extensions link. The Extensions page opens and displays a listing of extensions (if ones already exists).
- Click on the box to the left of the Extensions field. This value defaults to “10”. Enter the number of extensions you want to add and then click the ADD button.
- The Create Extensions page appears displaying the number of rows that was specified. Enter information for the extension in these fields. See table above for details.
- You can have the system automatically number the extensions you want to create by clicking the AutoNumber checkbox located on the top left hand corner of the Create Extensions page.
- Click on the CREATE button when all the extension information you want to create is entered. The system responds with a message indicating the results of adding the new extension(s). You should see a “SUCCESS” message.
- If there is an error, you will see an “ERROR” indicated under the Results field. An error is typically due to an extension number that is being duplicated (already existing in the system). Make the necessary adjustments to correct the error then click the CREATE button.
- Click on the
 button, to save the changes.
 - Select the Apply Changes link located on the right hand corner of the page, to commit the changes to the database.
Search Tab
This tab allows the user to search the extensions for keywords in the fields: Class of Service, Departments, Name, Numbers, CID Names, CID Numbers, Email, or Status .This section describes in detail how to search for existing extensions.
The following table describes the types of search parameters the system will perform.
| Sections/Fields | |
| Class of Service | This is the class of service that is assigned to the extension(s). |
| Departments | This is the department that is assigned to the extension(s). |
| Names | This is the name of the user assigned to the extension(s). |
| Numbers | This is the extension number. |
| CID Names | The caller ID name that is associated with the extension(s). |
| CID Numbers | This is the caller ID number that is associated with the extension(s). |
| Emails | Email address that is associated with the extension(s). |
| Status | This is the status of the extension(s). |
| Match Search Filter | Exactindicates that you want the search to match exactly as the search criteria that is entered.
Partialindicates that you want to partially match the search criteria entered. |
Search Extension
This section describes how to search for extensions.
STEPS:
- From the Extensions page, click the Search Tab. The list of extensions that are in the system appears with search options at the top section of the page.
- Click the
 drop-down arrow icon next to the Class of Service list.
Select the desired search criteria then enter the parameters in the box to the right of the list then click the Search button. If the system finds any extensions matching your search parameter, it will display the information in the extensions window.
If the field is left blank, the system will bring all the extensions.
View Tab (Extensions)
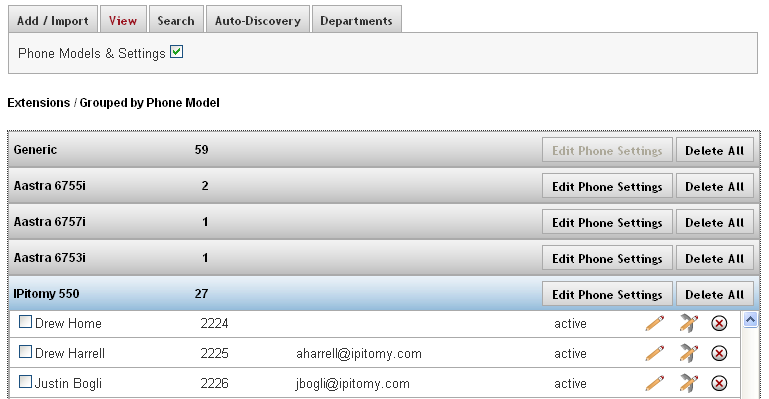
This tab allows the user to sort the display of extensions by Phone Model. Once sorted, phone key settings can be mass edited for phones of the same model. This section describes in detail how to view existing extensions.
Edit or View Extension
This section describes in detail how to view or edit extension details.
STEPS:
- Navigate to the Destinations=>Extensions page.
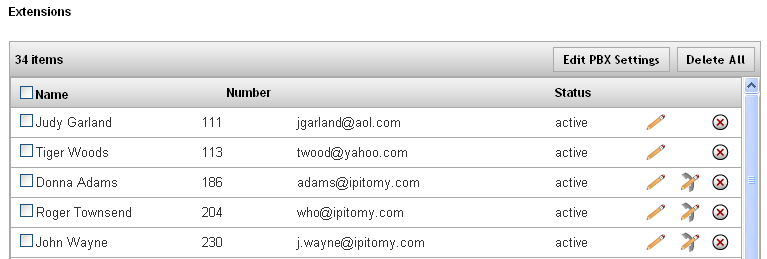
- Select the
 or the
  icon to the right of the extension name you want to view or edit. The pencil edits the PBX settings and the pencil with the handset behind it edits the Phone settings.
 - The Edit Extensions page displays with setting details for the extension.
- Make the necessary changes to the extension.
- Click on the
 button to save the changes.
 - Click the Apply Changes link located at the right hand corner of the top of the page, to commit the changes to the database.
You can edit multiple extensions by selecting (placing a checkmark in the box next to extension name). Only the fields being changed (that is common for all extensions selected) will be modifiedi.e. Status or call group, etc.).
Another shortcut that the system provides you is the Previous and Next button located on the top left corner of the Edit Extension page. Use these buttons to navigate backward or forward to find the extensions you want to view or modify.
Mass Edit PBX Extension Settings
This section describes in detail how to view or edit extension details.
STEPS:
- From the Destinations=>Extensions page, click on the View tab. A list of extensions appears.
You can sort the list by phone model by selecting (placing a checkmark) thePhone Model & Settings option located in the top left hand corner of the screen. If you are using this method, you can also Mass Edit Phone Key settings. See the section below for steps.
- Select (place a checkmark) in the box next to the extension name(s) you want to view or edit.
- Click on the Edit PBX Settings button. The extension details page appears. On the top left corner of the screen, you will see the extension numbers that you are viewing or editing.
- Make the necessary changes to the extension settings then click on the
 button to save the changes.
 - Click the Apply Changes link located at the right hand corner of the top of the page, to commit the changes to the database.
Mass Edit Phone Key Settings
This section of the Administration Guide describes how to mass edit the key settings for extensions using the same phone model.
STEPS:
- From the Destinations->Extensions page, click on the View tab.
- Select the Phone Models and Settings option at the top left hand corner of the list.
- The system will display a list of the extensions in a grouping of phone types. Select the group of phones you want to edit. A listing of all the extensions in the phone group will appear.
- Select the box next to the name of the extensions you want to update or click on box next to the Name field at the top of the column to select all the extensions.
- Click the Edit Phone Settings button. The system will take you to the Key Settings page for the phones. At the top of the page you will see a list of all the extensions that you are updating.
- By default, the Only Save Changed Fields option Is selected, de-select if needed.
- Once all the changes are made, select the Save and Restart Phone button to save changes and reboot the phones so they can pull down their updated configuration file.
Delete Extension
This section describes in detail how to delete existing extensions.
STEPS:
- Navigate to the Destinations->Extensions page
- Select the
 icon to the right of the extension name you want to Delete
 - The extension is deleted and a confirmation message will appear. Click OK on the message window.
- The system returns you to the Extensions page. The extension that was just deleted will no longer appear on the list of extensions.
- Click the Apply Changes link located at the top right hand corner of the page, to commit the changes to the database.
Delete Multiple Extension
This section describes in detail how to delete multiple extensions.
STEPS:
- Navigate to the Destinations=>Extensions page
- Select (place a checkmark) in the boxes next to the extension name(s) you want to delete.
- Click on the Delete All button. The selected extension will be removed from the list and deleted from the database.
- Click the Apply Changes link located at the top right hand corner of the page, to commit the changes to the database.
Extensions - General Settings Section
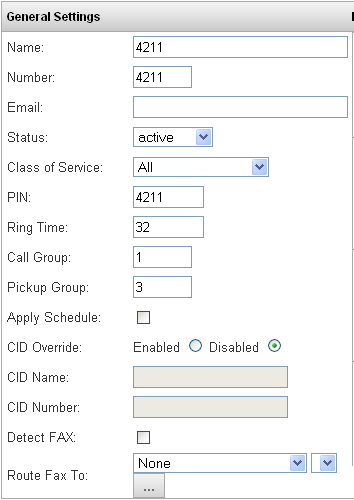
Once the extensions have been added to the database, you can edit the settings for each of the extensions.
| Sections/Fields | |
| Name | Name of the user associated with the extensions being created |
| Number | Extension number for this person or department. This must be 3 to 4 digits in length |
| Email address for the person assigned to the extension. This will allow the system to forward email messages to the address of the person at the extension when properly configured. | |
| Status | Active = currently in use
Disabled = currently not in use |
| Class of Service | This is the service type for the extension. When initially created, the PBX will set this to the COS you have definined as the system default class of service on the PBX SetupGeneral Page |
| PIN | This is the number used to access the extensions voicemail and can be between 1 and 6 digits long. The default setting is for the PIN to be the extension number. Be sure to instruct users to change the PIN to avoid unauthorized use. |
| Ring Time | This is the time in seconds that a call will ring before it is considered unanswered. Ring time must be between 1 and 100 seconds in length. |
| Call Group | This number assigns this extension to a group with a similar purpose (e.g., Sales or Customer Service). Multiple call groups can be assigned to each extension by putting a comma between the group numbers. The call groups also define which Pickup Groups can answer calls to this extension. |
| Pickup Group | This number should match any Call Group number entered on an extension. It defines the Call Group Numbers this extension can pickup remotely by pressing 99. |
| Apply Schedule | When an extension is created, a schedule destination is created automatically. This schedule is not activated until the Apply Schedule box is selected. When it is selected, all calls sent directly to this extension must first pass through the extension’s schedule and will be routed accordingly. Extension schedules will appear with the name of the extension (e.g., Extension 123 would appear as “ext_123”). (See the Schedules section of this guide for more information.) |
| CID Override | If enabled, the user will be able to override the Caller ID settings. When the user places a call, the original assigned CID will be bypassed and the name and number will that is entered in the CID Name and Number fields will be sent instead. Always check with your provider that CID override is allowed before configuring. |
| CID Name | If the CID Override parameter is enabled, this is the Caller ID name that will be seen by the recipient when an outbound call is placed. Always check with your provider that CID override is allowed before configuring. |
| CID Number | If the CID Override parameter is enabled, this is the Caller ID number that will be seen by the recipient when an outbound call is placed. Always check with your provider that CID override is allowed before configuring. |
| Detect Fax | If checked, calls from an Analog or T1/PRI card that route direct to this extension will spend a period of time (Defined under PBX SetupGeneral) checking if the call is a fax. During this time, the PBX holds the call; if fax tone is detected, the call will be passed along to the destination defined for Route Fax To, otherwise it will pass the call to the extension after the detection time has expired. Note: Fax detect does not work on inbound calls from a SIP trunk. |
| Route Fax To | Define where calls will be routed if fax tone is detected. |
Table 17General Extension Settings and Descriptions
Extensions - Forward Settings Section
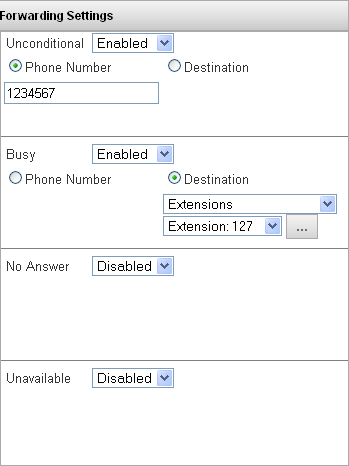
The extensions forwarding settings are made to be very user friendly. The settings may be modified from the Smart Personal Console, changed from your telephone extension, or changed remotely from any telephone (including cell phones), using the touch-tone key pad.
Forward settings routes calls to a different destination. These settings can be:
| Sections/Fields | |
| Unconditional | Always route calls to a specific destination. |
| Busy | Route calls to a specific destination when the extension is Paused, or when the user Rejects/Ignores the call via softkey. |
| No Answer | Route calls to a specific destination when a call is not answered in the defined Ring Time |
| Unavailable | Route calls to a specific destination when a phone is turned off, is not registered with the system, or has reached its call limit (as set in the IPitomy IP PBX). |
Table 18Extension Forward Settings and Descriptions
Enable/Disable Forward Settings
The following outlines steps to enable or disable forward settings:
STEPS:
- Pick the setting to be modifiedUnconditional, Busy, No Answer or Unavailable.
- Select Enabled or Disabled. Disabled turns the forward setting off. Enabled turns the forward setting on.
- Select either Phone Number or Destination. Phone Number allows you to enter the digits you want dialed, like a PSTN number. Destination will bring up the standard dropdown list of destinations in the system; Extensions, Groups, etc.
- Enter the Phone Number or select the Destination you would like the PBX to route to when meeting the forwarding requirements.
- Click the
 button to save the changes. The system returns you to the Edit Extensions page.
 - Click the Apply Changes link located on the right hand corner of the page, to commit the changes to the database.
Change Unconditional Forwarding via Keypad
STEPS:
Only unconditional forwarding can be changed from a touch-tone keypad. Enter the following code to set the unconditional forwarding setting.
- Dial *90 to disable forwarding.
- Dial *91 to enable forwarding.
- Dial *92 to set the forwarding number.
Change Unconditional Forwarding via PC
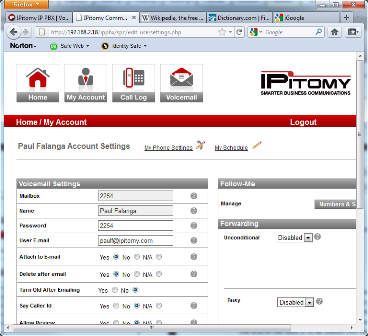
The following outlines the steps for the end user to change the extension forwarding setting from a PC using the Smart Personal Console. The administrator will need to have enabled Allow User to control Forwarding under the extensions calling permissions.
STEPS:
- Browse the internet to the Smart Personal Console page.
- Login.
- Click the My Account link to access the forwarding page.
- Enable/Disable the desired forwarding setting.
- Select either Phone Number or Destination. Phone Number allows you to enter the digits you want dialed, like a PSTN number. Destination will bring up the standard dropdown list of destinations in the system; Extensions, Groups, etc.
- Enter the Phone Number or select the Destination you would like the PBX to route to when meeting the forwarding requirements.
- Click the
 button to save the changes
Change Forwarding Number While Away from an Extension
Only unconditional forwarding can be changed from a touch-tone keypad.
STEPS:
- Call into the Automated Attendant (menu).
- Select the touch-tone digit that routes to the Forwarding Gateway.
- The system will prompt for an Extension Number and Password.
- The system will indicate if extension forwarding is Enabled or Disabled.
- Pressing “1” toggles between Enabled and Disabled.
- Pressing “2” allows the forwarding destination to be modified.
Extensions - Advanced Settings
Extensions - Network Settings Section
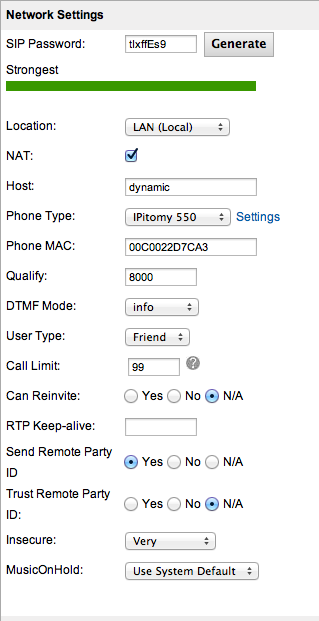
Network settings automatically register in the extension through the system. These settings represent registration and identification information. The system (extension) defaults should not be changed without advanced knowledge of the behaviors of the particular settings.
| Sections/Fields | ||||
| SIP Password | Password for the user to access IP PBX web-based administration system. Use a combination of uppercase letters, lowercase letters, and numbers. | |||
| Generate | If clicked, the system will automatically generate a password for the extension. | |||
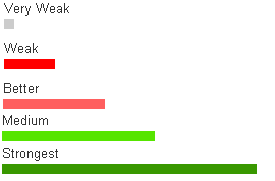
| Password Strength | This color code bar indicates the strength of the password being assigned for the extension. The strengths are represented with the following colors:
| |||
| Location | This allows the user to tell the PBX whether to expect this extension to register as a local extension (LAN) or as a remote extension (WAN). | |||
| NAT |
| |||
| HOST |
| |||
| Phone Type | The phone type is a drop down list for selecting which IP phone hardware is being used on the extension. IPitomy supports Aastra phones as well as our own IP550 and IP120 phones, and will be adding additional phone types in the future. When the phone type is selected, another configuration option is available to program the button mapping of each telephone model. The IPitomy IP PBX supports a variety of pre-programmed buttons like BLF, park, voicemail, as well as custom configurable speed dial buttons. Each phone can be configured for its own unique set of buttons. | |||
| Phone MAC | All of the IP phones have a MAC Address. The MAC ID identifies the piece of equipment for configuration. The auto configuration features of IPitomy rely on the MAC address to load the proper configuration files into the telephone when changes are made in the Web-based interface. The configuration files are stored on the IPitomy IP PBX and used when the phone powers back on after a power down cycle. If the configuration files have been updated when the phone powers back on, a new configuration is loaded into the phone. When the new configuration file is loaded, manual settings on the phone take priority and will be kept intact during the upgrade. Note that at this time only Aastra phones require and utilize the MAC address in the phone settings. | |||
| Qualify | This is the interval of time between checking registration for the phone. Default is set to 8000 and should not be changed unless instructed by an IPitomy representative. | |||
| DTMF Mode | This is where you set what kind of DTMF signaling the extension will use. The dropdown lists options are:
| |||
| User Type | This is defaulted to Friend and should not be changed unless instructed to do so by an IPitomy representative. | |||
| Call Limit | This is the number of concurrent calls allowable at an extension. The Call Limit selected must be between 1 and 99. Default is set to 4. It needs to be above 0 for BLF keys to function. | |||
| Can Reinvite | This parameter allows a device to reconnect calls midstream.
| |||
| RTP Keep-alive | Number of seconds, when a RTP Keepalive packet will be sent if no other RTP traffic on that connection. Default 0 (no RTP Keepalive) | |||
| Send Remote Party ID | no : If a Remote-Party-ID SIP header should be sent. Default no | |||
| Trust Remote Party ID | no : If Remote-Party-ID SIP header should be trusted. Default no | |||
| Insecure | This parameter allows you to specify how to handle connections with peers. Explanation of the different options available on the drop-down list are:
| |||
| Music On Hold | This setting allows the user to select a different Music On Hold playlist for their extension then the system default playlist. | |||
Table 19Extensions Advanced Networking Settings and Descriptions
Edit Extensions - Network Settings
STEPS:
- From the Edit Extensions page, locate the extension that you want to update. Click the
 (edit extensions) icon to the right of the name.
You can also edit multiple extensions by selecting (placing a checkmark) in the boxes to the left of the extensions you want to update. Click the Edit PBX Settings button located at the top right hand corner of the list.You will see the extensions that are currently being updated. Make sure that the “Only save the changed fields” box is selected.
- The Extension Details page appears. Select the link Advanced to open the Advanced Settings page.
- Make the necessary changes in the Network Settings section of the page.
- Click the
 button to save the changes. The system returns you to the Edit Extensions page.
 - Click the Apply Changes link located on the right hand corner of the page, to commit the changes to the database.
Extensions - Voicemail Settings Section
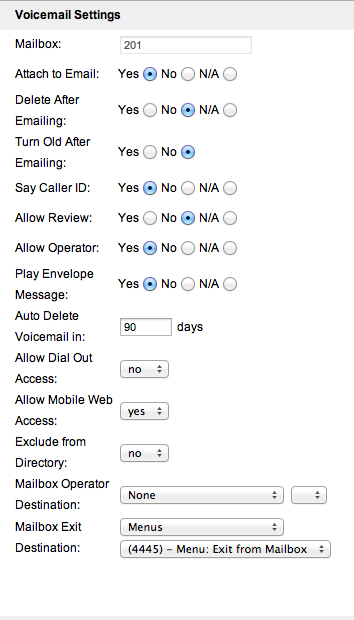
These settings manage voicemail messaging and routing. Mailboxes created when the extension is built can either be edited on the Advanded section of the extension or on the Voicemail section under Destinations.
This table describes the voicemail setting options for each extension.
| Sections/Fields | |
| Mailbox | This is the number associated with the extension. |
| Attach to Email | Select to enclose the message received in a notification e-mail as an attachment to the email address entered for the extension. An audio file (.Wav) will be the attachment. This requires for Unified Messaging to be configured on the PBX.
YES = attach message to email. NO =do not attach message to email. N/A = accepts the system wide default defined under PBX Setup=>Voicemail. If the default setting is acceptable and works within your business, we recommend leaving the parameter set to N/A. |
| Delete After Emailing | Delete the voicemail after it has been emailed to the email address provided for the extension in General Settings.
YES = delete message after emailing. NO = do not delete message after emailing. N/A = accepts the system wide default defined under PBX Setup=>Voicemail. If the default setting is acceptable and works within your business, we recommend leaving the parameter set to N/A. Note: This option should not be enabled with turn old after emailing. If you enable both, the message will not be emailed but it will be deleted. |
| Turn Old After Emailing | After emailing, the system moves the voicemail message to the Old folder.
YES = will move message to Old messages folder after emailing. NO = messages will not be moved after emailing. Note: This option should not be enabled with delete after emailing. If you enable both, the message will not be emailed but it will be deleted. |
| Say Caller ID | State Caller ID prior to playback of the message.
YES = play caller id prior to message content. NO = do not play caller id prior to message content. N/A = accepts the system wide default defined under PBX Setup=>Voicemail. If the default setting is acceptable and works within your business, we recommend leaving the parameter set to N/A. |
| Allow Review | Allow callers to review a message after they have recorded it.
YES = give callers leaving messages the option to review and rerecord the message they are leaving. NO = do not give callers the option to rerecord. N/A = accepts the system wide default defined under PBX Setup=>Voicemail. If the default setting is acceptable and works within your business, we recommend leaving the parameter set to N/A. |
| Allow Operator | Allow pressing “0” during the voicemail greeting to reach the system-wide operator.
YES = allow dialing 0 from mailbox. NO = disallow dialing 0 from mailbox. N/A = accepts the system wide default defined under PBX Setup=>Voicemail. If the default setting is acceptable and works within your business, we recommend leaving the parameter set to N/A. |
| Play Envelope Message | Play the time of call prior to the message.
YES = enabled. NO = disabled. N/A = accepts the system wide default defined under PBX Setup=>Voicemail. If the default setting is acceptable and works within your business, we recommend leaving the parameter set to N/A. |
| Auto Delete Voicemail In | Define the number of days in which voicemail messages are to be automatically deleted from a mailbox. If this is set to “0” (zero) the voicemail message will never expire. |
| Allow Dial Out Access | This allows the ‘Dial Out’ feature when a user is listening to their voicemail. |
| Allow Mobile Web Access | Default is No. Set to yes to allow users to use the Mobile App as well as their Smart Personal Console. |
| Exclude from Directory | This indicates whether to exclude this extension from the directory. |
| Mailbox Operator | If a caller presses “0” (zero) while listening to your mailbox greeting, the caller will be routed to this destination. Also, this is where a user will be sent if he dials ”0” from this extension. Set this to None to use the system default which is set under PBX SetupGeneral. |
| Mailbox Exit Destination | The Mailbox Exit Destination is where the system will route a caller who presses # when they finish leaving a voicemail message. Setting this to None will use the system default, which is set under PBX SetupGeneral. |
Edit Voicemail Settings
The following outlines the steps to set voicemail parameters.
STEPS:
- From the Edit Extensions page, locate the extension that you want to update. Click the
 (edit extensions) icon to the right of the name.
You can also edit multiple extensions by selecting (placing a checkmark) in the boxes to the left of the extensions you want to update. Click the Edit PBX Settings button located at the top right hand corner of the list.You will see the extensions that are currently being updated. Make sure that the “Only save the changed fields” box is selected.
- The Extension Detail page appears. Select the link to open the Advanced Settings page.
- Make the necessary changes in the Voicemail Settings section of the page.
- Click the
 button to save the changes. The system returns you to the Edit Extensions page.
 - Click the Apply Changes link located on the right hand corner of the page, to commit the changes to the database.
Extensions - Allow CODECs Section
These transmission speeds are configured by the service provider and designed to automatically register in the extension through the system.
| Sections/Fields | |||
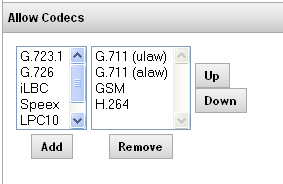
| CODEC Permissions (Allow CODECs) | Allows the administrator to define which codec the extension should use, and specify a priority from top down.
|
Edit CODEC Settings
The following outlines the steps to set CODECs parameters.
STEPS:
- From the Edit Extensions page, locate the extension that you want to update. Click the
 (edit extensions) icon to the right of the name.
You can also edit multiple extensions by selecting (placing a checkmark) in the boxes to the left of the extensions you want to update. Click the Edit PBX Settings button located at the top right hand corner of the list.You will see the extensions that are currently being updated. Make sure that the “Only save the changed fields” box is selected.
- The Extension Detail page appears. Select the Advanced link to open the Advanced Settings page.
- Make the necessary changes in the Allow CODECs Settings section of the page. Clicking Up or Down when highlighting a codec will allow you to raise or lower its usage priority.
- Click the
 button to save the changes. The system returns you to the Edit Extensions page.
 - Click the Apply Changes link located on the right hand corner of the page, to commit the changes to the database.
Extensions Calling Permissions Section
Calling permissions define the types of calls that can be sent and received from an extension and the call actions this extension can take. For example, you may want to limit who has the ability to monitor another extension.
The following table describes the settings for an extension’s calling permissions.
| Sections/Fields | |
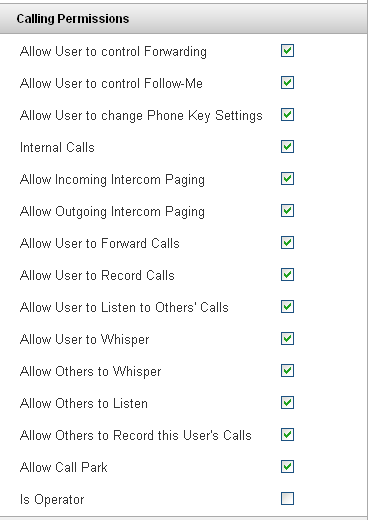
| Allow User to Control Forwarding | If Enabled (checked), this allows the user to modify their forwarding and schedule settings when they log into the Smart Personal Console user interface. |
| Allow User to Control Follow-Me | If Enabled (checked), this allows the user to modify their Follow-Me settings when they log into the Smart Personal Console user interface. |
| Allow User to Control Phone Key Settings | If Enabled (checked), this allows the user to modify their Phone Key settings when they log into the Smart Personal Console user interface. |
| Internal Calls | If Enabled (checked), this permits calls made from internal extensions. |
| Allow Incoming Intercom Paging | If Enabled (checked), this permits a page to be heard through this extension. |
| Allow Outgoing Intercom Paging | If Enabled (checked), this permits a page to be made through this extension. |
| Allow User to Forward Calls | If Enabled (checked), this permits an extension to forward a call or voicemail message to another destination on the system. |
| Allow User to Record Calls | If Enabled (checked), this permits the extension to record phone conversations. |
| Allow user to Listen to Others’ Calls | If Enabled (checked), this allows the user to listen to other user’s phone conversations. |
| Allow User to Whisper | If Enabled (checked), this allows the user to whisper to another user during a phone conversation. Whisper is similar to Listen but you can coach and only the person at the extension can hear. |
| Allow Others to Whisper | If Enabled (checked), other extensions can Whisper to your extensions calls |
| Allow Others to Listen | If Enabled (checked), other extensions can Listen to your extensions calls |
| Allow Others to Record this User’s Calls | If Enabled (checked), other extensions can Record calls at your extension |
| Allow Call Park | If Enabled (checked), this permits extension to park a call. |
| Is Operator | If Enabled (checked), the extension is designated as an operator. Being an operator allows the extension to control Day/Night mode overrides. |
Add/Edit Calling Permissions
The following outlines the steps to set calling permissions for extensions.STEPS:
- From the Edit Extensions page, locate the extension that you want to update. Click the
 (edit extensions) icon to the right of the name.
You can also edit multiple extensions by selecting (placing a checkmark) in the boxes to the left of the extensions you want to update. Click the Edit PBX Settings button located at the top right hand corner of the list.You will see the extensions that are currently being updated. Make sure that the “Only save the changed fields” box is selected.
- The Extension Detail page appears. Select the Advanced link to open the Advanced Settings page.
- Make the necessary changes in the Calling Permissions section of the page.
- Click the
 button to save the changes. The system returns you to the Edit Extensions page.
 - Click the Apply Changes link located on the right hand corner of the page, to commit the changes to the database.
Extensions - Follow-Me Section
The Follow Me feature allows the PBX to try and find a user by calling pre-configured numbers, simultaneously or in sequence of priority. Once answered, the called party is given the option to accept or reject the call. If the call is rejected, or not answered at all, the call will return to the PBX allowing the caller to leave a Voice Mail message.
To use Follow-Me, you can point a Menu destination or a DID to route direct to Follow-Me, or you can set an extension up to use a schedule that points to the Follow-Me at a given time. You can also use forwarding to get to Follow-Me, a typical use would be to have the NoAnswer forwarding to to Follow-Me so a call will ring an extension, and if its not answered, it can call a persons cell phone.
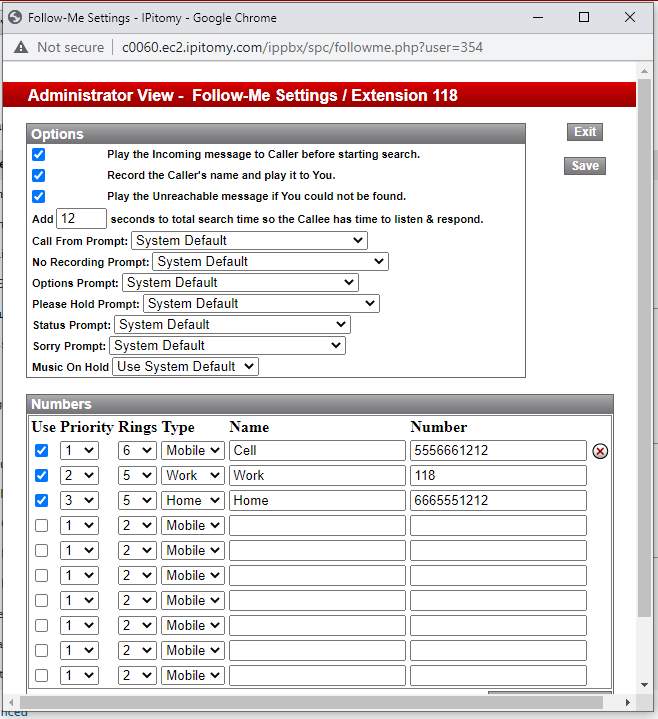
From this window it is easy to configure numbers to be dialed by the system in order to find the user. You can adjust the Name, Number (Number to be dialed), Type of Device that is being called, Rings to wait for an answer, and you can weight the priority from 1-20 (20 being lowest 1 being highest) to define search order.
The Use radio box allows you to easily turn on and off numbers to be dialed. Since the SPC can be accessed via remote management, this allows the users to modify and create these lists from remote locations easily. The following table details the parameters and descriptions necessary to configure the Follow-Me feature.
The system also allows you to record your own Prompts (recordings) under PBX Setup=>Prompts, and then use those prompts as custom messages for FollowMe feature.
| Sections/Fields | |
| Play the Incoming Message to Caller before Starting Search |
When Enabled (checked), the system plays the Status Prompt to the caller. |
| Record the Caller’s Name and Play it to You | When Enabled (checked), the caller will be asked to record their name, and will announce that recorded name prior to prompting the called party to accept or reject the call. |
| Play the Unreachable Message if You Could Not Be Found | When Enabled (checked), this will play the Sorry Prompt if the call is not answered, otherwise it goes right to the voicemail greeting. |
| Number of Seconds to Total Search Time so Caller Has Time to Listen & Record | This allows you to configure how many seconds the system will spend searching for the called party. Default is 12 seconds. |
| Call From Prompt | This plays when Record the Caller’s Name and Play it to You is enabled (checked). The system default message is “Incoming Call From” followed by the recording the caller made of their name. |
| No Recording Prompt | This plays when Record the Caller’s Name and Play it to You is disabled (not checked). The system default message of “You have an incoming call” followed by the Options Prompt. |
| Options Prompt | This plays after you have answered the call and prompts you to press either “1” to accept the call or “2” to reject the call. The system default message can be changed, but the options remain the same. |
| Please Hold Prompt | This plays to the caller alerting them that the system is going to find the user they are trying to reach. The system default message of “Please hold while I try to locate the person you are calling” will play during the search process. |
| Status Prompt | This plays the system default message of “The person you are calling is not at their desk, I will try to locate them for you”. |
| Sorry Prompt | This plays if the person could not be reached or they reject the call. The system default message of “I’m sorry, but I was unable to locate the person you were calling”. |
| Music On Hold | This allows you to specify a particular Music On Hold playlist to play to the caller during the search process. The system default Music on Hold (set at PBX Setup->Music on Hold) will play when this parameter is set to system default. |
| Numbers | If selected (checked), the Follow Me feature will try to either simultaneously or in sequence of priority to try and locate you by using this call list. |
Add/Edit Follow Me Settings
The following outlines the steps to set calling permissions for extensions.
STEPS:
- From the Edit Extensions page, locate the extension that you want to update. Click the
 (edit extensions) icon to the right of the name.
 - The Extension Detail page appears. Select the Advanced link to open the Advanced Settings page.
- Click on the Numbers and Settings button under the Follow-Me section of the Advanced page.
- The Administrator View Follow-Me Settings/Extensions window appears.
- Make the necessary changes in the Follow-Me parameters. Click on the SAVE button to save the changes to the Follow-Me settings. A message confirming the changes will appear.
- Click the EXIT button to close the window.
- Click the
 button to save the changes. The system returns you to the Edit Extensions page.
 - Click the Apply Changes link located at the right hand corner of the top of the page, to commit the changes to the database.
Multiple Simultaneous Calling
See the following guide to have a call ring two locations at the same time.
Auto Discovery of Extensions
This network discovery tool will automatically detect new devices that have been added to the network. This feature helps identify phones and other devices connected to the network and allow you to configure networked phones. The IP PBX system provides you with the option to either scan the network, or if a scan has been done recently, you could select No Scan to save time.
Auto-Discovery
Start Auto-Discovery Scan
This section describes how to start the Auto-Discovery scan for active devices on the network.
STEPS:
- From the Destination=>Extensions page, click the Auto-Discovery Tab.
- Select to either Scan or Not Scan the network and an Alert message indicating that the system is scanning the network for active devices appears.
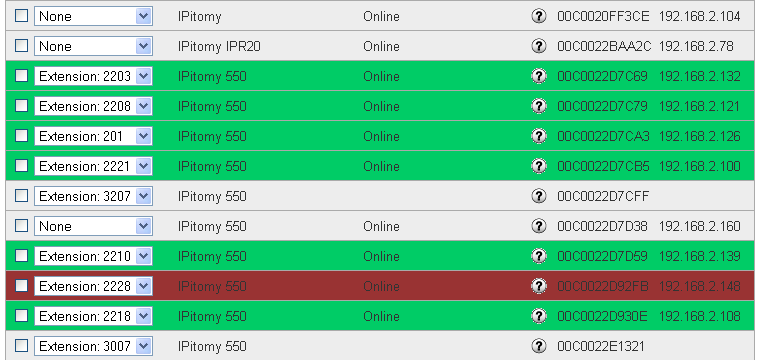
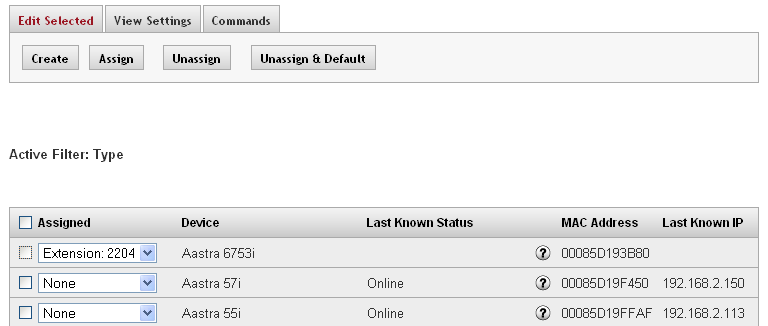
- Once the scanning process is complete, the system will display a list of active devices and assigned values such as IP Address, Device Type, Status, etc. Devices that appear on this list may be selected for editing. By default, the PBX will only display IPitomy and Aastra devices. Filter options can be modified to change display other devices.
If you click the refresh-view more than once within a short time period, the network is not rescanning. The minimum time period allowed between scans is indicated under the Advanced Settings (Min Refresh Interval).The network is only scanned for new information when you click REFRESH. Both REFRESH and FILTER ONLY apply whatever filters you have chosen to the displayed list.
List of Devices & Extensions
The list of discovered network devices comes from two sources:
- Network
- PBX Database
The following table describes the status of devices that will appear once an Auto-Discovery scan is completed.
| Sections/ Fields | |
| Assigned | This field indicates that extension that is assigned to the device (phones). Clicking on the box to the left of this field allows you to select it for editing. |
| Device | The Device column lists info about the device. Database info is preferred, so if a device is set to a certain phone type in the database, this is listed instead of the actual device type. |
| Status | This is the status of the device. If the status field is blank, this indicates that the device was not found on the network.
NOTE: Phones that are in the process of restarting, turned-off, or operating on a different network during a network scan will not be in an “Online” status. |
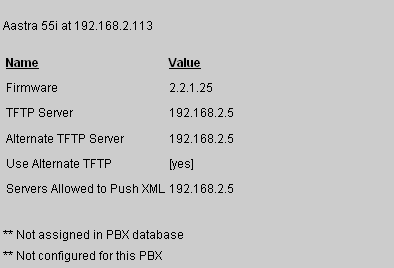
| Hovering the mouse over this icon will provide device information. See Figure 43 for an example of the data that can be viewed. | |
| MAC Address | This is the MAC Address assigned to the device. |
| IP Address | This is the IP Address assigned to the device. |
Auto Provisioning a Yealink Phone
PBX ver 6.0.5 or later method
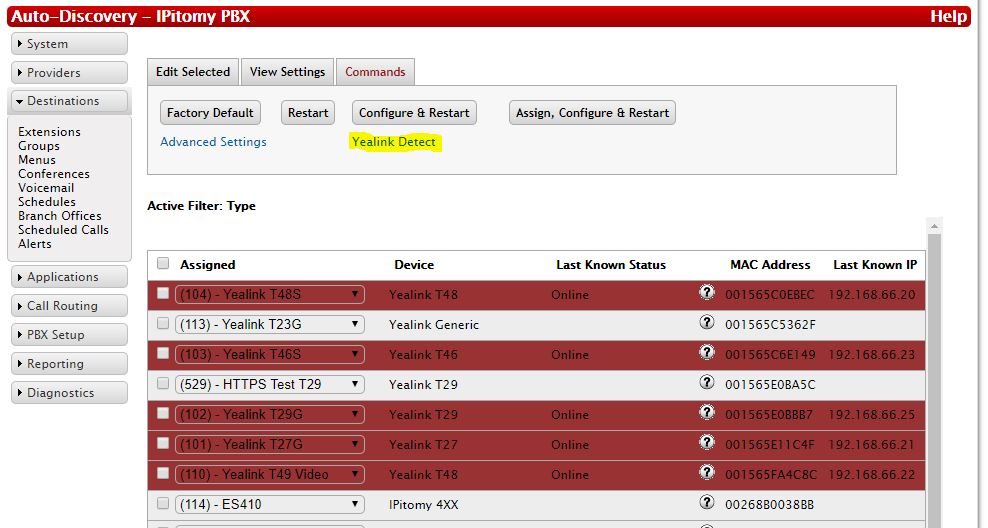
Starting in version 6.0.5, we have added the ability to configure and restart Yealink phones from the autodiscovery section of the pbx, eliminating much of the process previously needed to set these phones up.
1) Under Destinations=>Autodiscovery, after scanning the network, go to the commands tab and click the Yealink Detect link:
2) Press the Start button
3) In the list of phones discovered, you can now check the boxes, and assign, configure, and restart them as if they were IPitomy HD phones, using the buttons at the top of the page.
Important notes:
This only works for FACTORY DEFAULTED Yealink phones. Phones that have been previously provisioned will NOT respond to configure or restart commands from this process.
The Yealink discovery function will run for about 10 minutes before shutting itself back off. You can restart it by going to the commands tab and hitting start, if it has stopped. If it is running, it will say "Listening" on that page.
Device Information
To view detail information for a specific device, hover your cursor over the information icon to obtain details about the network device or phone. This can be an important source of information about which phones are available for live configuration.
Edit Selected Tab
The IP PBX system offers many ways to configure devices. This section describes an optional method using the Auto-Discovery feature.
The following table describes the fields and functions available on the Edit Selected Tab of the Auto-Discovery page:
| Fields | ||
| Create | Create new extensions for selected phones. You can upload extension details in a file or manually enter information. | |
| Assign | Assign existing extensions to selected phones. | |
| Unassign | Removes the configuration file for the phone and all association between the extension and the phone. | |
| Unassign & Default | Same as Unassign but also sends a Factory Default instruction to the phone. |
Create, Assign and Configure Phone
The following outlines steps to create, assign and configure a device.
| IMPORTANT: This assumes that the phones are in a FACTORY DEFAULTED state.
IPitomy recommends using the CSV upload file and the IP550 phone type which will help to simplify the setup and auto configuration process. |
STEPS:
- From the Extensions=>Destinations=>Auto-Discovery page, click the Edit Selected tab.
- Place a check mark next to the phones you wish to use when creating the extensions
- Click the Create button.
- Enter the new extension information. The MAC addresses of the selected phones will be populated so you have a reference as to what phones you are creating the extensions for.
- Click the “Create” button. If successful, Click “Return to Extensions”
- Click the Apply Changes link located at the right hand corner of the top of the page, to commit the changes to the database.
- Click the “Auto-Discovery” button and you will note the newly created extensions are now assigned to the phones that were checked.
- Check the boxes next to the phones that you just created extensions for.
- Click the Commands Tab.
- Click on the Configure & Restart button to provision the phones.
View Settings Tab
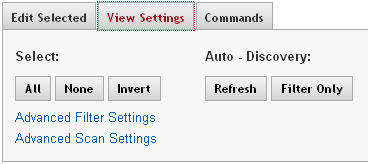
Filtering does not change how the network scanning is performed. It only limits the list of items displayed. This means that if you only want to change filters it is not necessary to re-scan the network. All of the network information from the last network scan is retained and used by filters.
| Sections/Fields | ||
| Select All, None, Invert | Check or uncheck multiple checkboxes with the click of a button. | |
| Refresh | Scan the network for devices. Scanning is done using the settings in Advanced Scan Settings. The scan results displayed depend on the active filters,controlled via Advanced Filter Settings. | |
| Filter Only | Displays results of the last network scan after applying the filters set in Advanced Filter Settings. |
Advanced Filter Settings
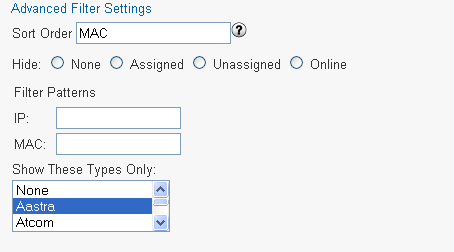
| Sections/Fields | |
| Sort Order | This allows you to set what order items are listed. Hover your cursor over the help icon next to the Sort Order fields for options. |
| Hide | Allows you to hide different status types from view. |
| Filter Patterns | Allows you to either enter a partial MAC or IP here. The only system criterion is that the pattern must match from the first character onward. i.e. “000D” would match “000DE” but not “A000DE”.
Full Regular Expression Matching is supported when you enclose your search pattern in double quotes. Some Examples are:
|
| Filter by Type | You can select multiple device types to filter by. Auto-Discovery is aware of MAC address ranges used by many popular networked devices. Although this is not the only way Auto-Discovery identifies devices, this allows the tool to identify and filter devices by type.
Only IPitomy devices and Aastra phones are shown by default because they are set in the Filter by Type. |
Advanced Scan Settings
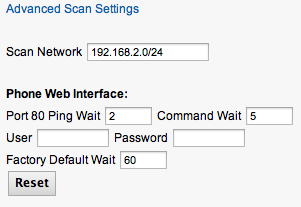
Changes to Scan Settings are kept when you click the GUI ‘Refresh’ button. Clicking on your browser’s refresh button will discard changes. For the most part these settings can remain unchanged and all will function as needed.
| Sections/Fields | |
| Scan Network | Subnet of the network to be scanned |
| Port 80 Ping Wait | Maximum seconds to wait for basic phone web interface to signal that it is alive. Rarely used. |
| Command Wait | Maximum seconds to wait for most commands. |
| User and Password | Phone’s Web User Name & Password may have to be specified if the phone is not using factory default settings for these items. When these fields are blank Auto-Discovery uses default settings. |
| Factory Default Wait | Maximum seconds to wait for the phone to signal completion of a Factory Default. |
| Reset | The ‘Reset’ button will return all Scan Settings to original default values. |
Commands Tab
The IP PBX system offers many ways to configure devices. This section describes an optional method using the use Auto-Discovery feature.
| Factory Default | Sends a Factory Default and restarts the phone. | |
| Restart | Sends a Restart instruction to the phone. | |
| Configure & Restart | Instructs phone to set TFTP server to the Server IP specified under Advanced Settings. Then the phone is commanded to restart, which will result in pulling down configuration files and firmware files if there are updated ones present. | |
| Assign, Configure, & Restart | Combines the functions of the Assign button with the Configure & Restart button. |
Factory Default Phone
STEPS:
- From the Extensions->Destinations page, click the Auto-Discovery Tab.
- Click the “Auto-Discovery” button, choosing to scan or not scan the network as needed.
- Click (placing a checkmark) on the boxes next to phones you wish to default.
- From the Auto-Discovery page, click on the Command tab. Click the “Factory Default” button. Wait long enough for the phones to default and restart. This could be anywhere from 30 seconds to 2 minutes for each phone, depending on the model. The phones will set themselves back to factory default and reboot during this period.
Troubleshooting Network Scanning Problems
Scan settings have been configured to work in a standard one subnet network environment. More complicated environments may require further tuning. The most useful setting is ‘Maximum wait’. However noisy environments will require increasing the packet Count and TX interval.
STEPS:
To tune scanning for your network:
- From the Extensions->Destination->Auto-Discovery page, click on Advanced Scan Settings link.
- Increase the ‘Maximum Wait’ setting by a few seconds.
- Click the GUI ‘Refresh’ button.
More specific tuning will require knowledge of your network and diagnostic tools like Ping.Phones that are in the process of restarting, turned-off, or operating on a different network during a network scan will not be in an “Online” status.
Auto Provisioning Phone Settings from Actual Device
The remainder of the configuration is done via the Phone interface, and will only work with IPitomy phones.
STEPS:
- Create an extension, setting the Device to either IP550 or IP120, depending on what IPitomy phone you intend to register to the extension.
IMPORTANT: To configure the phone using the auto provisioning, make sure that the “Auto-Provisioning” parameter is RUNNING. This can be done in PBX Setup=>General option of the system.
- From your phone, select the Menu button to start Auto-Provisioning then select Option 7: SIP Settings (you can do this without using the scroll keys by just pressing Menu then 7).
- It will prompt you for the Admin password. Enter the default password “1234” then press the Enter softkey (IP550) or the OK button (IP120)
- Select Option 8: Auto Prov.
- Select “YES” when the Autosearch PBX prompt appears.
- Enter either the extension number of the extension that has been created.
- Press the Done softkey (IP550) or the OK button (IP120) and the phone will run through the process of downloading its configuration file, updated firmware file, etc.
Edit Phone Settings
The settings for each individual device (phone) can be configured in the IP PBX system. The following outlines the steps to modify the phone settings from the IP PBX system.
View Phone Settings
Edit Phone Settings
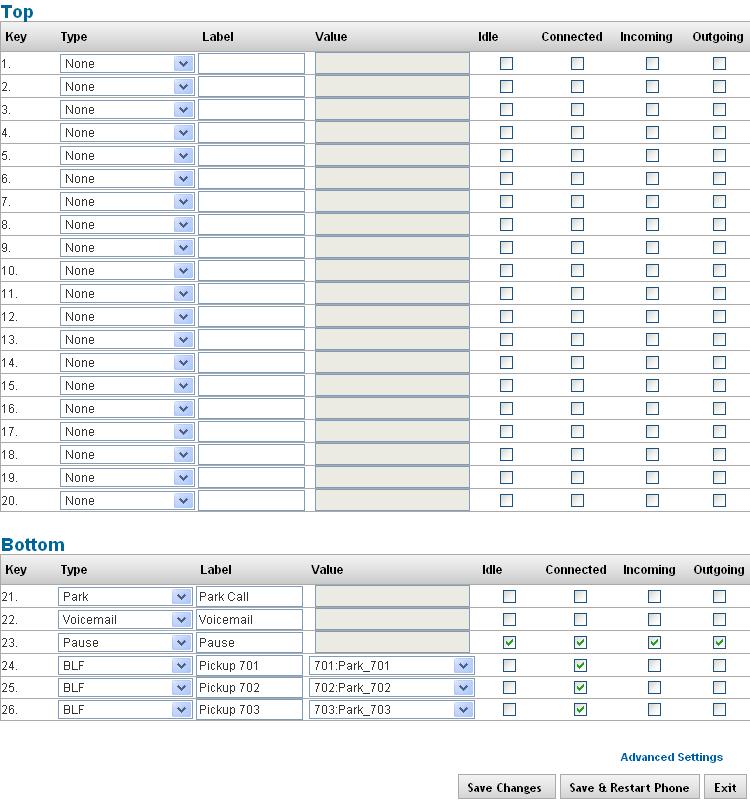
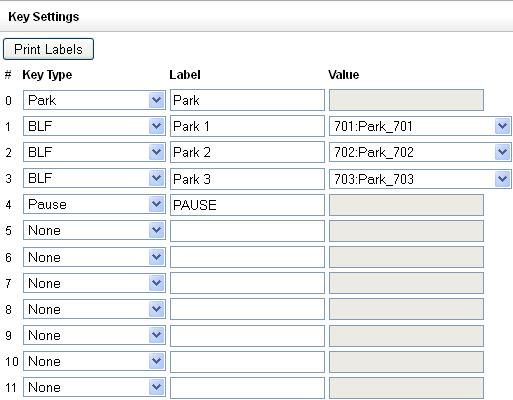
Key Settings
| Key Type |
Key type determines what function a key performs. A dropdown list shows which key types are available to the phone model you are working with. |
| Label |
This is the label associated with this key. If configured for a key around the LCD screen, this is what will display. |
| Value |
The value completes a key’s function. It may contain a number to dial special codes or allow you to select an extension from a dropdown list. Most key types do not require you to enter a value. For example, the Voicemail key does not require a value because the System Administrator determines it for the end user. |
STEPS:
- From the Extensions=>Destination page, find the extension you want to edit.
- Click on the
 icon to the right of the extensions name. The Edit Phone Settings page appears.
 - Make the necessary changes to the settings for the phone the click the Save & Configure Phone button.
- The PBX will update the configuration file and reboot the phone so that it can download the updated information for the keys.
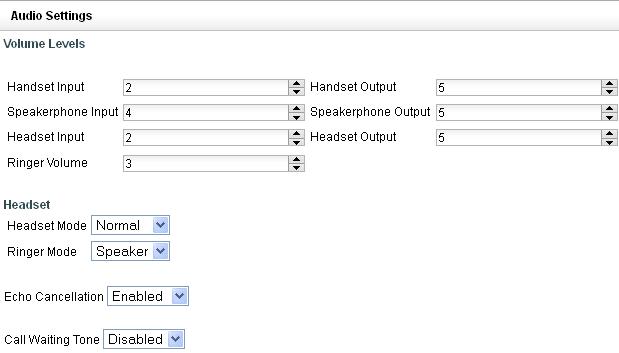
Audio Settings
| Handset Input |
Adjusts handset microphone volume. Default is 5. |
| Handset Output |
Adjusts handset speaker volume. Default is 5. |
| Speakerphone Input |
Adjusts speakerphone microphone volume. Default is 5. |
| Speakerphone Output |
Adjusts speakerphone speaker volume. Default is 5. |
| Headset Input |
Adjusts headset microphone volume. Default is 5. |
| Headset Output |
Adjusts headset speaker volume. Default is 5. |
| Ringer Volume |
Adjusts ringer volume. Default is 3. |
| Headset Mode |
Toggles functionality of making and answering calls. Default is Normal.
Normal: Primary method for making and answering calls will be the Handset and Speaker, depending on if the hookswitch is pressed. Headset: Primary method for making and answering calls will be the Headset. Press the Headset key to wait for calls without an open line. After that, pressing a Line key will open a line on the headset or answer an inbound call on the headset, as will pressing the Ans softkey for an inbound call. The hookswitch will not be functional. |
| Ringer Mode |
Toggles between Headset and Speaker for inbound ringing. Default is Speaker.
Speaker: Inbound calls ring on the speaker. Headset: Used in conjunction with Headset Mode, this will have inbound calls ring to the headset instead of the speaker. |
| Echo Cancellation |
Toggles the phones echo cancellation. The default setting is No. |
STEPS:
- From the Extensions=>Destination page, find the extension you want to edit.
- Click on the icon to the right of the extensions name. The Edit Phone Settings page appears.
- Make the necessary changes to the settings for the phone and click the Save & Configure Phone button.
- The PBX will update the configuration file and reboot the phone so that it can download the updated audio settings.
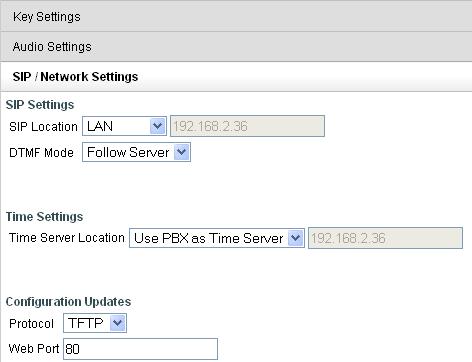
SIP / Network Settings
| SIP Location |
This defines whether the phone is communicating to the PBX over the LAN, WAN, a Custom server address, or Auto, which follows the PBX settings for this extension.
LAN configures phone to use the local IP of the PBX WAN configures phone to use the public IP of the PBX, as entered under PBX SetupSIP Custom configures phone to use the an IP you enter manually |
| DTMF Mode |
Defines what DTMF method the phone uses. Default is Follow Server. The dropdown lists options are:
|
| Time Server Location |
Displays the address the phone is using for its time server. When set to Custom this field allows you to manually enter the time server address. |
| Protocol |
Defines what protocol the phone will use to download configuration information, HTTP or TFTP. Default is TFTP. |
| Web Port |
Defines what port the phones uses to access its GUI. Default is 80. |
| VLAN Settings |
This allows you to have individual control over an extension's VLAN settings. By default this is set to follow the global template, instructions for modifying VLAN are found here [VLAN]. If you have a single phone that needs different VLAN settings, set to Custom and enter in a VID and Port Priority. These can be set separately for Phone port and PC port. |
STEPS:
- From the Extensions=>Destination page, find the extension you want to edit.
- Click on the icon to the right of the extensions name. The Edit Phone Settings page appears.
- Make the necessary changes to the settings for the phone and click the Save & Configure Phone button.
- The PBX will update the configuration file and reboot the phone so that it can download the updated SIP/Network settings.
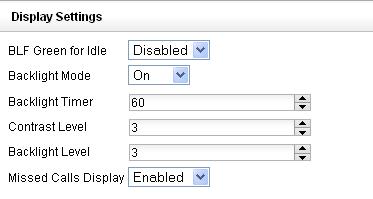
Display Settings
| Sections/ Fields |
Description |
| BLF Green for Idle |
Toggles if BLFs for idle phones will light green, or not light at all. Default is disabled. |
| Backlight Mode |
Toggles between backlight always On, always Off, or on a timer. Default is on. |
| Backlight Timer |
Defines the interval when Backlight Mode is set to Timer. Default is 60 sec. |
| Contrast Level |
Controls the screen contrast. Default is 3. |
| Backlight Level |
Controls the backlight brightness. Default is 3. |
Table 33Edit Phone Display Settings and Descriptions
STEPS:
- From the Extensions=>Destination page, find the extension you want to edit.
- Click on the icon to the right of the extensions name. The Edit Phone Settings page appears.
- Make the necessary changes to the settings for the phone and click the Save & Configure Phone button.
- The PBX will update the configuration file and reboot the phone so that it can download the updated display settings.
Expansion Module Settings
| Sections/ Fields |
Description |
| Number of Modules |
Defines how many expansion modules the phone is using. Once configured, you can select each module and set their keys. |
| Print All Labels |
Prints labels for all configured expansion modules. |
| Print Labels |
Prints labels for the expansion module that is currently displayed. |
| Key Type |
Key type determines what function a key performs. A dropdown list shows which key types are available to the phone model you are working with. |
| Label |
This is the label associated with this key. If configured for a key around the LCD screen, this is what will display. |
| Value |
The value completes a key’s function. It may contain a number to dial special codes or allow you to select an extension from a dropdown list. Most key types do not require you to enter a value. For example, the Voicemail key does not require a value because the System Administrator determines it for the end user.
Incoming' – A call is ringing the extension |
STEPS:
- From the Extensions=>Destination page, find the extension you want to edit.
- Click on the
 icon to the right of the extensions name. The Edit Phone Settings page appears.
 - Make the necessary changes to the settings for the phone and click the Save & Configure Phone button.
- The PBX will update the configuration file and reboot the phone so that it can download the updated expansion module settings.
Edit Phone Settings
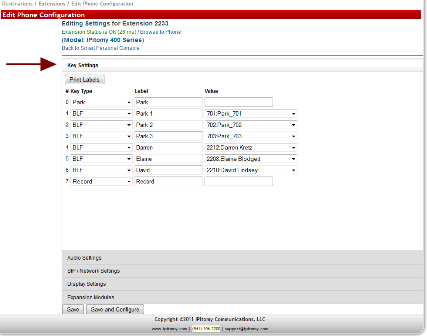
To access the Phone settings, Navigate to Destinations - Extensions and then select the Phone settings Icon. This is the Icon with the Pencil/Handset. When moused over it will have a mouse over popup which indicates it is the Phone settings Icon. The first page is the Key Settings Page. From this page the Technician may set key settings for the phone in question and also print labels for the DESI as indicated.
A description of all key types and their uses may be found in the Manual Appendices. And may also be found by following this link.

Appendix 1: Key Types and Codes
This table describes the function of each key type, and how to manually configure them. It is not advised to manually configure unless the phone is in a situation where you cannot easily use the PBX to set the keys (ie: remote phones). Unless specified, the Line field when manually configuring should be set to All.
| Key Type | |
|---|---|
| BLF |
Can be set to an extension or park orbit. Pressing the key will call the extension or retrieve a call from the park orbit. When an extension is ringing the light will flash, and when an extension is connected to a call, the light will be solid. Park BLF keys will lamp when a call is parked in that particular orbit. To manually configure, log into the phone and set the key to:
Type: BLF Label: Meaningful Descriptor Value: The extension or park orbit number to monitor Line: 1 |
| Speed Dial | Dials the digits entered as for the Value and sends them to the PBX. To manually configure, log into the phone and set the key to:
Type: Speed dial Label: Meaningful Descriptor Value: Any number or feature code that the PBX can recognize |
| Park | Takes the connected call and parks it in an available orbit from 701-720, starting at the lowest available slot. When parking, the PBX will tell you audibly which orbit the call was sent to. To manually configure, log into the phone and set the key to:
Type: Speeddial Label: Park Value: ##700# |
| DND | Places the phone itself in a state where it will not receive calls. This does not communicate your state to the PBX (see Pause key). To configure manually, log into the phone and set the key to:
Type: Do Not Disturb |
| Blind Transfer | This key starts the transfer process and allows you to enter a transfer destination. Once entered, press Dial or wait for the digit timeout and the call will transfer. This key is most useful if a phone has no open lines to perform a transfer using the fixed key on the phone, as it does not open a new line to transfer. To configure manually, log into the phone and set the key to:
Type: Prefix Label: Blind Transfer Value: ## |
| Call Pickup | Allows the user to answer calls ringing direct to extensions that are in the Call Group that matches the phones Pickup Group. To manually configure, log into the phone and set the key to:
Type: Pickup Label: Meaningful Descriptor Value: 99 |
| Voicemail | Allows the user to check their voicemail messages. User will be prompted for their password(PIN). To manually configure, log into the phone and set the key to:
Type: Speed dial Label: Voicemail Value: 923 |
| Voicemail Gateway | Allows the user to check any voicemail box for messages. User will be prompted for mailbox number and password(PIN). To manually configure, log into the phone and set the key to:
Type: Speed dial Label: VM Gateway Value: 924 |
| Record | Toggles on and off the record feature on the current active call. The file will be saved in the voicemail box for the extension, under the Work folder. To manually configure, log into the phone and set the key to:
Type: Speed dial Label: Record Value: *# |
| Fwd On | With a single press, a user can enable their unconditional forwarding. If no destination is set, you will need to define one before forwarding can be enabled. To manually configure, log into the phone and set the key to:
Type: Speed dial Label: Fwd On Value: *91 |
| Fwd Off | With a single press, a user can disable their unconditional forwarding. To manually configure, log into the phone and set the key to:
Type: Speed dial Label: Fwd Off Value: *90 |
| Set Fwd | With a singe press, a used can define their forwarding destination. To manually configure, log into the phone and set the key to:
Type: Speed dial Label: Set Fwd Value: *92 |
| Fwd Gateway | This takes the user to a gateway that allows them to control forwarding for extensions other than their own. User will be prompted for an extension number and password (PIN) before they can make changes. Once logged in, you can enable, disable, and set the forward destination. To manually configure, log into the phone and set the key to:
Type: Speed dial Label: Fwd Gateway Value: *9 |
| Intercom | This key starts the intercom process and allows you to enter an extension or group number. Once entered, press Dial or wait for the digit timeout, and the page will happen. To manually configure, log into the phone and set the key to:
Type: Intercom Label: Intercom |
| Pause | Similar to the DND key, except pressing this key communicates to the PBX, and will pause you out of call queues. The key is a BLF and will lamp when the phone is paused. To manually configure, log into the phone and set the key to: Pause functions as DND, however will allow a Page to be sent to the phone. Type: BLF Label: Pause Value: ABC<extnum> Line: 1 |
| Day/Night BLF | When pressed, a call is established to the PBX telling the user the state of Day/Night mode override, and gives instructions on how to change the settings. If Day/Night mode is forced into night mode, the light will blink; and if forced into day mode, the light will be solid. If Day/Night mode is following the schedule the BLF will not lamp. To manually configure, log into the phone and set the key to:
Type: BLF Label: Day/Night Value: ff Line: 1 |
| Page BLF | Allows BLF monitoring of an extension, as well as one press paging to that extension. TO manually configure, log into the phone and set the key to:
Type: BLF Label: Meaningful Descriptor Value: **<extnum> Line: 1 |
Also found within the Manual Appendices is the full Designation Print Guide. Which may also be accessed at this link
HD Phone Key Labeling
About
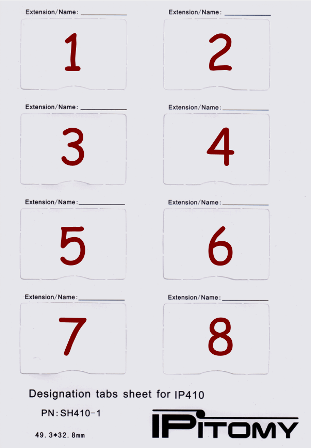
Designation labels for the programmable buttons on IPitomy HD phones can be printed using plain 8.5”X11” paper or the perforated sheets that are included with each phone. The IPitomy HD series SIP telephones are packaged with designation label sheets that can be used to label the programmable keys in a professional manner. Each telephone and the IPX32 Expansion Module are shipped with one label sheet. Label sheets have multiple labels so that they can be used to print labels for multiple telephones. The perforated sheet size is A5; when printing on plain paper, use 8.5"X11". Each Sheet can be used to print more than one label:
|
Telephone model |
Sheet Part Number |
Quantity Labels per sheet |
|
IP320-P |
SH320-1 |
6 |
|
IP410-P |
SH410-1 |
8 |
|
IPX32 |
SHX32-1 |
2 |
Sheets can be ordered in quantities using the following part numbers:
|
Telephone model |
Part Number |
Quantity of sheets |
|
IP320-P |
SH320-25 |
25 |
|
IP410-P |
SH410-25 |
25 |
|
IPX32 |
SHX32-25 |
25 |
Sheets can be used in most laser and ink-jet type printers. This requires setup practice to find the best paper positioning for your specific printer. You must learn top/bottom and face/reverse side printing characteristics for your printer. The IPitomy IP PBX equipped with Firmware version 4.2.x and above provides for printing of labels directly from the programming interface and from the user’s SPC interface.
This guide will help you setup and utilize the label printing utility in the IPitomy IP PBX.
Revision History
|
Revision |
Changes |
Date |
|
Initial Revision |
n/a |
Oct 2011 |
|
|
|
|
|
|
|
|
Label Printing Overview
Programming the HD SIP Telephone Keys
Assigning labels for the keys
Printing one label for one telephone
Choosing the position of the label on the sheet
Printing multiple telephone labels
Programming the HD SIP Telephone Keys
Programming labels is the same interface from either the user interface – SPC (Smart Personal Console) or from the administrator’s interface – PBX Administration. This guide will focus on the user interface for programming of the keys.
Administrators have the added advantage of being able to print multiple labels at one time for multiple extensions. This setup information is provided following the SPC instructions.
To print labels you must be able to access the IP PBX. Doing so requires a web browser – like Microsoft Internet Explorer, Mozilla Firefox or Google Chrome.
Programming Steps:
Assigning labels for the keys
The keys on the IP410 in this example are: Park, BLF:Park701, BLF:Park702, BLF:Park703, BLF:Extension 2212, BLF:Extension 2208, BLF:Extension 2210, and Record… some key type choices will automatically fill the Label data field when the key choice is selected, others require that you input the label you wish to print in that key position.
Note: The name/definition input here will print on the actual label.
- Program keys and input names/definitions as you wish.
Printing one label for one telephone
Printing multiple telephone labels
From the Administration interface it is possible to program multiple telephones at one time. Doing so requires entering into the Administrator’s Extension Settings : Destination/Extension page under the View tab.
Once View is selected go to the telephone model for which labels are to be printed. Only one model phone can be printed at one time when multiples are printed.
- In this example we have 8 – IP320’s and 9 – IP410’s installed.
- To program the Keys for multiple phones, click on the title bar of the phone models to be programmed… In this case, we clicked on the IPitomy 4XX bar.
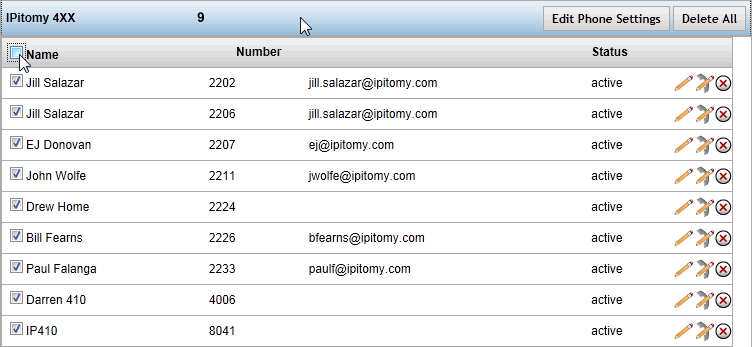
- Click on the checkbox in the left-hand column of each phone that is to be programmed or if all are to be programmed, click on the checkbox at the top left and all will be selected.
- Once the telephones to be programmed are selected, click on the "Edit Phone Settings" button at the right of the model bar.
- Doing so opens the same Key Settings interface seen from SPC except that all of the extensions selected are shown at the top indicating those to be programmed.
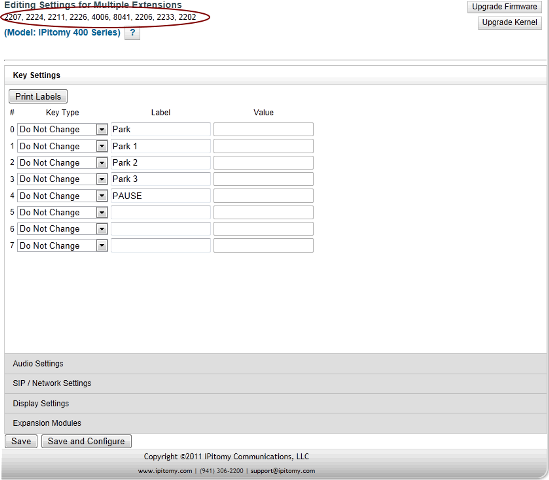
- Program those Keys desired for all of the extensions selected.
- Note 1: If programming is different on various extensions they must be programmed in like-groups or one-at-a-time.
- Note 2: When extensions of like model have different key programming the labels can still be printed in multiples by first programming the keys on the various extensions and then proceeding to the View – Model programming above.
- Note 3: Keys that indicate “Do Not Change” indicate those keys that will not be affected by the programming in progress. This is helpful to retain unique programming on various keys while making changes to other keys in multiples.
- When key programming is complete, click on "Print Labels"
- Doing so opens the dialog box: Position
- At the time of this release this dialog box has no effect on the positioning of printed labels. Regardless of the position selected, the printout was always the same – starting in the upper left-hand corner of the printed page. (At Position “1”).
- Click on "GO" your page will open in a new browser window. The printed format is PDF so that it is portable to most printers.
- Use the File-Print function to print the page.
- Be sure to disable scaling, shrink to fit, rotation and other page altering printer parameters… the page must print in its native format to align properly with the sheet labels.
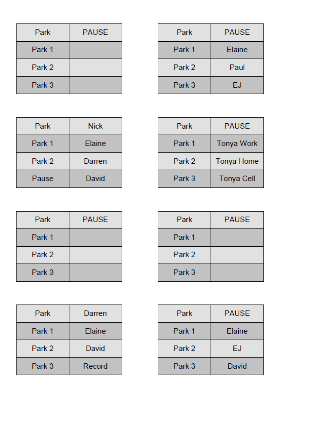
Our printed page appears as:
Since 9 extensions where selected a second page is printed with a single extension label.
- Note1: Depending on your printer, the sheet may only be useful for one or two prints.
- Note2: Once labels are removed from the sheet, the sheet may not go through the printer as well… printers differ from one model to the next.
- Note 3: It may be best to print several phones on one sheet before removing labels from the sheet.
Printing notes:
- Use plain paper first and practice so that the orientation of the page and face-side is known before using the perforated label sheets.
- The pre-fabricated perforated sheet size is A5.
- When you are finished printing, close the PDF (printed page) window.
- Remove the printed labels from the sheet by carefully tearing the label at the edges along the perforation.
- Exit the Print Label Dialog by clicking on the encircled “X” in the upper right-hand corner.
The next tab on the Phone Settings page is Audio Settings. This is the are where default audio settings may be accessed.
STEPS:
- From the Extensions=>Destination page, find the extension you want to edit.
- Click on the icon to the right of the extensions name. The Edit Phone Settings page appears.
- Make the necessary changes to the settings for the phone the click the Save & Configure Phone button.
- The PBX will update the configuration file and reboot the phone so that it can download the updated information for the keys.
| Handset Input |
Adjusts handset microphone volume. Default is 5. |
| Handset Output |
Adjusts handset speaker volume. Default is 5. |
| Speakerphone Input |
Adjusts speakerphone microphone volume. Default is 5. |
| Speakerphone Output |
Adjusts speakerphone speaker volume. Default is 5. |
| Headset Input |
Adjusts headset microphone volume. Default is 5. |
| Headset Output |
Adjusts headset speaker volume. Default is 5. |
| Ringer Volume |
Adjusts ringer volume. Default is 3. |
| Headset Mode |
Toggles functionality of making and answering calls. Default is Normal.
Normal: Primary method for making and answering calls will be the Handset and Speaker, depending on if the hookswitch is pressed. Headset: Primary method for making and answering calls will be the Headset. Press the Headset key to wait for calls without an open line. After that, pressing a Line key will open a line on the headset or answer an inbound call on the headset, as will pressing the Ans softkey for an inbound call. The hookswitch will not be functional. |
| Ringer Mode |
Toggles between Headset and Speaker for inbound ringing. Default is Speaker.
Speaker: Inbound calls ring on the speaker. Headset: Used in conjunction with Headset Mode, this will have inbound calls ring to the headset instead of the speaker. |
| Echo Cancelation |
Toggles the phones echo cancelation. The default setting is No. |
Call Waiting Toggles Call Wating on and off. Default is Yes
Sip Network Setting is the Next Tab on Phone settings.
SIP / Network Settings
|
SIP Settings – SIP Location |
LAN = Local Area Network located telephone, no unauthorized security measures required (LAN IP Address of the IPPBX will be shown) WAN = Wide Area Network located telephone, unauthorized security measures apply (WAN interface – Public IP Address is shown) |
|
SIP Settings – DTMF Mode |
Follow Server – follows settings stored in PBX settings for this phone RFC2833 – use RFC2833 (regardless of PBX settings for phone) SIP Info – use SIP Info (regardless of PBX settings for phone)(SIP Info is SIP Header information included in SIP Packets) Inband – use Inband (regardless of PBX settings for phone) Auto – use Auto Detect (regardless of PBX settings for phone) |
|
Time Settings – Time Server Location |
Use PBX as Time Server – uses the PBX clock for sync Use PBX Time Server – use the same timer server as defined in the PBX Custom – identify the time server to be used |
|
Configuration Updates – Protocol |
TFTP – Trivial File Transfer Protocol (used for LAN phones) HTTP – Hypertext Transfer Protocol (used for WAN phones) |
|
Configuration Updates – Web Port |
When HTTP is used the Port assignment will usually be 80, however any valid port number can be assigned in this field. |
The next tab in Phone settings is the Display Settings Tab
Display Settings
| Sections/ Fields |
Description |
| BLF Green for Idle |
Toggles if BLFs for idle phones will light green, or not light at all. Default is disabled. |
| Backlight Mode |
Toggles between backlight always On, always Off, or on a timer. Default is on. |
| Backlight Timer |
Defines the interval when Backlight Mode is set to Timer. Default is 60 sec. |
| Contrast Level |
Controls the screen contrast. Default is 3. |
| Backlight Level |
Controls the backlight brightness. Default is 3. |
The last tab on Phone settings is the Expansion Module Tab. This will only appear on Phone Models which support an Expansion Module.
Expansion Module Settings
| Sections/ Fields |
Description |
| Number of Modules |
Defines how many expansion modules the phone is using. Once configured, you can select each module and set their keys. |
| Print All Labels |
Prints labels for all configured expansion modules. |
| Print Labels |
Prints labels for the expansion module that is currently displayed. |
| Key Type |
Key type determines what function a key performs. A dropdown list shows which key types are available to the phone model you are working with. |
| Label |
This is the label associated with this key. If configured for a key around the LCD screen, this is what will display. |
| Value |
The value completes a key’s function. It may contain a number to dial special codes or allow you to select an extension from a dropdown list. Most key types do not require you to enter a value. For example, the Voicemail key does not require a value because the System Administrator determines it for the end user.
Incoming' – A call is ringing the extension |
STEPS:
- From the Extensions=>Destination page, find the extension you want to edit.
- Click on the icon to the right of the extensions name. The Edit Phone Settings page appears.
- Make the necessary changes to the settings for the phone and click the Save & Configure Phone button.
- The PBX will update the configuration file and reboot the phone so that it can download the updated expansion module settings.
NOTE: You must first pair the module to the phone. This is accomplished by the following:
- Attach the Expansion Module to the EXT port on the back of the phone.
- At the phone Press Menu
- Select Function Settings
- Select Expansion Installation
- Press the key on the expansion module to define which expansion this will be, as a phone can have more than 1 module:
- Top left most key is expansion 1, the key below that is expansion two, down to the 6th key being expansion 6.
- Press OK
The following link will take you to a page that goes over how to add extra pages to an IP620 if its a current model and firmware:
http://wiki.ipitomy.com/wiki/HD_Phones#How_do_I_access_the_Multiple_Key_Pages_on_the_new_IP620
