Difference between revisions of "IP PBX Manual PBXSetup Database"
Jump to navigation
Jump to search

support@ipitomy.com | 941.306.2200 (Opt 2 for Support)
You are viewing the IPitomy IP PBX Manual, Table of Contents.
| Line 141: | Line 141: | ||
| style="border-top:0.0069in solid #0000ff;border-bottom:0.0069in solid #0000ff;border-left:0.0069in solid #0000ff;border-right:none;padding-top:0in;padding-bottom:0in;padding-left:0.075in;padding-right:0.075in;"| Action | | style="border-top:0.0069in solid #0000ff;border-bottom:0.0069in solid #0000ff;border-left:0.0069in solid #0000ff;border-right:none;padding-top:0in;padding-bottom:0in;padding-left:0.075in;padding-right:0.075in;"| Action | ||
| − | | style="border:0.0069in solid #0000ff;padding-top:0in;padding-bottom:0in;padding-left:1.5in;padding-right:0.075in;"| Delete Backup | + | | style="border:0.0069in solid #0000ff;padding-top:0in;padding-bottom:0in;padding-left:1.5in;padding-right:0.075in;"| [[File:deleteselected.png]] Delete Backup |
| − | Restore Backup | + | [[File:restorefile.png]] Restore Backup |
| − | Download Backup | + | [[File:downloadbutton.jpg]] Download Backup |
|} | |} | ||
| + | |||
| + | [[File:backupdatetimeinfo.png|center]] | ||
==== Delete Backup File ==== | ==== Delete Backup File ==== | ||
| Line 154: | Line 156: | ||
#From the '''PBX Setup'''=>'''Database Administration '''page, scroll to the bottom of the page to find the backup files stored on the PBX. | #From the '''PBX Setup'''=>'''Database Administration '''page, scroll to the bottom of the page to find the backup files stored on the PBX. | ||
#Find the backup file that you want to delete. | #Find the backup file that you want to delete. | ||
| − | #Select the icon to the right of the backup file name. The file is removed from the list. | + | #Select the [[File:deleteselected.png]] icon to the right of the backup file name. The file is removed from the list. |
#Click on the '''Apply Changes''' link at the top of the page to save the information and commit the changes to the database. This will permanently remove the backup file from the server. | #Click on the '''Apply Changes''' link at the top of the page to save the information and commit the changes to the database. This will permanently remove the backup file from the server. | ||
| Line 163: | Line 165: | ||
#From the '''PBX Setup=>Database '''page, scroll to the bottom of the page to find the backup files stored on the PBX. | #From the '''PBX Setup=>Database '''page, scroll to the bottom of the page to find the backup files stored on the PBX. | ||
#Find the backup file that you want to restore. | #Find the backup file that you want to restore. | ||
| − | #Select the icon to the right of the backup file name you want to restore. | + | #Select the [[File:restorefile.png]] icon to the right of the backup file name you want to restore. |
#A box will appear prompting you on which values you wish to restore. Select per your needs, and click Restore. | #A box will appear prompting you on which values you wish to restore. Select per your needs, and click Restore. | ||
#Click on the '''Apply Changes''' link at the top of the page to save the information and commit the changes to the database. | #Click on the '''Apply Changes''' link at the top of the page to save the information and commit the changes to the database. | ||
| Line 173: | Line 175: | ||
#From the '''PBX Setup=>Database Administration '''page, scroll to the bottom of the page to find the backup files stored on the PBX. | #From the '''PBX Setup=>Database Administration '''page, scroll to the bottom of the page to find the backup files stored on the PBX. | ||
#Find the backup file you want to download. | #Find the backup file you want to download. | ||
| − | #Select the icon to the right of the backup file name. The system will ask you whether want to open or save the file. Choose Save. | + | #Select the [[File:downloadbutton.jpg]] icon to the right of the backup file name. The system will ask you whether want to open or save the file. Choose Save. |
#Depending on your browser settings, you may have to define where the file should be downloaded to. | #Depending on your browser settings, you may have to define where the file should be downloaded to. | ||
Revision as of 16:10, 23 May 2013

Database Administration
Create Backup Section
| Description |
Use this field to enter keywords to identify what the backup you are making pertains to. |
| Categories |
This is the types of files that you want to create backups for. Select the desired type by clicking in the box to the left of the item. This will place a checkmark next to the item. Available categories are:
|
| Create |
Clicking the Create button will generate a backup file on the PBX containing the information selected under Categories. |
Creating a Backup
STEPS:
- From the PBX Setup=>Database Administration page, locate the Create Backup section.
- From the Create Backup section, enter the keywords in the Description field for the backup file you want to create.
- Select the categories you want included in the backup.
- Click on the CREATE button to create the backup file.
- Scroll down to the Date/Time section of the Database page. The backup file that was just created will appear at the bottom of the list with the corresponding date and time the backup was made. Use your mouse to hover over the date and time field and the keywords entered will be displayed.
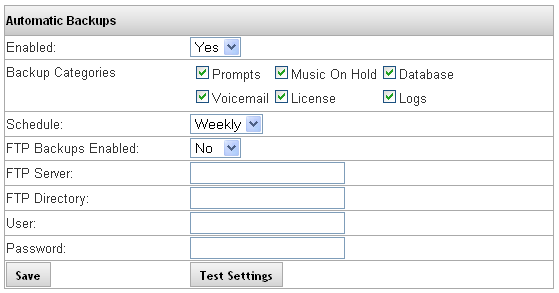
Automatic Backups Section
With this feature, you can have the PBX automatically create backups at a set interval, as well as send those backups to an external FTP. The system will only store a total of 4 automated backups at any given time, overwriting the oldest when a new on is created.
| Enabled |
If Enabled (set to YES), a backup will be performed automatically based on the interval set under Schedule. |
| Backup Categories |
This is the types of files that you want to create backups for. Select the desired type by clicking in the box to the left of the item. This will place a checkmark next to the item. Available categories are:
|
| Schedule |
This is the frequency for which you want the automated backup to be performed. Options are Daily, Weekly and Monthly. |
| FTP Backups Enabled |
If Enabled (set to YES), the PBX will send automatic backups to the configured FTP server |
| FTP Server |
This is the FTP server address that the FTP backup will be stored. |
| FTP Directory |
This is the FTP directory on the server where a backup will be stored. |
| User |
Enter the Username required to write files to your FTP (we require a username, so ensure the FTP is set to use one) |
| Password |
Enter the password associated with the Username used to access your FTP (we require a password, so ensure the FTP is set to use one) |
| SAVE Button |
This button will save the changes made to the automated backup settings. |
| Test Settings Button |
This button will initiate a test to validate the FTP server, directory, username, and password. A message will display the success or failure, and if successful, a test file will be placed on the FTP |
Set Automatic Backup
STEPS:
- From the PBX Setup=>Database Administration page, locate the Automatic Backup section.
- Enabled the Automated Backup process by setting the Enabled field to “YES”.
- Select the Category that you want to have backed up.
- Set the Schedule to the desired interval.
- Enter FTP parameters and Username and Password if you want the backup to be sent to an external FTP.
- Click the Save button to save the settings.
- Click on the Apply Changes link at the top of the page to save the information and commit the changes to the database.
- Click the Test Settings button to validate the automated backup settings. You should receive a backup “Successful” message. If the setup test failed, you receive an “Error” with a message indicating what parameters failed.
- Make the necessary adjustments to the backup parameter, Save, Apply Changes, and try the test again.
Upload Backup File Section
This feature allows you to upload backup files to the PBX system.
Upload Backup Files
STEPS:
- From the PBX Setup=>Database Administration page, locate the Upload Backup File section.
- Click on the Browse button to search for the file you want to upload.
- Double click on the file that you want to upload. The file directory will appear in the box next to the Browse button.
- Click on the Upload File button to initiate the upload process. You should receive a message stating that the upload was “Successful”. If the upload process failed you will receive an “Error” message indicating what failed during the process.
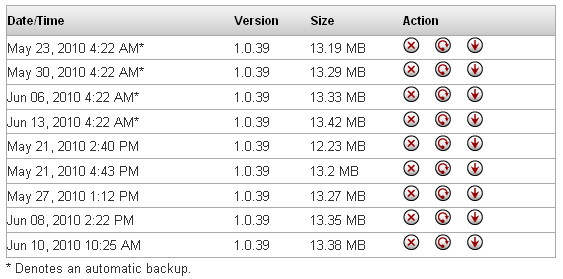
Backup Storage Section
The bottom of the Database Backup page lists the backup files that are stored on the PBX. The list will provide the following information for each backup file created:
Delete Backup File
STEPS:
- From the PBX Setup=>Database Administration page, scroll to the bottom of the page to find the backup files stored on the PBX.
- Find the backup file that you want to delete.
- Select the
 icon to the right of the backup file name. The file is removed from the list.
 - Click on the Apply Changes link at the top of the page to save the information and commit the changes to the database. This will permanently remove the backup file from the server.
Restore Backup File
STEPS:
- From the PBX Setup=>Database page, scroll to the bottom of the page to find the backup files stored on the PBX.
- Find the backup file that you want to restore.
- Select the
 icon to the right of the backup file name you want to restore.
 - A box will appear prompting you on which values you wish to restore. Select per your needs, and click Restore.
- Click on the Apply Changes link at the top of the page to save the information and commit the changes to the database.
Download Backup File
STEPS:
- From the PBX Setup=>Database Administration page, scroll to the bottom of the page to find the backup files stored on the PBX.
- Find the backup file you want to download.
- Select the
 icon to the right of the backup file name. The system will ask you whether want to open or save the file. Choose Save.
 - Depending on your browser settings, you may have to define where the file should be downloaded to.


