Difference between revisions of "Yealink"
| Line 9: | Line 9: | ||
'''Manual''' – Navigate to Destinations -> Extensions -> Edit Extension -> Advanced and enter the MAC address of the phone into the “Phone MAC:” field. SAVE CHANGES then APPLY CHANGES. | '''Manual''' – Navigate to Destinations -> Extensions -> Edit Extension -> Advanced and enter the MAC address of the phone into the “Phone MAC:” field. SAVE CHANGES then APPLY CHANGES. | ||
| − | + | ||
Revision as of 18:27, 20 November 2017
Beginning in PBX software version 5.2.1-10, we have begun including more integrated support for Yealink phones. They can now be found via autodiscovery and assigned to extensions, although they do not currently respond to configure or restart commands. Yealink phones CAN autoprovision from the pbx once assigned, however, by either logging into each phone's webGUI, or using our quick setup utility. The quick setup utility can be downloaded here Yealink Quick Setup utility
Auto Provisioning a Yealink Phone
You must assign a phone to an extension either manually or using Auto-Discovery:
Manual – Navigate to Destinations -> Extensions -> Edit Extension -> Advanced and enter the MAC address of the phone into the “Phone MAC:” field. SAVE CHANGES then APPLY CHANGES.
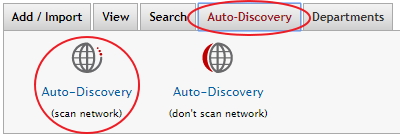
Auto Discovery - Navigate to Destinations -> Extensions. Click the “Auto-Discovery” tab at the top, and then click “Auto-Discovery (scan network)”
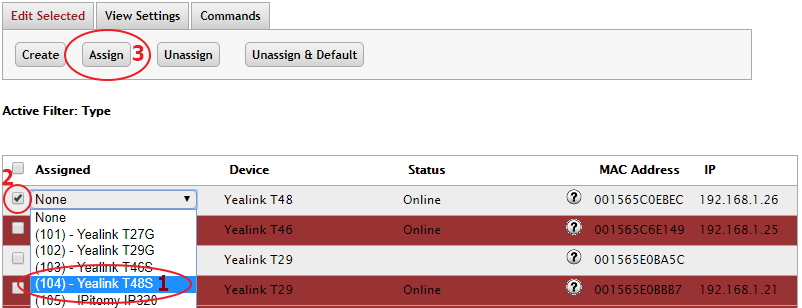
Once the scan has completed:
1. Select the extension you would like to assign to the Yealink phone(s) from the drop down list.
2. Check the box next to each Yealink phone.
3. Click the Assign button.
This will automate the process of entering the Yealink phone’s MAC address into each extensions Phone MAC field in it’s advanced settings section.
- Yealink phones shown in the Auto Discovery section will not show up colored green even though they may well be assigned and using the PBX. The coloring is merely cosmetic and will not affect the operation of the phone.
- Log into the GUI interface of phone via its IP Address (user: admin/pass:admin)
- Navigate to Settings=>Auto Provision
- If the phone is local: Set Server URL to
TFTP://<IP address of pbx>/
- If the phone is remote: Set server URL to
http://<public IP address of pbx>/ippbx/phonecfg/
- If the phone is remote: Set the username to admin, and the password to 1234
- Click Confirm at the bottom of the page
- Click Auto Provision Now
The phone's screen should change to indicate that it is updating its config, and will then register if successful.
Quick Setup Guide
Use this in conjunction with the quick setup utility
- Yealink Quick Setup Guide
- Yealink Quick Setup utility
- When using the Quick Setup Utility with remote phones the correct provisioning URL syntax is:
http://admin:1234@<public IP of PBX>/ippbx/phonecfg
Additional programming tips:
Keys
- When configuring the Park key manually, set the type to DTMF, and the value to ##700#.
- When configuring a Record key manually, set the type to DTMF, and the value to *#
- When configuring the Day/Night key manually, set the type to BLF and the value to ff.
- Under the DDS key tab is a link for Line Keys. Be sure to set the Line Keys to Account 1 if you want them to function as a line key, otherwise you can configure them just like any other programmable key.
- Yealink Phones - Blind BLF transfers to voicemailUse a prefix key on the Yealink phones to handle blind transfers directly to a BLF extensions voicemail.Key Type: Prefix Label: VM Xfer Value: *While on the call press: TRANSFER -> VM Xfer -> BLF of the extension -> TRANSFER
- EXP20 Expansion module for Yealink T2 Series phones - Key #1 AND Key #21 must be left blank in order for the Page Switch to work properly.
Multicast
To set up multicast on your Yealink phone:
- Log into the GUI interface of phone via its IP Address (user: admin/pass:admin)
- Navigate to Contacts=>MulticastIP
- Populate the Listening Address field with the mutlicast IP of the multicast group built in the PBX, followed by a colon and the port configured for the group.
- eg. 225.5.5.5:1235
- Populate the Label field with a name that will display on the LCD when paged by the multicast group
- Click the Confirm key and your settings will be saved, allowing the phone to receive multicast pages.
A dealer has brought to our attention this link to a Yealink forum that has a firmware for multicast. I know in our testing, the .143 version had the settings needed. But its possible you may need this version as that is what the dealer needed, so we are linking to the information.
http://forum.yealink.com/forum/showthread.php?tid=189&page=3
Fixes
- T38G firmware version fixes an issue with Parked calls bonding with other calls incorrectly. Extract the .rom from the Zip folder and load it into the phone.

