Grandstream 410X Setup
Grandstream GXW 410X Gateway
Description
The following configuration guide is for use setting up the Grandstream GXW410X gateways with analog circuits.
NOTE: This guide is based upon the most current software from Grandstream. However if you have older firmware this is a link to the older guide which documents and covers the older firmware. The 4104 and 4108 use the exact same firmware as each other and have the same interface.
http://wiki.ipitomy.com/images/5/57/Tech_Bulletin_2011-008_Grandstream_Configuration_Guide.pdf
Procedure—Connections
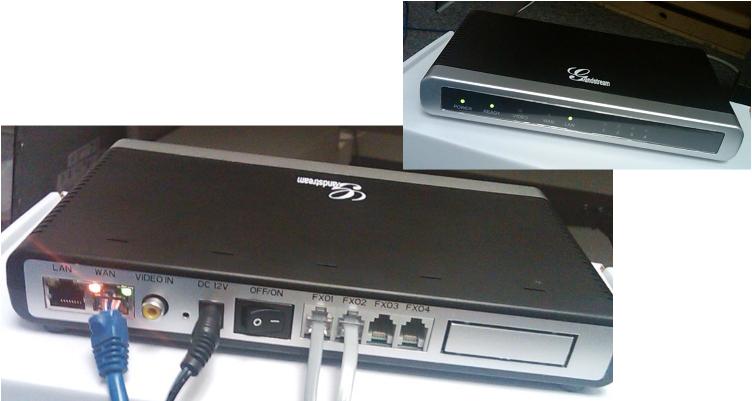
1. Connect each analog circuit to the desired FXO port, as above
2. Connect the Grandstream WAN port to an available LAN port of the network switch/router being used on site.
Procedure—Power Up and Login
1. Power up the unit and identify its assigned IP address. (Typically assigned from the DCHP server of the host router.)
2. Use your browser to access the Grandstream by inputting the IP Address assigned to it. The IP Address assigned by your router via DHCP can be discovered several ways – the easiest of which is likely by accessing the router’s connected devices page and finding it listed there.
3. When the Grandstream page is accessed, input the password (admin at default) and navigate to the pages below making the changes as defined.
IMPORTANT: Procedure Line Setup
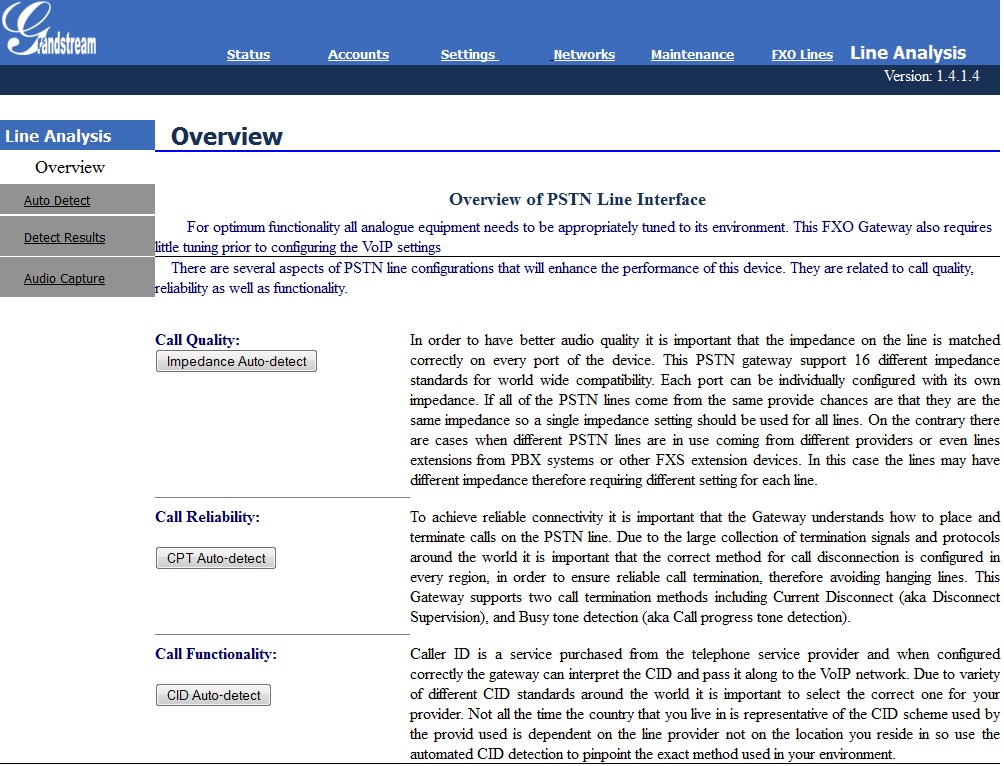
On first login to the Grandstream, you will be brought to the following page.
In ALL new installs once you have the device on the Network and lines connected, you should run each of these tests. The first is for Call quality and is MOST important. As this test matches line impedance which if it is in variance can cause echo and poor calls. The second allows the device to learn Call Progress Tones (CPT) and is also very important so that the Unit can learn disconnect and busy tones on the lines. NOTE: The Grandstream can learn a Disconnect Supervision Current drop and a busy tone for disconnect. Lastly is the test for CID. This is also important and additionally can detect CID presence on the line. For proper performance of the Grandstream Device these tests SHOULD NOT be skipped.
NOTE: These tests should be performed at the site and with the lines that the unit is intended to be in service upon.
Procedure—Configuration
1. Navigate to the Networks Basic Setting page and input the data as in the example.
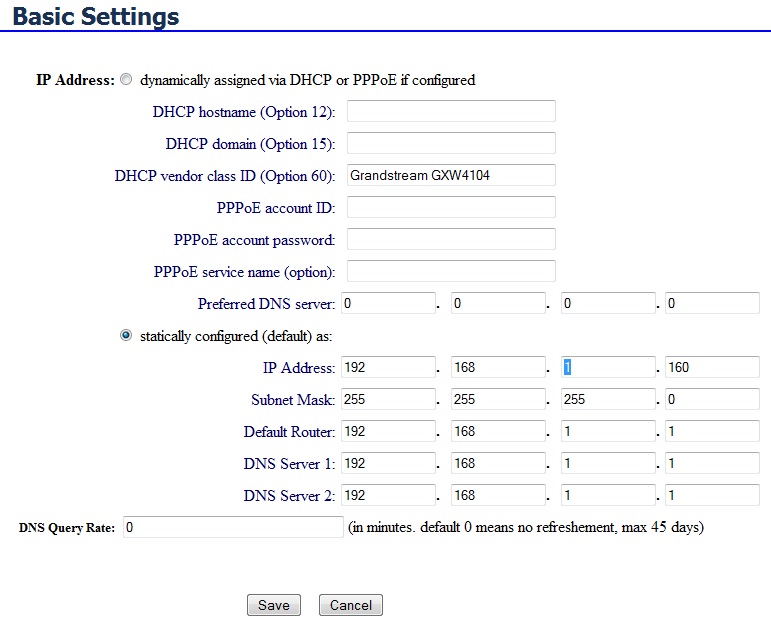
2. Assign a Static IP Address. The device must be found by the IPBX regardless of incidental changes and network adjustments. For this reason its best to change the IP Address to Static and assign an address that is out of range of those assigned for DCHP subscription. (E.g. if the router will assign DCHP Addresses from 192.168.1.1 ~ 192.168.1.50 you should select an IP Address out of this range ...192.168.1.200 would work unless it is being used elsewhere.)
3. Use the other information provided by the DCHP assignment process in the remaining data fields; Subnet is usually 255.255.255.0. The Default Router Address must be that of the router the same one that assigns DCHP IP Addresses. DNS should also be the router since it will direct traffic.
4. Click the save button. This saves information on this page before moving on.
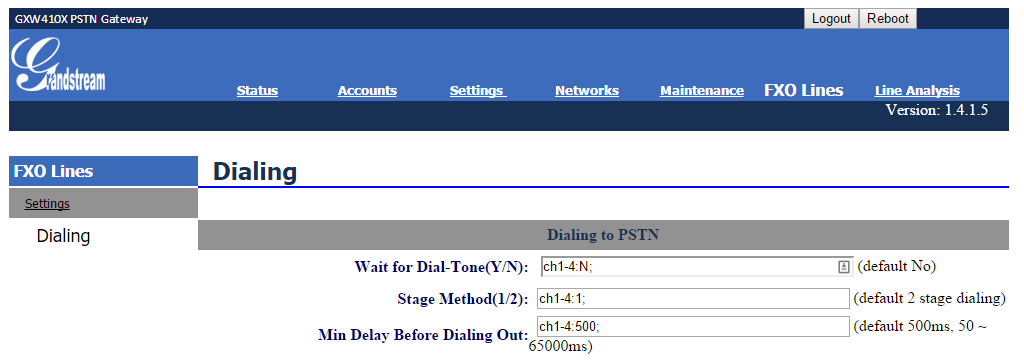
5. Navigate to the FXO Lines page. Then Select Dialing on the left.
6. Change the Stage Method(1/2)
Ch1-4:1;
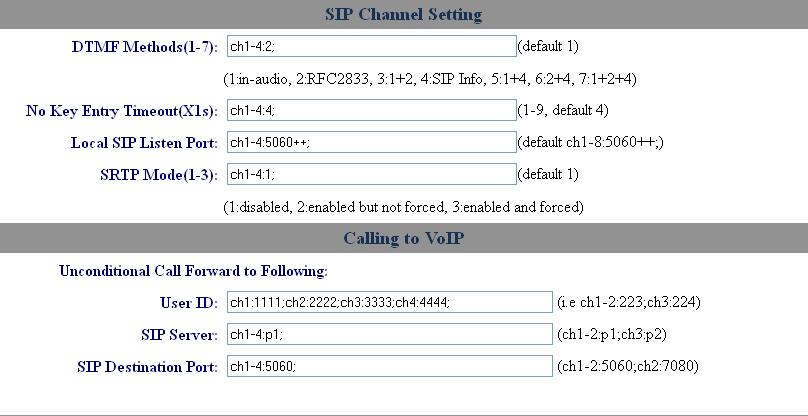
7. Navigate to Settings and then select Channels Settings on the left. Program the Unconditional Call Forward to VOIP: to include the DID (Direct Inward Dial) number(s) that are to be routed.This routing is accomplished by Profiles 1, 2 & 3. Usually only one is necessary.This data field is the routing of the calls that are received on this FXO circuit (It is recomended to use our example on this line which is
ch1:1111;ch2:2222;ch3:3333;ch4:4444;
This will create "virtual DIDs" of 1111, 2222, etc, that allow you to enter DIDs in the PBX under the SIP Provider so you can route calls to different locations based on what line they came in on. We have programmed the Grandstream to route calls that have been received to the SIP Server using Profile 1.
8.Click the save button.
Procedure—Configuration Profile
1. Navigate to the Accounts=>Account 1=>General Settings page.
2. Here the SIP Server must be programmed. Set this to be the IP Address of the IPBX. In our example, the address is 192.168.2.153.
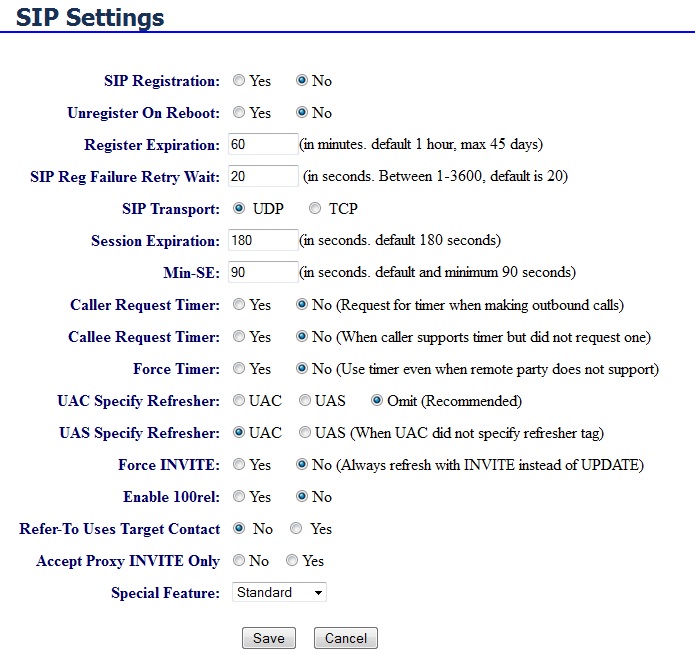
3. Also be sure that the SIP Registration field is set to No.
4.Click the save button.
5.The Grandstream configuration is now complete. However if you wish to make changes to the dial plan allowed digits you must also program that information.
Note: At default the Grandstream allows only digits 0-9 to be sent to the connected PSTN circuit. If you want to use PSTN features like call forward you will need to change the Outgoing Dial Plan field to;
{x+ | [x*]+}
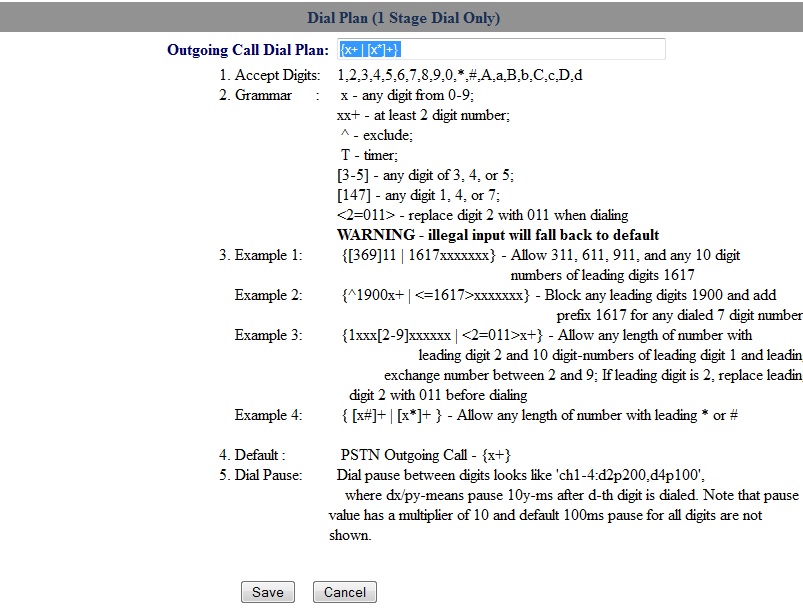
to be able to send a * to outside IVR's
6. When programming is complete in the Grandstream, click submit will commit the changes saved thus far to memory and make them operational. Continue to Procedure Configuring the IPitomy IP PBX
Procedure—Configuring the IPitomy IP PBX for Grandstream GXW 410x
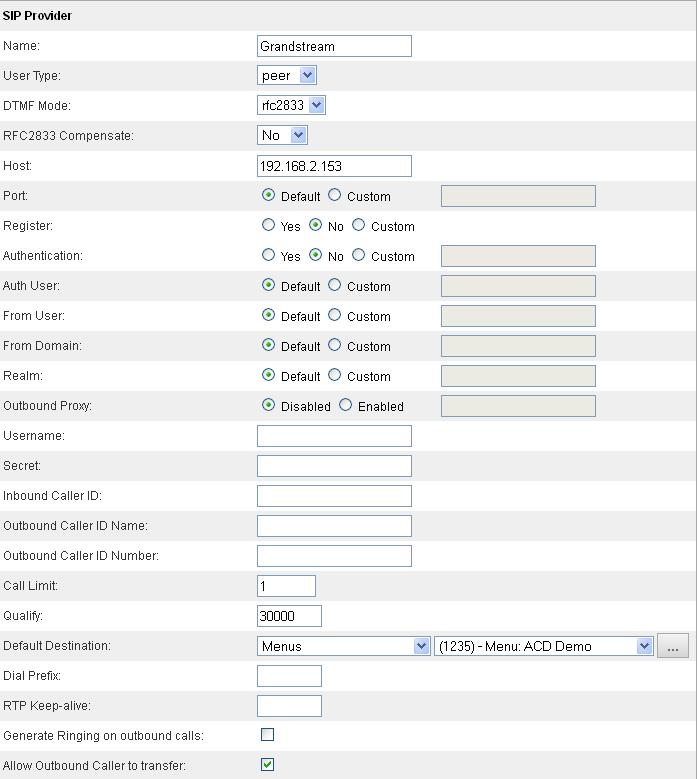
1.In the IPitomy IPBX set the fields as you see them below... using the Static IP Address assigned to the Procedure—Configuration step previously completed.. (In our example we assigned the Grandstream an IP Address of 192.168.2.9. This becomes the ―Host)
2. Click “Save Changes”
3. Then click on theApply Changes (upper right) to make these settings operational in the Ipitomy IPBX.
4.Test the operation. Make a call into each of the Grandstream ports that have circuits and assure that they are being routed as defined in Call Routing—Incoming.
5.Test the operation. Make a call at an Ipitomy extension using a calling pattern as defined in Call Routing Outgoing to assure that the call that should be placed over the Grandstream ports are placed.
Procedure—Configuring Optional Outbound Routing Methods
The Grandstream allows for two methods of outbound dialing at the same time.
Round-Robin (Linear Hunt)
If you add the trunk to an outbound route in the PBX, the Grandstream will follow the Round-Robin rules, which are found on the Channels page. By default it will start at Line
1, and move on until it finds an available channel to dial outbound.If you add the trunk to an outbound route and configure Prefix Digits to 99X where X is the port on the Grandstream you wish to use when placing this call (e.g. 991 is line 1). By doing this you can configure the calls to route out a particular line, or a different order if you add the trunk multiple times and prefix accordingly (992, 994, 991, 993, etc). The code of 99 can be changed on the Channels page in the Grandstream.
1. Navigate to the Channels page
2. Go to the Port Scheduling Schema (Voip->PSTN) section and input the code or codes that you wish (99x)
Remote Grandstream Configuration
In order to get a Grandstream 410x working as a remote device, you must make a few changes from the standard, local configuration. Use this guide in conjunction with the standard guide.
Grandstream Changes
- On the Accounts=>Account X=>SIP Settings page, set SIP Registration to YES
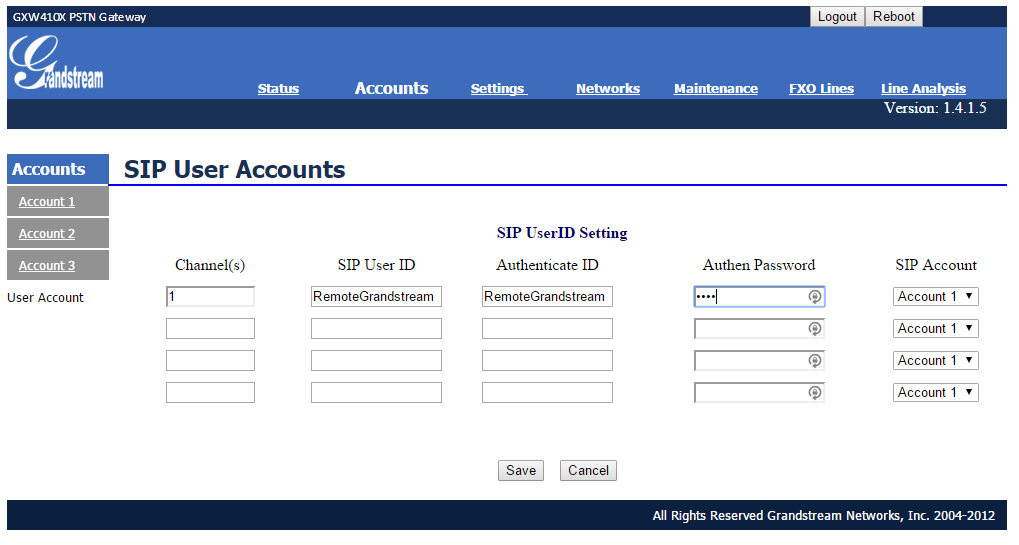
- Under the User Accounts page, configure one channel with login credentials:
- Set the SIP server in the Profile to the PBX Public IP.
PBX SIP Provider Changes
- Instead of entering an IP address for Host, set to “dynamic”
- Set Register and Authentication to YES
- Set Username and Name to the value entered as SIP User ID and Authenticate ID in the grandstream
- Set Secret to the value entered for Authen Password in the grandstream
Note: If the grandstream is not the only device at the remote site, then all remote SIP devices will need to have Can Reinvite set to YES.
Troubleshooting
Procedure—Troubleshooting—Outbound Dialing
If you having trouble dialing outbound make the following changes on the FXO Lines page:
1. Tweak the Disconnect Threshold from 100 to 300ms.
2. Tweak the Minimum Delay Before Dialing Out from 500 to 750ms.
Procedure—Troubleshooting—Call Quality
If you are having call quality issues try the following changes on the Channels page:
1.Set Silence Suppression from YES to NO.
2. Set Echo Cancellation from YES to NO
Procedure—Troubleshooting—Call Volume
If you are having issue with call volume try the following changes on the Channels page:
1.Increase/Decrease Tx to PSTN Audio Gain by increments of 3 for issues with external party volume.
2. Increase/Decrease Rx from PSTN Audio Gain by increments of 3 for issues with internal party volume
Procedure—Troubleshooting—Call Buzzing Noise
If you are having issues with a buzz heard prior to a Menu prompt; try upgrading the Grandstream firmware:
1. Navigate to Advanced Settings page
2. Ensure HTTP is selected for the method to upgrade
3. Set Firmware Server Path: to firmware.grandstream.com
4. Set Automatic Upgrade to YES
5. Set Allow DHCP Option 66 to override server to No Click Update at the bottom of the page
6. Click Reboot The upgrade may take as long as 20min when done through the internet, so allow plenty of time for this. While upgrading the LED will blink. When the LED returns to normal, the device has completed its upgrade
Procedure—Troubleshooting—Restore Factory Default
To Restore Factory Defaults:
1. While powered up, hold the recessed Reset button in for 7+ seconds
Procedure Setup of QOS
1. Access the IP of the Grandstream.
2. Navigate in the Grandstream Web Admin to Networks – Advanced Settings
3. Set the Layer 3 Diff Serv Value to 24 Which is CS3 or in Binary 011000
4. Submit your changes and reboot
FAQ - Grandstream GXW 410X Gateway
When I call an outside party and the party puts me on hold with no music or sound, I am disconnected after 60 seconds. Is there a way to change this?
On the FXO-Lines Page there is a setting called Silence Timeout. Set this value to however many seconds you wish to remain connected to a silent line. (A good setting would be 3600s a.k.a. 1 hour).
How do I ensure that the Grandstream is on the latest firmware?
- Navigate to the Advanced Settings Page
- Ensure HTTP is selected for the method to upgrade
- Set Firmware Server Path: to firmware.grandstream.com
- Set Automatic Upgrade to YES
- Set Allow DHCP Option 66 to override server to No
- Click Update at the bottom of the page
- Click Reboot
The upgrade may take as long as 20min when done through the internet, so allow plenty of time for this. While up- grading the LED will blink. When the LED returns to normal, the device has completed its upgrade.
How do I adjust the Call Volume?
First, please consider that analog lines are supposed to be individually isolated electrically. This means that you may have to adjust line volumes individually. Be sure to specify the volume per line if your lines exhibit different electrical characteristics.
In order to adjust the settings:
- Navigate to the Channel's page
- Increase Tx to PSTN Audio Gain for issues with external party volume
- Increase Rx from PSTN Audio Gain for issues with internal party volume
Note that you will have to restart calls in order for changes to be applied.
I am having general call quality issues. Voice is choppy or unintelligible.
Before performing generic analog line troubleshooting. You may want to set the following settings to ensure optimal performance: Silence Suppression and Echo Cancellation.
- Navigate to the channels page
- Under Channel Voice Setting :
Set Silence Suppression to:
ch1-4:N;
and/or
Set Echo Cancellation to:
ch1-4:N;
Note that Silence suppression can always be turned off safely, but you may have differing results turing off echo cancellation depending on your particular environment.
If you are not successful in resolving the problem with the above settings, please ensure that your firmware is updated to the latest.
Additional Resources regarding analog line issues and VOIP/Digitial Systems: Sandman
I am having difficulty with line disconnect using Comcast Cable Lines.
If you are using Comcast Cable as your line provider for Analog lines, you should note that Comcast uses Line Voltage drop for disconnect and the timing on this is 900 ms. To make certain the Grandstream is configured optimally you should log in to the Grandstream. Then Navigate to the FXO Lines page. The first item on this page is Enable Current Disconnect and by default this is set to on or Yes. Beneath this entry is the entry If enabled, use threshold: and the default value is 100 ms. You should change this to 900 ms when using Comcast Cable lines. Additionally this information is applicable when using the Ipitomy IP 400 platform for line integration also. Make sure to save and reboot the Grandstream after applying this change. NOTE: On any analog line, you should match this field to the timing value that the provider is sending. As this value is not standard industry wide.
I am getting echo on trunk calls, but not on ext to ext calls
Typically we have found echo on analog trunks to be caused by the trunks themselves. You will likely have to contact the provider to resolve this, but there are a few things you can try to help alleviate the problem while working with the provider.
- Ensure that Echo Cancel is enabled in the Grandstream
- Since echo is typically caused by "hot" lines, you can lower the dB gain to help. This is found in the Grandstream under the Channels page.
- Check with Sandman for other solutions, and how to test the properties of the lines so you can relay the issue to the provider accurately.
Having issues with DTMF being recognized when calling out
- Set the SIP Provider in the PBX to DTMF mode rfc2833
- Set the DTMF mode in the Grandstream (found under the Channels page) to rfc2833
