Difference between revisions of "Cloud Phone Configuration"
| Line 3: | Line 3: | ||
*Start by filling out the [[File:IPitomy_Setup_Worksheet.xls]] | *Start by filling out the [[File:IPitomy_Setup_Worksheet.xls]] | ||
**Be sure to enter the MAC addresses for the phones, as without that information you the PBX will not create a config file | **Be sure to enter the MAC addresses for the phones, as without that information you the PBX will not create a config file | ||
| − | *Next, you need to ensure the PBX is correctly configure to function with Remote Phones | + | *Next, you need to ensure the PBX is correctly configure to function with Remote Phones, and program the phone manually to communicate with the PBX over HTTP. |
{{:HD_Phones_Remote_Configuration}} | {{:HD_Phones_Remote_Configuration}} | ||
*Once this is completed, you will simply reboot the phone and it will download its config file and update its firmware directly from the PBX. | *Once this is completed, you will simply reboot the phone and it will download its config file and update its firmware directly from the PBX. | ||
Latest revision as of 15:35, 6 February 2014
With the implementation of our Cloud PBX service, configuration of a phone is a little different than what would be done if the phones were local to the PBX. Below is the best practice to get phones deployed to the Cloud.
- Start by filling out the File:IPitomy Setup Worksheet.xls
- Be sure to enter the MAC addresses for the phones, as without that information you the PBX will not create a config file
- Next, you need to ensure the PBX is correctly configure to function with Remote Phones, and program the phone manually to communicate with the PBX over HTTP.
Remote Phones
For Premise Based IP1100/IP1150/IP1200/IP2000/IP5000:
- Configure the PBX Site router with port forwards of 5060 UDP and 10k-20k TCP/UDP. The port forwards should point at the LAN address of the PBX
- Navigate to PBX Setup=>SIP and enter the Public IP address of the PBX under External IP, Save
- Navigate to System=>Access Control=>Access Control List
- Configure so that the IP address for the remote phone can communicate to the PBX in one of two ways:
- Add the Public IP address of the remote location if its static (eg. 75.124.65.8/32)
- Delete the SIP service from the Access Control List if the remote phone will not have a static IP. If you use this method, we advise to enable Log Watch & Ban after you have verified the remote phone works.
- Navigate to the PBX Settings for the Extension
- Click the blue Advanced link
- Change the Location from LAN to WAN, Save and Apply Changes
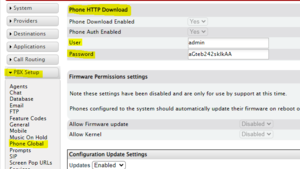
- Navigate to PBX Setup=>Phone Global (Needed for HTTP download of files from remote)
- Ensure that Phone Download Enabled and Phone Auth Enabled are set to Yes (Needed for HTTP download of files from remote)
- Navigate to the Phone Settings for the Extension (click the Pencil w Handset)
- Under Configuration Updates change from TFTP to HTTP (Needed for HTTP download of files from remote) NOTE:The port set must be forwarded to the PBX, typically 8080 or 80.
- Click Save and then Apply Changes
Manual Configuration Settings in Phone for HTTP (required for phones registering to a Cloud PBX)
Sometimes it may be necessary to program a phone for remote operation when it is at the remote site. (You weren't able to do the previous steps while at the PBX location.) Use these steps as a guide:
FOR IPITOMY PHONES
- Open a browser and navigate to the Phone GUI
- Navigate to Phone Maintenance -> Advanced -> Auto Provision
- Change Protocol to HTTP
- Change Software Server URL: to
http://<pbx public ip>/ippbx/phonecfg/
- Set the Username to admin (default value)
- Set the Password to the unique password located in PBX Setup > Phone Global in the Phone HTTP Download section.
- Uncheck Auto Download Kernel
- Uncheck Auto Download Personal Phonebook
- Click Submit
- Click Autoprovision Now
FOR YEALINK PHONES
- Open a web browser and log into the web interface of the phone using it's IP address [Yealink default username:admin password: admin]
- Navigate to Settings -> Auto Provision
- In the Server URL field enter:
http://<pbx public ip>/ippbx/phonecfg/
- In the User Name field enter: admin [default value]
- In the Password field ,set the Password to the unique password located in PBX Setup > Phone Global in the Phone HTTP Download section.
- Click the "Confirm" button
- Click the "Auto Provision Now" button

'NOTE: In order for their to be a config file for th'e phone to download, the MAC address of the phone must be entered under the extension in the PBX. Also, you must remove the <> as they are not part of the software URL.
For this to work, you must navigate in the PBX to PBX Setup=>General; ensure that Autoprovisioning is Running (click ON if it is currently Stopped)
- Once this is completed, you will simply reboot the phone and it will download its config file and update its firmware directly from the PBX.