Difference between revisions of "Desktop Call Manager"
Paul Falanga (talk | contribs) |
Paul Falanga (talk | contribs) |
||
| Line 11: | Line 11: | ||
| − | [[File:DCM1 Full Screen.gif|none|DCM1 Full Screen.gif]]http://wiki.ipitomy.com/index.php?title=Training:Desktop_Call_Manager&action=edit | + | [[File:DCM1 Full Screen.gif|none|DCM1 Full Screen.gif]][http://wiki.ipitomy.com/index.php?title=Training:Desktop_Call_Manager&action=edit http://wiki.ipitomy.com/index.php?title=Training:Desktop_Call_Manager&action=edit] |
| Line 37: | Line 37: | ||
| | ||
| − | {| align=" | + | {| style="width: 500px" align="left" border="1" cellpadding="1" cellspacing="1" |
|- | |- | ||
| − | | | + | | Call<br/> |
| − | + | | Displays what type of call you are viewing - Incoming, Outgoing, or Internal<br/> | |
| − | |||
| − | | | ||
| − | Displays what type of call you are viewing | ||
| − | |||
|- | |- | ||
| − | | | + | | Time<br/> |
| − | + | | Displays the duration of the call<br/> | |
| − | |||
| − | | | ||
| − | Displays the duration of the call | ||
| − | |||
|- | |- | ||
| − | | | + | | Connected To<br/> |
| − | + | | Shows what trunk/channel the call is using<br/> | |
| − | |||
| − | | | ||
| − | Shows what trunk/channel the call is using | ||
| − | |||
|- | |- | ||
| − | | | + | | CID<br/> |
| − | + | | Displays the Caller ID information for the call<br/> | |
| − | |||
| − | | | ||
| − | Displays the Caller ID information for the call | ||
| − | |||
|- | |- | ||
| − | | | + | | Status<br/> |
| − | + | | Shows the status of the call - Connected, Hold, No Link<br/> | |
| − | |||
| − | | | ||
| − | Shows the status of the call | ||
| − | |||
|} | |} | ||
| − | |||
| − | |||
| − | |||
| − | |||
| − | |||
| − | |||
| − | |||
| − | |||
| − | |||
| − | |||
| − | |||
| − | |||
| − | |||
| − | |||
| − | |||
| − | |||
| − | |||
| − | |||
| − | |||
| − | |||
| − | |||
| − | |||
| − | |||
| − | |||
=== '''''Call Control'''''<br/> === | === '''''Call Control'''''<br/> === | ||
| Line 116: | Line 72: | ||
*'''<u>Park</u>'''<ul style="list-style-type:circle;"> | *'''<u>Park</u>'''<ul style="list-style-type:circle;"> | ||
</ul></ul> | </ul></ul> | ||
| + | |||
| + | </ul> | ||
*On your DCM personal call window, highlight the active call and click PARK. The call will automatically be placed in the next available Park orbit (701-720). The IPitomy system will tell you which park orbit the call is parked on. The call will be available on one of the park pickup keys on all telephones. | *On your DCM personal call window, highlight the active call and click PARK. The call will automatically be placed in the next available Park orbit (701-720). The IPitomy system will tell you which park orbit the call is parked on. The call will be available on one of the park pickup keys on all telephones. | ||
*'''<u>Listen to Voicemail</u>'''<ul style="list-style-type:circle;"> | *'''<u>Listen to Voicemail</u>'''<ul style="list-style-type:circle;"> | ||
| − | < | + | </ul></ul> |
| − | + | ||
| + | *This feature allows you to listen to a caller while s/he is leaving you a message in voicemail. On your DCM personal call window, highlight the active call that is in your VM. Then click LISTEN TO VM. The speaker on your phone will automatically activate, and you will be able to hear the caller leaving the voicemail message (hands free via the phone’s speaker). | ||
| + | |||
| + | </li> | ||
| + | |||
| + | *'''<u>Pickup Voicemail</u>'''<ul style="list-style-type:circle;"> | ||
<li>On your DCM personal call window, highlight the active call that is in your VM. Click PICKUP VM to pull the caller out of your voicemail box and into an active call with you. (Make sure you hang up the previous call using “Listen to Voice Mail)</li> | <li>On your DCM personal call window, highlight the active call that is in your VM. Click PICKUP VM to pull the caller out of your voicemail box and into an active call with you. (Make sure you hang up the previous call using “Listen to Voice Mail)</li> | ||
| − | </ul></li> | + | </ul></li></li><li>'''<u>Hang-up</u>'''<ul style="list-style-type:circle;"> |
| − | <li>'''<u>Hang-up</u>'''<ul style="list-style-type:circle;"> | ||
<li>On your DCM personal call window highlight the active call and click HANGUP to terminate the call.</li> | <li>On your DCM personal call window highlight the active call and click HANGUP to terminate the call.</li> | ||
| − | </ul></li></li> | + | </ul></li></li></li> |
<li>'''<u>Record</u>'''<ul style="list-style-type:circle;"> | <li>'''<u>Record</u>'''<ul style="list-style-type:circle;"> | ||
<li>On your DCM personal call window highlight the active call and click RECORD to start recording the call. The RECORD button automatically changes to STOP RECORD. To terminate the recording of this call, just click on STOP RECORD.</li> | <li>On your DCM personal call window highlight the active call and click RECORD to start recording the call. The RECORD button automatically changes to STOP RECORD. To terminate the recording of this call, just click on STOP RECORD.</li> | ||
| Line 510: | Line 472: | ||
| | ||
| − | You should then save and restart the Call Manager Application. Your text messaging window will be populated with your Jabber contacts. | + | You should then save and restart the Call Manager Application. Your text messaging window will be populated with your Jabber contacts. </li> |
</li> | </li> | ||
Revision as of 17:51, 13 September 2012
Desktop Call Manager – DCM
Desktop Call Manager or DCM is Ipitomy’s Call Management application for Windows Operating Systems. It allows the user to Control their calls and the calls of others within the system that they have permissions to control using the PC and the interface. It offers a robust platform for call management.
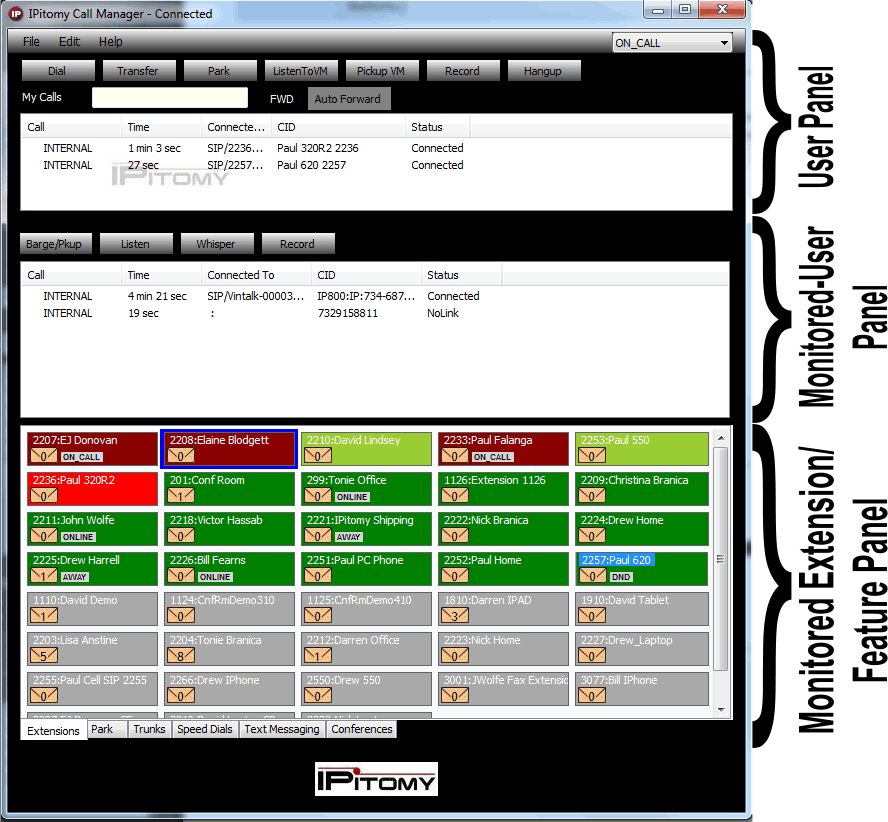
Desktop Call Manager (DCM) R2 Display
The DCM R2 display is comprised of three functional areas, the User Panel, the Manager Panel and the Feature Panel.
http://wiki.ipitomy.com/index.php?title=Training:Desktop_Call_Manager&action=edit
NOTE that with DCM R2 there is no distinction between the display window for a user and for an operator/supervisor. In DCM R2 functionality (such as LISTEN, WHISPER and RECORD) is controlled under calling permissions in the extension configuration in the IPitomy IP PBX database.
User Panel
The User Panel provides the ability to perform certain call control actions for a user’s own extension.
Call Monitoring
In the large white box you will see any calls that are ringing your extension, actively connected to your extension, on hold with your extension, or in your extension’s voicemail box.
| Call |
Displays what type of call you are viewing - Incoming, Outgoing, or Internal |
| Time |
Displays the duration of the call |
| Connected To |
Shows what trunk/channel the call is using |
| CID |
Displays the Caller ID information for the call |
| Status |
Shows the status of the call - Connected, Hold, No Link |
Call Control
The buttons across the top of the User Display allow you to control the operation of your telephone.
Dial
To place a call, enter an extension number or telephone number in the text field next to My Calls. Click DIAL. Your extension will ring. When you answer, you will be connected to the call.
Shortcut: You can take advantage of the Extension Panel right click feature. The Extension Panel allows you to right click on the extension you wish to call and click dial. Each extension that is monitored will appear as a colored box in the Extensions panel. The right click menu provides several other options including transfer, transfer to voice mail and page.
Transfer
To transfer a call, enter an extension number or telephone number in the text field next to My Calls. On your DCM personal call window, highlight the active call you want to transfer, and then click TRANSFER to send the call to the extension or telephone number input in the text field.
- Shortcut: You can take advantage of the Extension Panel right click feature. The Extension Panel allows you to right click on the extension you wish to transfer a call to and click transfer; the caller will be transferred to the extension. Each extension that is monitored will appear as a colored box in the Extensions panel. The right click menu provides several other options including dial, transfer to voice mail and page.
- Park
</ul>
- On your DCM personal call window, highlight the active call and click PARK. The call will automatically be placed in the next available Park orbit (701-720). The IPitomy system will tell you which park orbit the call is parked on. The call will be available on one of the park pickup keys on all telephones.
- Listen to Voicemail
- This feature allows you to listen to a caller while s/he is leaving you a message in voicemail. On your DCM personal call window, highlight the active call that is in your VM. Then click LISTEN TO VM. The speaker on your phone will automatically activate, and you will be able to hear the caller leaving the voicemail message (hands free via the phone’s speaker).
</li>
- Pickup Voicemail
- On your DCM personal call window, highlight the active call that is in your VM. Click PICKUP VM to pull the caller out of your voicemail box and into an active call with you. (Make sure you hang up the previous call using “Listen to Voice Mail)
</li></li>
- On your DCM personal call window highlight the active call and click HANGUP to terminate the call.
- On your DCM personal call window highlight the active call and click RECORD to start recording the call. The RECORD button automatically changes to STOP RECORD. To terminate the recording of this call, just click on STOP RECORD.
</ul>
Manager Panel
The Manager Panel includes the ability to monitor the status of selected extensions and perform call control functions. It also includes whisper features that supervisors will find useful. When an extension is selected from the extension panel, the calls for that extension are displayed on the Manager Panel.
The manager can select a call from the list then choose to use the enabled functions available on the Manager Buttons; Barge/Pickup, Listen, Whisper and Record. Each button can be enabled or disabled based upon each individual user requirements.
Barge/Pickup
Highlight an extension and then highlight the active call. Click BARGE/PKUP to take that call. This will work for a ringing extension as well as an extension that is connected to a call.
Listen
Highlight an extension and then highlight the active call. Click LISTEN to listen in on the call. NOTE that access to this functionality, typically used by supervisors for employee coaching, is controlled under calling permissions in the extension configuration in the IPitomy IP PBX database.
Whisper
Highlight an extension and then highlight the active call. Click WHISPER to listen in on the call and be able to talk to the internal party. Only the internal party can hear you. NOTE that this functionality is controlled under calling permissions in the extension configuration in the IPitomy IP PBX database.
Record
Highlight an extension and then highlight the active call. Click RECORD to start recording the call. NOTE that this functionality is controlled under calling
Extension Panel
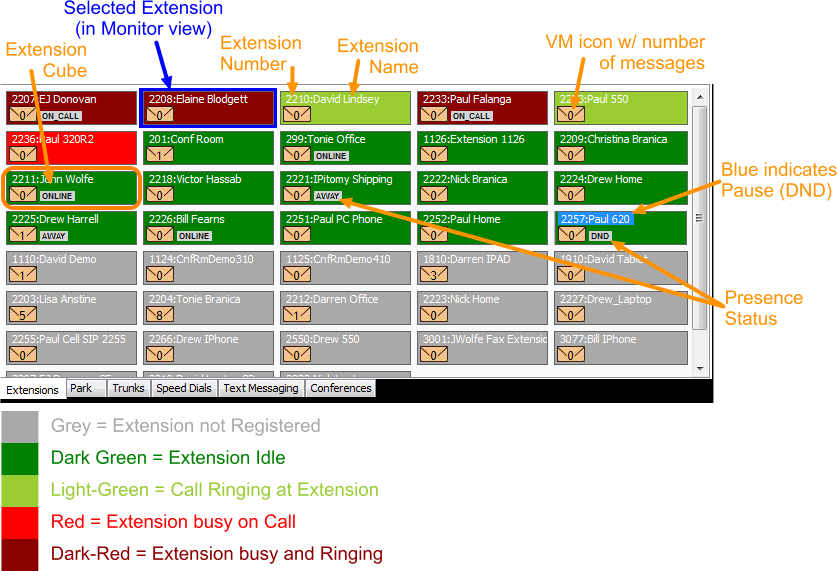
The Extension Panel displays the extensions you are monitoring. Each extension monitored has its own icon. The extension Panel can be configured to monitor all extensions, or just a certain group of extensions required to be monitored by an individual user. Each extension will appear in a color that indicates the status of the user.
===
===
===
===
===
Accessing Calls Recorded via Desktop Call Manager
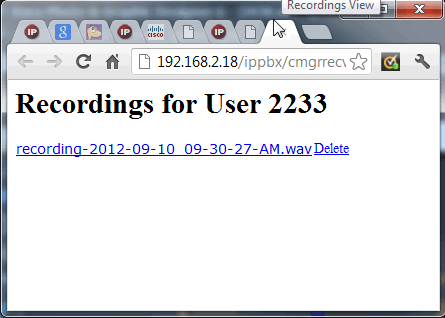
To view Recordings made through DCM, click EDIT at the top of the DCM window (toolbar located above the User Display). Then click View Call Recordings. This will take you to a webpage that allows you to listen, download, and delete your call recordings.
Tabbed Options to Access Feature Panels
Tabs across the bottom of the Operator Display, provide additional views and functionality.
Park Panel
Click the PARK tab at the bottom to view Park activity. This will change the Panel view to display the status of the 20 park orbits (701-720). Green designates the park orbit is free, and red indicates there is a call parked. Parked calls will display the Caller ID (CID) under the park orbit name. The ability to view parked calls across multiple sites is available as an option. To pick up a call on park using DCM, right click on the red park icon and click pickup.
Trunks Panel
To view Trunk activity, click the TRUNKS tab. This will open a new window displaying the status of system trunks. Green designates an open channel, and red indicates that the channel/trunk is actively connected with a call. NOTE that only trunks using Internal hardware cards installed in the IPitomy IP PBX will display, i.e., T1 cards, analog cards, etc. SIP trunks and analog trunks terminated on IP400 gateways will not display. The ability to view parked calls across multiple sites is available as an option.
Speed Dials Panel
To configure a speed dial in DCM, click the SPEED DIALS tab. There are twenty (20) possible speed dials. To configure a speed dial, right click one of the green boxes, select EDIT, and input a text LABEL and the value you want dialed. Speed dials can be configured as virtually any dialable string of digits: extension or ring group numbers, external telephone numbers, feature codes, etc. Once configured, right click the speed dial you wish to use and select DIAL from the drop down menu.
Text Messaging Panel
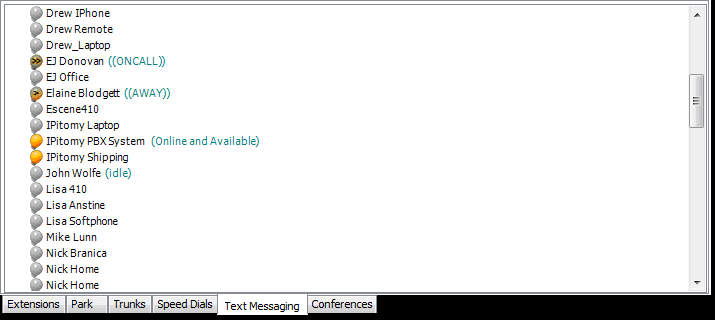
When configured using any XMPP compliant server and client application, you can click on the TEXT MESSAGING tab to bring up your chat contacts. To initiate a chat, double click the icon next to the person you wish to chat with. Different icons will display for chat based on the status of the individual users:

|
|
IPitomy Desktop Call Manager Install Guide
This guide assumes that your IP1200/IP1500/IP2000 is on firmware 3.1-2437 or more recent and has been licensed for Call Manager already. If the PBX is on a version prior to 3.1-2437 you will need to reference the IP1200/1500/2000 Upgrade Guide if you wish to use Call Manager. To get licensed, contact IPitomy Sales.
Installing .NET Framework
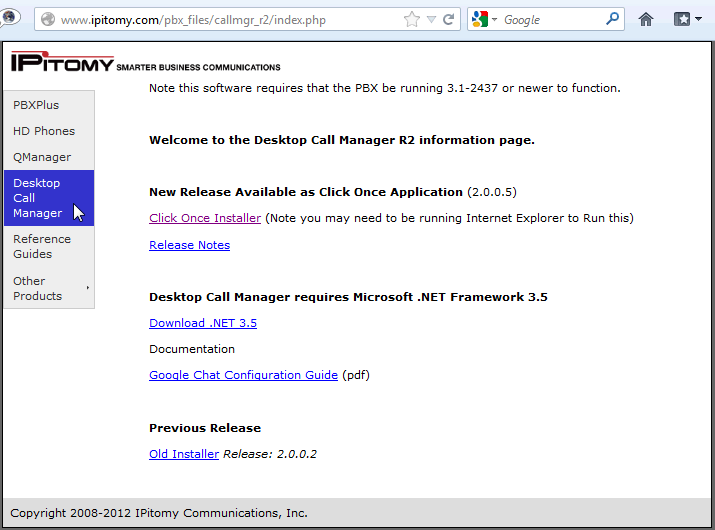
- At the computer you wish to install Call Manager on, navigate with your web browser to http://ipitomy.com/pbx_files/callmgr_r2/index.php
- Click the link Download .NET 3.5 if your PC does not already have it
- Download .NET 3.5 and follow the instructions until it has been installed
Assigning Licenses to Extensions
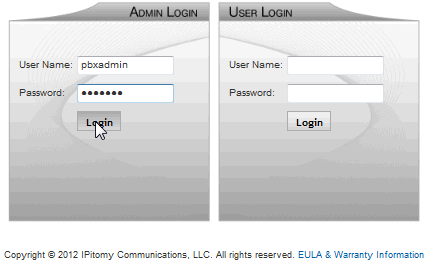
- Login to the PBX
- Navigate to PBX Setup=>Services and scroll down to the section with User Licenses
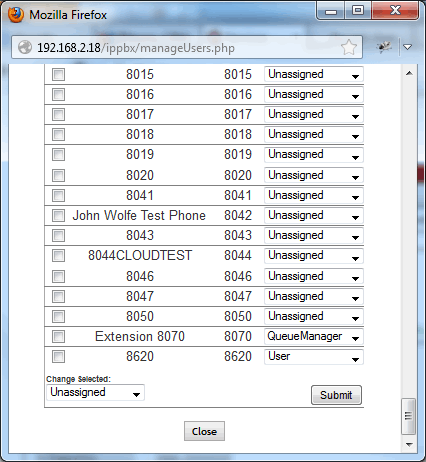
- Click Assign User Licenses and the pop-up for assigning licenses to extension will appear
- From the dropdown select which license you would like the extensions to use
- Once selected, scroll to the bottom of the window and click Submit and then close the window
- Click Apply Changes
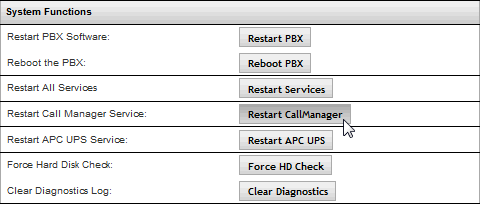
- Navigate to PBX Setup=>Services and scroll down to the System Functions panel
- Click the Restart Call Manager Daemon button
Installing Desktop Call Manager
- Navigate in your web browser to http://ipitomy.com/pbx_files/callmgr_r2/index.php
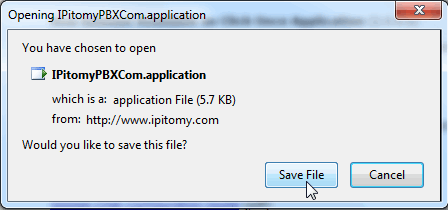
- Click Click Once Application to begin installing Desktop Call Manager
- Click Run ClickOnce Application and the installer will launch
- Once requirements are verified, the following window pops up
- Click Install to begin the installation process
- Once the install has completed, the application will open and an error will appear indicating settings are are correct.
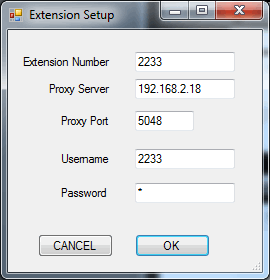
- Click OK and Extension Setup will appear, populated with default information
- Under Extension Number and Username, enter the extension number for an extension that was assigned a Call Manager license.
- Under Password, enter the PIN (VM Password) for the extension.
- Under Proxy Server, enter the local IP for the PBX
- Click OK once all the correct data has been entered and Call Manager will load
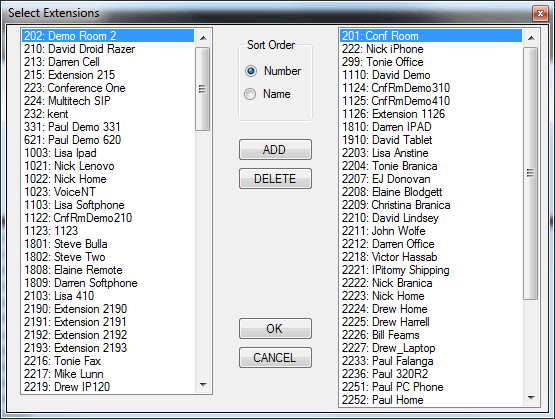
- At the top of the window click Edit followed by Select Monitored Extensions
- Highlight the extensions you would like to monitor, individually or in groups by using the CTRL or SHIFT keys, followed by clicking the Add button to add them to the your list of monitored extensions
- When finished adding extensions, click OK
Congratulations, you have successfully installed the IPitomy Desktop Call Manager. Please see the Call Manager User Guide for instructions on how to use your new application.
Optional Chat Settings
To setup Text Messaging/Chat in Call Manager R2, you can use the built-in IPitomy XMPP server will need to either have a Google Talk account, or a Jabber Talk server or some other XMPP compliant Chat server.
Configuration using IPitomy's XMPP PBX-embedded Server.
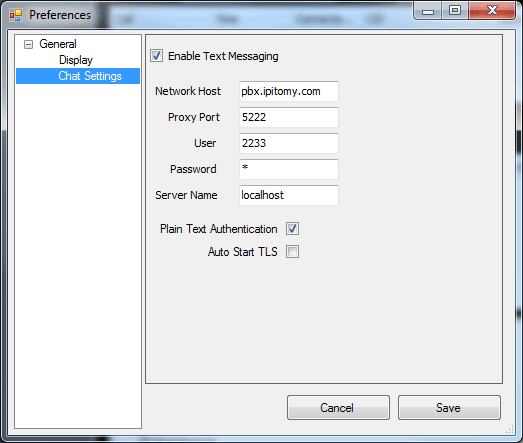
Open Call Manager and then select Edit and the Preferences.
In the Preferences under Chat Settings you will need to set the following
Network Host : IP Address of the PBX (usually 192.168.1.249)
Proxy Port 5222
User: Extension Number
Password: VM Password
Server Name: localhost
Plain Text Authentication should be enabled
Auto Start TLS should be disabled
Now Save your settings and restart the Call Manager Application. Your text messaging window will be populated with any other extensions on the IPitomy XMPP Server.
Configuration using Google Talk.
To configure using Google Talk as your chat server, open Call Manager and then select Edit and the Preferences.
In the Preferences you will need to set the following
Network Host : talk.l.google.com
Proxy Port 5222
User: <your Google Username>
Password: <your Google Password>
Server Name: Google.com
Plain Text Authentication should be disabled
Auto Start TLS should be enabled
At this point you should save your settings and restart the Call Manager Application. Your text messaging window will be populated with your Google Talk contacts.
Configuration using a Jabber Talk Server such as Open Fire.
To configure using Jabber Talk as your chat server, open Call Manager and then select Edit and the Preferences.
Network Host : <your hostname or IP for your Jabber Server>
Proxy Port 5222
User: <your Jabber Username>
Password: <your Jabber Password>
Server Name: <Name of Jabber Server>
Plain Text Authentication should be enabled
Auto Start TLS should be disabled
You should then save and restart the Call Manager Application. Your text messaging window will be populated with your Jabber contacts. </li>
