Difference between revisions of "Edit Phone Settings"
John Wolfe (talk | contribs) (Created page with "= Edit Phone Settings<br/> = To access the Phone settings, Navigate to Destinations - Extensions and then select the Phone settings Icon. This is the Icon with the Pencil/Han...") |
John Wolfe (talk | contribs) |
||
| Line 9: | Line 9: | ||
A description of all key types and their uses may be found in the Manual Appendices. And may also be found by following this link. | A description of all key types and their uses may be found in the Manual Appendices. And may also be found by following this link. | ||
| − | + | {{:IP PBX Manual Appendix 1 Key Types}} | |
Also found within the Manual Appendices is the full Designation Print Guide. Which may also be accessed at this link | Also found within the Manual Appendices is the full Designation Print Guide. Which may also be accessed at this link | ||
| − | + | {{:Print hd labels}} | |
Revision as of 12:53, 12 July 2013
Edit Phone Settings
To access the Phone settings, Navigate to Destinations - Extensions and then select the Phone settings Icon. This is the Icon with the Pencil/Handset. When moused over it will have a mouse over popup which indicates it is the Phone settings Icon. The first page is the Key Settings Page. From this page the Technician may set key settings for the phone in question and also print labels for the DESI as indicated.

A description of all key types and their uses may be found in the Manual Appendices. And may also be found by following this link.
.gif)
Appendix 1: Key Types and Codes
This table describes the function of each key type, and how to manually configure them. It is not advised to manually configure unless the phone is in a situation where you cannot easily use the PBX to set the keys (ie: remote phones). Unless specified, the Line field when manually configuring should be set to All.
| Key Type | |
|---|---|
| BLF |
Can be set to an extension or park orbit. Pressing the key will call the extension or retrieve a call from the park orbit. When an extension is ringing the light will flash, and when an extension is connected to a call, the light will be solid. Park BLF keys will lamp when a call is parked in that particular orbit. To manually configure, log into the phone and set the key to:
Type: BLF Label: Meaningful Descriptor Value: The extension or park orbit number to monitor Line: 1 |
| Speed Dial | Dials the digits entered as for the Value and sends them to the PBX. To manually configure, log into the phone and set the key to:
Type: Speed dial Label: Meaningful Descriptor Value: Any number or feature code that the PBX can recognize |
| Park | Takes the connected call and parks it in an available orbit from 701-720, starting at the lowest available slot. When parking, the PBX will tell you audibly which orbit the call was sent to. To manually configure, log into the phone and set the key to:
Type: Speeddial Label: Park Value: ##700# |
| DND | Places the phone itself in a state where it will not receive calls. This does not communicate your state to the PBX (see Pause key). To configure manually, log into the phone and set the key to:
Type: Do Not Disturb |
| Blind Transfer | This key starts the transfer process and allows you to enter a transfer destination. Once entered, press Dial or wait for the digit timeout and the call will transfer. This key is most useful if a phone has no open lines to perform a transfer using the fixed key on the phone, as it does not open a new line to transfer. To configure manually, log into the phone and set the key to:
Type: Prefix Label: Blind Transfer Value: ## |
| Call Pickup | Allows the user to answer calls ringing direct to extensions that are in the Call Group that matches the phones Pickup Group. To manually configure, log into the phone and set the key to:
Type: Pickup Label: Meaningful Descriptor Value: 99 |
| Voicemail | Allows the user to check their voicemail messages. User will be prompted for their password(PIN). To manually configure, log into the phone and set the key to:
Type: Speed dial Label: Voicemail Value: 923 |
| Voicemail Gateway | Allows the user to check any voicemail box for messages. User will be prompted for mailbox number and password(PIN). To manually configure, log into the phone and set the key to:
Type: Speed dial Label: VM Gateway Value: 924 |
| Record | Toggles on and off the record feature on the current active call. The file will be saved in the voicemail box for the extension, under the Work folder. To manually configure, log into the phone and set the key to:
Type: Speed dial Label: Record Value: *# |
| Fwd On | With a single press, a user can enable their unconditional forwarding. If no destination is set, you will need to define one before forwarding can be enabled. To manually configure, log into the phone and set the key to:
Type: Speed dial Label: Fwd On Value: *91 |
| Fwd Off | With a single press, a user can disable their unconditional forwarding. To manually configure, log into the phone and set the key to:
Type: Speed dial Label: Fwd Off Value: *90 |
| Set Fwd | With a singe press, a used can define their forwarding destination. To manually configure, log into the phone and set the key to:
Type: Speed dial Label: Set Fwd Value: *92 |
| Fwd Gateway | This takes the user to a gateway that allows them to control forwarding for extensions other than their own. User will be prompted for an extension number and password (PIN) before they can make changes. Once logged in, you can enable, disable, and set the forward destination. To manually configure, log into the phone and set the key to:
Type: Speed dial Label: Fwd Gateway Value: *9 |
| Intercom | This key starts the intercom process and allows you to enter an extension or group number. Once entered, press Dial or wait for the digit timeout, and the page will happen. To manually configure, log into the phone and set the key to:
Type: Intercom Label: Intercom |
| Pause | Similar to the DND key, except pressing this key communicates to the PBX, and will pause you out of call queues. The key is a BLF and will lamp when the phone is paused. To manually configure, log into the phone and set the key to: Pause functions as DND, however will allow a Page to be sent to the phone. Type: BLF Label: Pause Value: ABC<extnum> Line: 1 |
| Day/Night BLF | When pressed, a call is established to the PBX telling the user the state of Day/Night mode override, and gives instructions on how to change the settings. If Day/Night mode is forced into night mode, the light will blink; and if forced into day mode, the light will be solid. If Day/Night mode is following the schedule the BLF will not lamp. To manually configure, log into the phone and set the key to:
Type: BLF Label: Day/Night Value: ff Line: 1 |
| Page BLF | Allows BLF monitoring of an extension, as well as one press paging to that extension. TO manually configure, log into the phone and set the key to:
Type: BLF Label: Meaningful Descriptor Value: **<extnum> Line: 1 |
Also found within the Manual Appendices is the full Designation Print Guide. Which may also be accessed at this link
HD Phone Key Labeling
About
Designation labels for the programmable buttons on IPitomy HD phones can be printed using plain 8.5”X11” paper or the perforated sheets that are included with each phone. The IPitomy HD series SIP telephones are packaged with designation label sheets that can be used to label the programmable keys in a professional manner. Each telephone and the IPX32 Expansion Module are shipped with one label sheet. Label sheets have multiple labels so that they can be used to print labels for multiple telephones. The perforated sheet size is A5; when printing on plain paper, use 8.5"X11". Each Sheet can be used to print more than one label:
|
Telephone model |
Sheet Part Number |
Quantity Labels per sheet |
|
IP320-P |
SH320-1 |
6 |
|
IP410-P |
SH410-1 |
8 |
|
IPX32 |
SHX32-1 |
2 |
Sheets can be ordered in quantities using the following part numbers:
|
Telephone model |
Part Number |
Quantity of sheets |
|
IP320-P |
SH320-25 |
25 |
|
IP410-P |
SH410-25 |
25 |
|
IPX32 |
SHX32-25 |
25 |
Sheets can be used in most laser and ink-jet type printers. This requires setup practice to find the best paper positioning for your specific printer. You must learn top/bottom and face/reverse side printing characteristics for your printer. The IPitomy IP PBX equipped with Firmware version 4.2.x and above provides for printing of labels directly from the programming interface and from the user’s SPC interface.
This guide will help you setup and utilize the label printing utility in the IPitomy IP PBX.
Revision History
|
Revision |
Changes |
Date |
|
Initial Revision |
n/a |
Oct 2011 |
|
|
|
|
|
|
|
|
Label Printing Overview
Programming the HD SIP Telephone Keys
Assigning labels for the keys
Printing one label for one telephone
Choosing the position of the label on the sheet
Printing multiple telephone labels
Programming the HD SIP Telephone Keys
Programming labels is the same interface from either the user interface – SPC (Smart Personal Console) or from the administrator’s interface – PBX Administration. This guide will focus on the user interface for programming of the keys.
Administrators have the added advantage of being able to print multiple labels at one time for multiple extensions. This setup information is provided following the SPC instructions.
To print labels you must be able to access the IP PBX. Doing so requires a web browser – like Microsoft Internet Explorer, Mozilla Firefox or Google Chrome.
Programming Steps:
You will see the Login screen pictured here
|
 |
|
 |
|
 |
|
Assigning labels for the keys
The keys on the IP410 in this example are: Park, BLF:Park701, BLF:Park702, BLF:Park703, BLF:Extension 2212, BLF:Extension 2208, BLF:Extension 2210, and Record… some key type choices will automatically fill the Label data field when the key choice is selected, others require that you input the label you wish to print in that key position.
Note: The name/definition input here will print on the actual label.
- Program keys and input names/definitions as you wish.
Printing one label for one telephone
In the case of the IP410 telephone there are 8 positions available. |
 |
Our printed page appears as the image on the right.
Printing notes:
|
 |
|
 |
Printing multiple telephone labels
From the Administration interface it is possible to program multiple telephones at one time. Doing so requires entering into the Administrator’s Extension Settings : Destination/Extension page under the View tab.

Once View is selected go to the telephone model for which labels are to be printed. Only one model phone can be printed at one time when multiples are printed.
- In this example we have 8 – IP320’s and 9 – IP410’s installed.

- To program the Keys for multiple phones, click on the title bar of the phone models to be programmed… In this case, we clicked on the IPitomy 4XX bar.
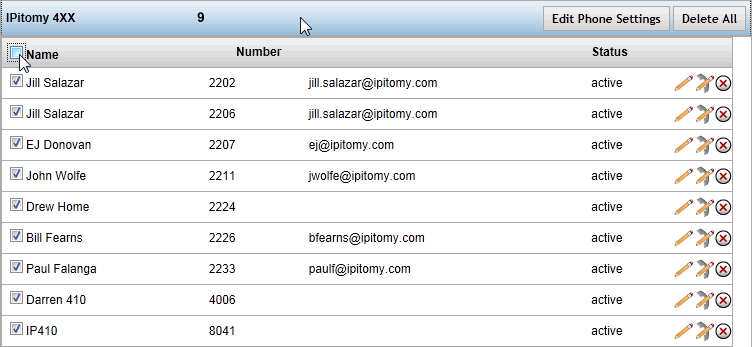
- Click on the checkbox in the left-hand column of each phone that is to be programmed or if all are to be programmed, click on the checkbox at the top left and all will be selected.
- Once the telephones to be programmed are selected, click on the "Edit Phone Settings" button at the right of the model bar.
- Doing so opens the same Key Settings interface seen from SPC except that all of the extensions selected are shown at the top indicating those to be programmed.

- Program those Keys desired for all of the extensions selected.


- Note 1: If programming is different on various extensions they must be programmed in like-groups or one-at-a-time.
- Note 2: When extensions of like model have different key programming the labels can still be printed in multiples by first programming the keys on the various extensions and then proceeding to the View – Model programming above.
- Note 3: Keys that indicate “Do Not Change” indicate those keys that will not be affected by the programming in progress. This is helpful to retain unique programming on various keys while making changes to other keys in multiples.
- When key programming is complete, click on "Print Labels"
- Doing so opens the dialog box: Position
- At the time of this release this dialog box has no effect on the positioning of printed labels. Regardless of the position selected, the printout was always the same – starting in the upper left-hand corner of the printed page. (At Position “1”).
- Click on "GO" your page will open in a new browser window. The printed format is PDF so that it is portable to most printers.
- Use the File-Print function to print the page.
- Be sure to disable scaling, shrink to fit, rotation and other page altering printer parameters… the page must print in its native format to align properly with the sheet labels.
Our printed page appears as:

Since 9 extensions where selected a second page is printed with a single extension label.
- Note1: Depending on your printer, the sheet may only be useful for one or two prints.
- Note2: Once labels are removed from the sheet, the sheet may not go through the printer as well… printers differ from one model to the next.
- Note 3: It may be best to print several phones on one sheet before removing labels from the sheet.
Printing notes:
- Use plain paper first and practice so that the orientation of the page and face-side is known before using the perforated label sheets.
- The pre-fabricated perforated sheet size is A5.
- When you are finished printing, close the PDF (printed page) window.
- Remove the printed labels from the sheet by carefully tearing the label at the edges along the perforation.
- Exit the Print Label Dialog by clicking on the encircled “X” in the upper right-hand corner.
The next tab on the Phone Settings page is Audio Settings. This is the are where default audio settings may be accessed.

STEPS:
- From the Extensions=>Destination page, find the extension you want to edit.
- Click on the icon to the right of the extensions name. The Edit Phone Settings page appears.
- Make the necessary changes to the settings for the phone the click the Save & Configure Phone button.
- The PBX will update the configuration file and reboot the phone so that it can download the updated information for the keys.
| Handset Input |
Adjusts handset microphone volume. Default is 5. |
| Handset Output |
Adjusts handset speaker volume. Default is 5. |
| Speakerphone Input |
Adjusts speakerphone microphone volume. Default is 5. |
| Speakerphone Output |
Adjusts speakerphone speaker volume. Default is 5. |
| Headset Input |
Adjusts headset microphone volume. Default is 5. |
| Headset Output |
Adjusts headset speaker volume. Default is 5. |
| Ringer Volume |
Adjusts ringer volume. Default is 3. |
| Headset Mode |
Toggles functionality of making and answering calls. Default is Normal.
Normal: Primary method for making and answering calls will be the Handset and Speaker, depending on if the hookswitch is pressed. Headset: Primary method for making and answering calls will be the Headset. Press the Headset key to wait for calls without an open line. After that, pressing a Line key will open a line on the headset or answer an inbound call on the headset, as will pressing the Ans softkey for an inbound call. The hookswitch will not be functional. |
| Ringer Mode |
Toggles between Headset and Speaker for inbound ringing. Default is Speaker.
Speaker: Inbound calls ring on the speaker. Headset: Used in conjunction with Headset Mode, this will have inbound calls ring to the headset instead of the speaker. |
| Echo Cancelation |
Toggles the phones echo cancelation. The default setting is No. |
Call Waiting Toggles Call Wating on and off. Default is Yes
Sip Network Setting is the Next Tab on Phone settings.

SIP / Network Settings
|
SIP Settings – SIP Location |
LAN = Local Area Network located telephone, no unauthorized security measures required (LAN IP Address of the IPPBX will be shown) WAN = Wide Area Network located telephone, unauthorized security measures apply (WAN interface – Public IP Address is shown) |
|
SIP Settings – DTMF Mode |
Follow Server – follows settings stored in PBX settings for this phone RFC2833 – use RFC2833 (regardless of PBX settings for phone) SIP Info – use SIP Info (regardless of PBX settings for phone)(SIP Info is SIP Header information included in SIP Packets) Inband – use Inband (regardless of PBX settings for phone) Auto – use Auto Detect (regardless of PBX settings for phone) |
|
Time Settings – Time Server Location |
Use PBX as Time Server – uses the PBX clock for sync Use PBX Time Server – use the same timer server as defined in the PBX Custom – identify the time server to be used |
|
Configuration Updates – Protocol |
TFTP – Trivial File Transfer Protocol (used for LAN phones) HTTP – Hypertext Transfer Protocol (used for WAN phones) |
|
Configuration Updates – Web Port |
When HTTP is used the Port assignment will usually be 80, however any valid port number can be assigned in this field. |
The next tab in Phone settings is the Display Settings Tab

Display Settings
| Sections/ Fields |
Description |
| BLF Green for Idle |
Toggles if BLFs for idle phones will light green, or not light at all. Default is disabled. |
| Backlight Mode |
Toggles between backlight always On, always Off, or on a timer. Default is on. |
| Backlight Timer |
Defines the interval when Backlight Mode is set to Timer. Default is 60 sec. |
| Contrast Level |
Controls the screen contrast. Default is 3. |
| Backlight Level |
Controls the backlight brightness. Default is 3. |
The last tab on Phone settings is the Expansion Module Tab. This will only appear on Phone Models which support an Expansion Module.

Expansion Module Settings
| Sections/ Fields |
Description |
| Number of Modules |
Defines how many expansion modules the phone is using. Once configured, you can select each module and set their keys. |
| Print All Labels |
Prints labels for all configured expansion modules. |
| Print Labels |
Prints labels for the expansion module that is currently displayed. |
| Key Type |
Key type determines what function a key performs. A dropdown list shows which key types are available to the phone model you are working with. |
| Label |
This is the label associated with this key. If configured for a key around the LCD screen, this is what will display. |
| Value |
The value completes a key’s function. It may contain a number to dial special codes or allow you to select an extension from a dropdown list. Most key types do not require you to enter a value. For example, the Voicemail key does not require a value because the System Administrator determines it for the end user.
Incoming' – A call is ringing the extension |
STEPS:
- From the Extensions=>Destination page, find the extension you want to edit.
- Click on the icon to the right of the extensions name. The Edit Phone Settings page appears.
- Make the necessary changes to the settings for the phone and click the Save & Configure Phone button.
- The PBX will update the configuration file and reboot the phone so that it can download the updated expansion module settings.