IP PBX Manual Destinations Extensions AutoDiscovery
Auto Discovery of Extensions
This network discovery tool will automatically detect new devices that have been added to the network. This feature helps identify phones and other devices connected to the network and allow you to configure networked phones. The IP PBX system provides you with the option to either scan the network, or if a scan has been done recently, you could select No Scan to save time.
Auto-Discovery
Start Auto-Discovery Scan
This section describes how to start the Auto-Discovery scan for active devices on the network.
STEPS:
- From the Destination=>Extensions page, click the Auto-Discovery Tab.
- Select to either Scan or Not Scan the network and an Alert message indicating that the system is scanning the network for active devices appears.
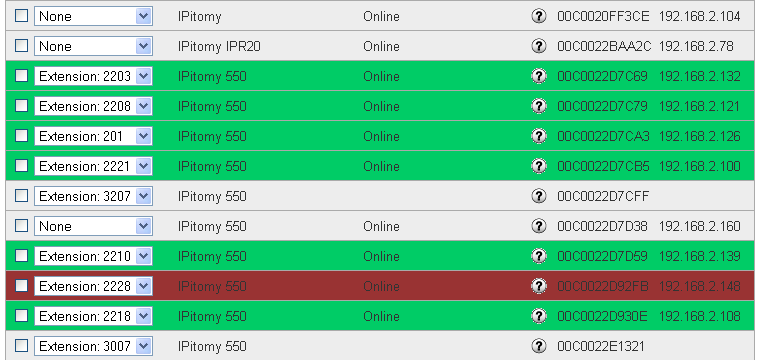
- Once the scanning process is complete, the system will display a list of active devices and assigned values such as IP Address, Device Type, Status, etc. Devices that appear on this list may be selected for editing. By default, the PBX will only display IPitomy and Aastra devices. Filter options can be modified to change display other devices.
If you click the refresh-view more than once within a short time period, the network is not rescanning. The minimum time period allowed between scans is indicated under the Advanced Settings (Min Refresh Interval).The network is only scanned for new information when you click REFRESH. Both REFRESH and FILTER ONLY apply whatever filters you have chosen to the displayed list.
List of Devices & Extensions
The list of discovered network devices comes from two sources:
- Network
- PBX Database
The following table describes the status of devices that will appear once an Auto-Discovery scan is completed.
| Sections/ Fields | |
| Assigned | This field indicates that extension that is assigned to the device (phones). Clicking on the box to the left of this field allows you to select it for editing. |
| Device | The Device column lists info about the device. Database info is preferred, so if a device is set to a certain phone type in the database, this is listed instead of the actual device type. |
| Status | This is the status of the device. If the status field is blank, this indicates that the device was not found on the network.
NOTE: Phones that are in the process of restarting, turned-off, or operating on a different network during a network scan will not be in an “Online” status. |
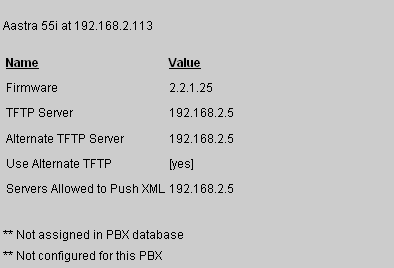
| Hovering the mouse over this icon will provide device information. See Figure 43 for an example of the data that can be viewed. | |
| MAC Address | This is the MAC Address assigned to the device. |
| IP Address | This is the IP Address assigned to the device. |
Auto Provisioning a Yealink Phone
PBX ver 6.0.5 or later method
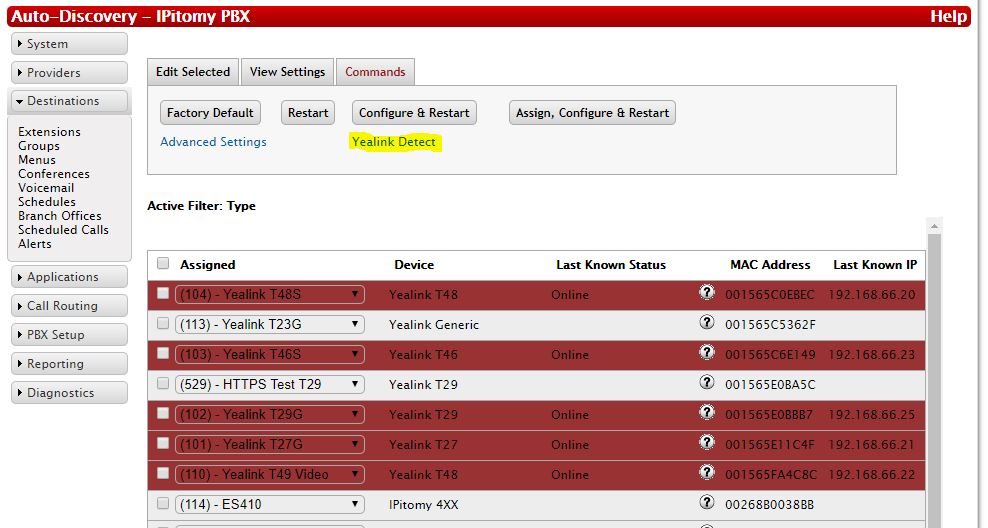
Starting in version 6.0.5, we have added the ability to configure and restart Yealink phones from the autodiscovery section of the pbx, eliminating much of the process previously needed to set these phones up.
1) Under Destinations=>Autodiscovery, after scanning the network, go to the commands tab and click the Yealink Detect link:
2) Press the Start button
3) In the list of phones discovered, you can now check the boxes, and assign, configure, and restart them as if they were IPitomy HD phones, using the buttons at the top of the page.
Important notes:
This only works for FACTORY DEFAULTED Yealink phones. Phones that have been previously provisioned will NOT respond to configure or restart commands from this process.
The Yealink discovery function will run for about 10 minutes before shutting itself back off. You can restart it by going to the commands tab and hitting start, if it has stopped. If it is running, it will say "Listening" on that page.
Device Information
To view detail information for a specific device, hover your cursor over the information icon to obtain details about the network device or phone. This can be an important source of information about which phones are available for live configuration.
Edit Selected Tab
The IP PBX system offers many ways to configure devices. This section describes an optional method using the Auto-Discovery feature.
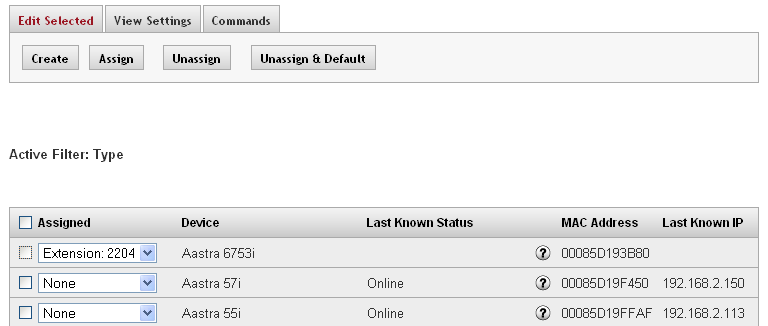
The following table describes the fields and functions available on the Edit Selected Tab of the Auto-Discovery page:
| Fields | ||
| Create | Create new extensions for selected phones. You can upload extension details in a file or manually enter information. | |
| Assign | Assign existing extensions to selected phones. | |
| Unassign | Removes the configuration file for the phone and all association between the extension and the phone. | |
| Unassign & Default | Same as Unassign but also sends a Factory Default instruction to the phone. |
Create, Assign and Configure Phone
The following outlines steps to create, assign and configure a device.
| IMPORTANT: This assumes that the phones are in a FACTORY DEFAULTED state.
IPitomy recommends using the CSV upload file and the IP550 phone type which will help to simplify the setup and auto configuration process. |
STEPS:
- From the Extensions=>Destinations=>Auto-Discovery page, click the Edit Selected tab.
- Place a check mark next to the phones you wish to use when creating the extensions
- Click the Create button.
- Enter the new extension information. The MAC addresses of the selected phones will be populated so you have a reference as to what phones you are creating the extensions for.
- Click the “Create” button. If successful, Click “Return to Extensions”
- Click the Apply Changes link located at the right hand corner of the top of the page, to commit the changes to the database.
- Click the “Auto-Discovery” button and you will note the newly created extensions are now assigned to the phones that were checked.
- Check the boxes next to the phones that you just created extensions for.
- Click the Commands Tab.
- Click on the Configure & Restart button to provision the phones.
View Settings Tab
Filtering does not change how the network scanning is performed. It only limits the list of items displayed. This means that if you only want to change filters it is not necessary to re-scan the network. All of the network information from the last network scan is retained and used by filters.
| Sections/Fields | ||
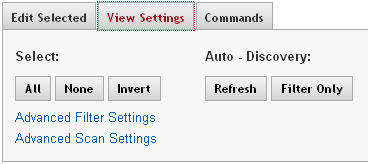
| Select All, None, Invert | Check or uncheck multiple checkboxes with the click of a button. | |
| Refresh | Scan the network for devices. Scanning is done using the settings in Advanced Scan Settings. The scan results displayed depend on the active filters,controlled via Advanced Filter Settings. | |
| Filter Only | Displays results of the last network scan after applying the filters set in Advanced Filter Settings. |
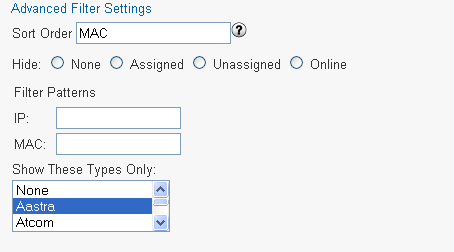
Advanced Filter Settings
| Sections/Fields | |
| Sort Order | This allows you to set what order items are listed. Hover your cursor over the help icon next to the Sort Order fields for options. |
| Hide | Allows you to hide different status types from view. |
| Filter Patterns | Allows you to either enter a partial MAC or IP here. The only system criterion is that the pattern must match from the first character onward. i.e. “000D” would match “000DE” but not “A000DE”.
Full Regular Expression Matching is supported when you enclose your search pattern in double quotes. Some Examples are:
|
| Filter by Type | You can select multiple device types to filter by. Auto-Discovery is aware of MAC address ranges used by many popular networked devices. Although this is not the only way Auto-Discovery identifies devices, this allows the tool to identify and filter devices by type.
Only IPitomy devices and Aastra phones are shown by default because they are set in the Filter by Type. |
Advanced Scan Settings
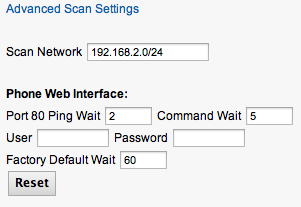
Changes to Scan Settings are kept when you click the GUI ‘Refresh’ button. Clicking on your browser’s refresh button will discard changes. For the most part these settings can remain unchanged and all will function as needed.
| Sections/Fields | |
| Scan Network | Subnet of the network to be scanned |
| Port 80 Ping Wait | Maximum seconds to wait for basic phone web interface to signal that it is alive. Rarely used. |
| Command Wait | Maximum seconds to wait for most commands. |
| User and Password | Phone’s Web User Name & Password may have to be specified if the phone is not using factory default settings for these items. When these fields are blank Auto-Discovery uses default settings. |
| Factory Default Wait | Maximum seconds to wait for the phone to signal completion of a Factory Default. |
| Reset | The ‘Reset’ button will return all Scan Settings to original default values. |
Commands Tab
The IP PBX system offers many ways to configure devices. This section describes an optional method using the use Auto-Discovery feature.
| Factory Default | Sends a Factory Default and restarts the phone. | |
| Restart | Sends a Restart instruction to the phone. | |
| Configure & Restart | Instructs phone to set TFTP server to the Server IP specified under Advanced Settings. Then the phone is commanded to restart, which will result in pulling down configuration files and firmware files if there are updated ones present. | |
| Assign, Configure, & Restart | Combines the functions of the Assign button with the Configure & Restart button. |
Factory Default Phone
STEPS:
- From the Extensions->Destinations page, click the Auto-Discovery Tab.
- Click the “Auto-Discovery” button, choosing to scan or not scan the network as needed.
- Click (placing a checkmark) on the boxes next to phones you wish to default.
- From the Auto-Discovery page, click on the Command tab. Click the “Factory Default” button. Wait long enough for the phones to default and restart. This could be anywhere from 30 seconds to 2 minutes for each phone, depending on the model. The phones will set themselves back to factory default and reboot during this period.
Troubleshooting Network Scanning Problems
Scan settings have been configured to work in a standard one subnet network environment. More complicated environments may require further tuning. The most useful setting is ‘Maximum wait’. However noisy environments will require increasing the packet Count and TX interval.
STEPS:
To tune scanning for your network:
- From the Extensions->Destination->Auto-Discovery page, click on Advanced Scan Settings link.
- Increase the ‘Maximum Wait’ setting by a few seconds.
- Click the GUI ‘Refresh’ button.
More specific tuning will require knowledge of your network and diagnostic tools like Ping.Phones that are in the process of restarting, turned-off, or operating on a different network during a network scan will not be in an “Online” status.
Auto Provisioning Phone Settings from Actual Device
The remainder of the configuration is done via the Phone interface, and will only work with IPitomy phones.
STEPS:
- Create an extension, setting the Device to either IP550 or IP120, depending on what IPitomy phone you intend to register to the extension.
IMPORTANT: To configure the phone using the auto provisioning, make sure that the “Auto-Provisioning” parameter is RUNNING. This can be done in PBX Setup=>General option of the system.
- From your phone, select the Menu button to start Auto-Provisioning then select Option 7: SIP Settings (you can do this without using the scroll keys by just pressing Menu then 7).
- It will prompt you for the Admin password. Enter the default password “1234” then press the Enter softkey (IP550) or the OK button (IP120)
- Select Option 8: Auto Prov.
- Select “YES” when the Autosearch PBX prompt appears.
- Enter either the extension number of the extension that has been created.
- Press the Done softkey (IP550) or the OK button (IP120) and the phone will run through the process of downloading its configuration file, updated firmware file, etc.

