Difference between revisions of "IP PBX Manual PBXSetup SIP"
Jump to navigation
Jump to search

support@ipitomy.com | 941.306.2200 (Opt 2 for Support)
You are viewing the IPitomy IP PBX Manual, Table of Contents.
SIP Setup

| Line 6: | Line 6: | ||
=== SIP Networking Settings Section === | === SIP Networking Settings Section === | ||
| − | + | ||
{| style="border-spacing:0" | {| style="border-spacing:0" | ||
|- | |- | ||
Revision as of 15:50, 27 October 2014
.gif)
SIP Setup
This page defines global SIP configuration parameters.
SIP Networking Settings Section
| Local Network & Subnet Masks |
This is the IP address to the local network and associated subnet masks. |
| Delete Selected |
Allows you to delete the item selected from list of networks. |
| Add Local Network |
Allows you to add local network information. This information will appear in the list of networks. |
| External IP |
The public IP address associated with the SIP network. |
| Add Button |
This button will create/add the network information to the list of local network section. |
Add SIP Networking Settings
STEPS:
- From the PBX Setup->SIP page, locate the SIP Networking Settings section.
- Enter the IP Address and Subnet Mask for the network the PBX is being installed on.
- Click the Add button.
- Click the
 button.
 - Click on the Apply Changes link at the top of the page to save the information and commit the changes to the database.
Delete SIP Networking Settings
STEPS:
- From the PBX Setup->SIP page, locate the SIP Networking Settings section.
- Highlight the listing you wish to delete. You can use Shift/Ctrl click functionality to select multiple listings.
- Click the Delete Selected button.
- Click the button.
- Click on the Apply Changes link at the top of the page to save the information and commit the changes to the database
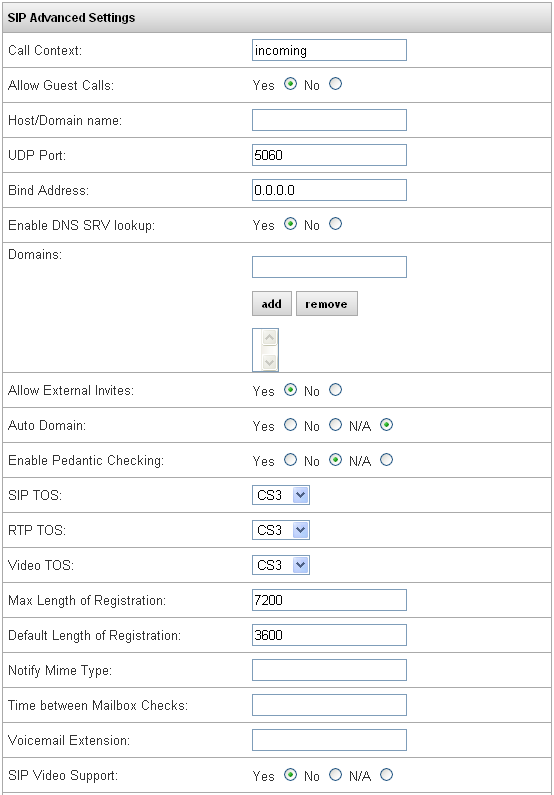
SIP Advanced Settings Section
Advanced SIP settings define in more detail the management of network traffic. These settings are automatically provisioned when the system registers with the router. In most business implementations it is not necessary to make changes to these defaulted settings


| IMPORTANT: The default settings for the SIP configuration should not require any changes. If it is necessary for you to do so to meet your customer’s business requirements, we recommend that you contact IPitomy’s Technical Support for assistance. |
| Call Context |
Default: INCOMING |
| Allow Guest Calls |
Default: YES |
| Host/Domain Name |
Default: BLANK |
| UDP Port |
Default: 5060 |
| Bind Address |
Default: 0.0.0.0 |
| Enable DNS SRV Lookup |
Default: NO |
| Domains |
Default: BLANK |
| Allow External Invites |
Default: YES |
| Auto Domain |
Default: N/A |
| Enable Pedantic Checking |
Default: N/A |
| SIP TOS |
Default is CS3. To configure QOS on your LAN, set your managed switches to prioritize packets flagged with CS3 |
| RTP TOS |
Default is CS3. To configure QOS on your LAN, set your managed switches to prioritize packets flagged with CS3 |
| Video TOS |
Default is CS3. To configure QOS on your LAN, set your managed switches to prioritize packets flagged with CS3 |
| Max Length of Registration |
Default: 7200 |
| Default Length of Registration |
Default: 3600 |
| Notify Mime Type |
Default: BLANK |
| Time Between Mailbox Checks |
Default: BLANK |
| Voicemail Extension |
Default: BLANK |
| SIP Video Support |
Default: YES |
| Record History of Default |
Default: N/A |
| First disallow all Codecs |
Default: ALL |
| Allow Codecs |
Default: G.711 ulaw, G.711 alaw, GSM |
| Default Music on Hold |
This will display whatever playlist is set to default on the PBX Setup=>Music On Hold page |
| Relax DTMF Handling |
Default: YES |
| RTP Keep-Alive |
update text |
| RTP Timeout |
Default is BLANK. Set to a value, in seconds, if you wish the PBX to end a call when no RTP traffic is detected for that long. Typically used in regards to lines that are not disconnecting correctly. |
| RTP Timeout on Hold |
Default: BLANK |
| Trust Remote Party ID |
Default: N/A |
| Send Remote Party ID |
Default: N/A |
| Progress in Band |
Default: BLANK |
| User Agent |
Default: BLANK |
| Allow Redirect to Non-local SIP Address |
Default: N/A |
| User = Phone |
Default: N/A |
| DTMF Mode |
Default: AUTO |
| Compact SIP Headers |
Default: N/A |
| SIP Debug |
Default: N/A |
| Subscriber Context |
Default: BLANK |
| Notify Ringing |
Default: YES |
| Qualify |
Default: 8000 |
| Generate Manager Events |
Default: YES |
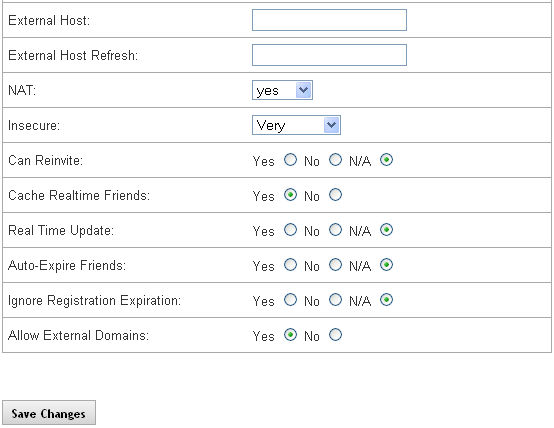
| External Host |
Default is BLANK. When the site is using a dynamic public IP, you can go to dyndns.com, set up a domain with them, and enter that domain name here. |
| External Host Refresh |
Default is BLANK. Set this under the interval used at dyndns.com for checking the current IP. |
| NAT |
Default: YES |
| Insecure |
Default: VERY |
| Can Reinvite |
Default: N/A |
| Cache Realtime Friends |
Default: YES |
| Real Time Update |
Default: N/A |
| Auto-Expire Friends |
Default: N/A |
| Ignore Registration Expiration |
Default: N/A |
| Allow External Domains |
Default: YES |
Edit Advanced SIP Networking Settings
STEPS:
- From the PBX Setup->SIP page, click on the Advanced link.
- The Advanced SIP Networking Settings page is displayed.
- Set the SIP Network parameters base on your business requirements or what is recommended by IPitomy.
The default settings should not require any changes. If it is necessary for you to do so to meet your customer’s business requirements, we recommend that you contact IPitomy’s Technical Support for assistance..
- Click the button.
- Click on the Apply Changes link at the top of the page to save the information and commit the changes to the database.