Difference between revisions of "Outlook Dialer"
Jump to navigation
Jump to search

support@ipitomy.com | 941.306.2200 (Opt 2 for Support) ________________________________________________________________ Outlook Dialer for IPitomy (a SIP TAPI Service Provider for 32bit Windows XP and Windows Vista) Contact IPitomy Support if you need the 64bit tapi file.
Paul Falanga (talk | contribs) |
Drew Harrell (talk | contribs) |
||
| Line 1: | Line 1: | ||
| − | <center>[[ | + | <center>[[File:Logo on white background (small).gif]]</center><center>'''[mailto:support@ipitomy.com support@ipitomy.com] | 941.306.2200 (Opt 2 for Support)'''</center><center>________________________________________________________________</center><center>Outlook Dialer for IPitomy</center><center>(a SIP TAPI Service Provider for 32bit Windows XP and Windows Vista)</center><center>''Contact IPitomy Support if you need the 64bit tapi file.''</center> |
| + | <br/>'''Steps to install TAPI Dialer''' | ||
| − | |||
| − | |||
| + | #Copy siptapi.tsp file and paste it in c:\windows\system32\ | ||
| + | ##If this fails to copy – you may already have a siptapi.tsp file installed. Go to Control Panel->Phone and Modem Options. On the advanced tab – select the SIP TAPI dialer and click remove. Now try to copy the file to c:\windows\system32 again. If it asks you if you wish to overwrite a file say yes. | ||
| + | #Go to Control Panel -> Phone and Modem Options | ||
| + | #On the Advanced Tab click Add and select SIP TAPI Service Provider for IPitomy and click OK. | ||
| + | #After the SIP TAPI Provider appears in the list press the Configure button. | ||
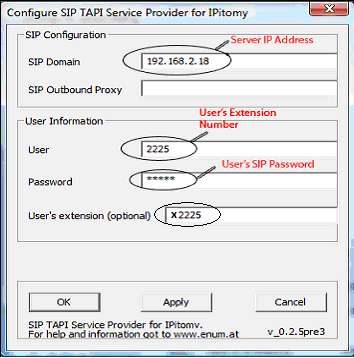
| + | #Enter the following Data as specified in the picture below. | ||
| − | + | Screen shot of Windows TAPI configuration window: [[File:Configure TAPI.gif]] | |
| − | + | #Click OK. | |
| − | + | #In Outlook, right click on a contact and select Call Contact | |
| − | + | #Click Dialing Options | |
| − | + | #Where it says ‘Connect using line’ select “LineName: SIP TAPI for IPitomy | |
| − | + | #Click OK | |
| − | |||
| − | |||
| − | |||
| − | |||
| − | |||
| − | |||
| − | |||
| − | |||
| − | |||
| − | |||
| − | |||
| − | |||
| − | |||
| − | # Click OK. | ||
| − | # In Outlook, right click on a contact and select Call Contact | ||
| − | # Click Dialing Options | ||
| − | # Where it says ‘Connect using line’ select “LineName: SIP TAPI for IPitomy | ||
| − | # Click OK | ||
Congratulations, you have now successfully installed and configured your Outlook Dialer. To make a call, simply right click on a contact, select Call Contact, and click Start Call. The selected extension will intercom and begin dialing in speaker phone mode. | Congratulations, you have now successfully installed and configured your Outlook Dialer. To make a call, simply right click on a contact, select Call Contact, and click Start Call. The selected extension will intercom and begin dialing in speaker phone mode. | ||
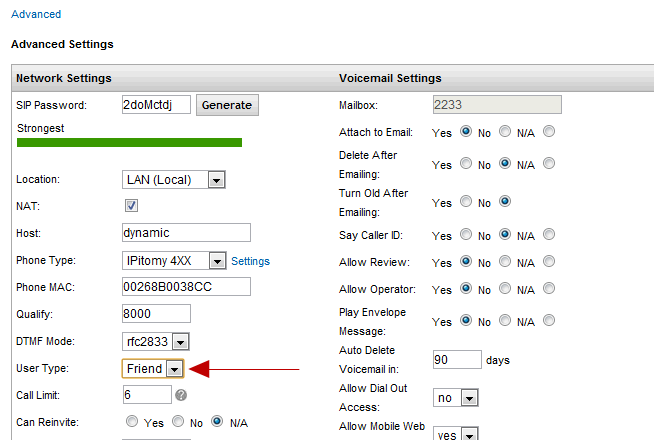
| − | In PBX SW version 4.6.1 and greater the Extension User Type must be changed from "Peer" to "Friend". | + | In PBX SW version 4.6.1 and greater the Extension User Type must be changed from "Peer" to "Friend". |
'''Steps to set User Type of the Outlook Dialer extension to Friend:''' | '''Steps to set User Type of the Outlook Dialer extension to Friend:''' | ||
| − | |||
| − | |||
| − | |||
| − | |||
| − | |||
| − | |||
| − | Screen shot of Extension - Advanced screen: | + | #Open the PBX GUI |
| − | [[ | + | #Navigate to Destinations - Extension |
| + | #Open the Advanced categories by clicking the Advanced link at the bottom of the initial extension screen. | ||
| + | #Locate the User Type and set it to "Friend" | ||
| + | #Click Save Changes | ||
| + | #Click Apply Changes | ||
| + | |||
| + | Screen shot of Extension - Advanced screen: [[File:Ext Advanced User Type.gif]] | ||
Revision as of 15:16, 22 August 2012

Steps to install TAPI Dialer
- Copy siptapi.tsp file and paste it in c:\windows\system32\
- If this fails to copy – you may already have a siptapi.tsp file installed. Go to Control Panel->Phone and Modem Options. On the advanced tab – select the SIP TAPI dialer and click remove. Now try to copy the file to c:\windows\system32 again. If it asks you if you wish to overwrite a file say yes.
- Go to Control Panel -> Phone and Modem Options
- On the Advanced Tab click Add and select SIP TAPI Service Provider for IPitomy and click OK.
- After the SIP TAPI Provider appears in the list press the Configure button.
- Enter the following Data as specified in the picture below.
Screen shot of Windows TAPI configuration window: 
- Click OK.
- In Outlook, right click on a contact and select Call Contact
- Click Dialing Options
- Where it says ‘Connect using line’ select “LineName: SIP TAPI for IPitomy
- Click OK
Congratulations, you have now successfully installed and configured your Outlook Dialer. To make a call, simply right click on a contact, select Call Contact, and click Start Call. The selected extension will intercom and begin dialing in speaker phone mode.
In PBX SW version 4.6.1 and greater the Extension User Type must be changed from "Peer" to "Friend".
Steps to set User Type of the Outlook Dialer extension to Friend:
- Open the PBX GUI
- Navigate to Destinations - Extension
- Open the Advanced categories by clicking the Advanced link at the bottom of the initial extension screen.
- Locate the User Type and set it to "Friend"
- Click Save Changes
- Click Apply Changes
