Difference between revisions of "Print hd labels"
| (22 intermediate revisions by the same user not shown) | |||
| Line 1: | Line 1: | ||
| − | |||
| − | |||
| − | |||
'''HD Phone Key Labeling''' | '''HD Phone Key Labeling''' | ||
| − | |||
| − | |||
| − | |||
| − | |||
| − | |||
| − | |||
| − | |||
| − | |||
| − | + | = About = | |
| − | |||
| − | |||
| − | |||
| − | |||
| − | |||
| − | |||
| − | |||
| − | |||
| − | |||
| − | |||
| − | |||
| − | |||
| − | |||
| − | |||
| − | |||
| − | |||
| − | |||
| − | |||
| − | |||
| − | |||
| − | |||
| − | |||
| − | |||
| − | |||
| − | |||
| − | |||
| − | |||
| − | |||
Designation labels for the programmable buttons on IPitomy HD phones can be printed using plain 8.5”X11” paper or the perforated sheets that are included with each phone. The IPitomy HD series SIP telephones are packaged with designation label sheets that can be used to label the programmable keys in a professional manner. Each telephone and the IPX32 Expansion Module are shipped with one label sheet. Label sheets have multiple labels so that they can be used to print labels for multiple telephones. The perforated sheet size is A5; when printing on plain paper, use 8.5"X11". Each Sheet can be used to print more than one label: | Designation labels for the programmable buttons on IPitomy HD phones can be printed using plain 8.5”X11” paper or the perforated sheets that are included with each phone. The IPitomy HD series SIP telephones are packaged with designation label sheets that can be used to label the programmable keys in a professional manner. Each telephone and the IPX32 Expansion Module are shipped with one label sheet. Label sheets have multiple labels so that they can be used to print labels for multiple telephones. The perforated sheet size is A5; when printing on plain paper, use 8.5"X11". Each Sheet can be used to print more than one label: | ||
| Line 196: | Line 157: | ||
| | ||
| − | |||
| − | |||
| − | + | = Label Printing Overview = | |
| + | |||
| + | Programming the HD SIP Telephone Keys | ||
| − | + | Assigning labels for the keys | |
| − | + | Printing one label for one telephone | |
| − | + | Choosing the position of the label on the sheet | |
| − | + | Printing multiple telephone labels | |
| − | = | + | = Programming the HD SIP Telephone Keys = |
Programming labels is the same interface from either the user interface – SPC (Smart Personal Console) or from the administrator’s interface – PBX Administration. This guide will focus on the user interface for programming of the keys. | Programming labels is the same interface from either the user interface – SPC (Smart Personal Console) or from the administrator’s interface – PBX Administration. This guide will focus on the user interface for programming of the keys. | ||
| Line 219: | Line 180: | ||
== Programming Steps: == | == Programming Steps: == | ||
<p style="text-align: right;"></p><p style="text-align: right;"></p> | <p style="text-align: right;"></p><p style="text-align: right;"></p> | ||
| − | {| border="1" cellspacing="1" cellpadding="1" style="width: | + | {| border="1" cellspacing="1" cellpadding="1" style="width: 900px;" |
|- | |- | ||
| | | | ||
| − | + | #Open the web browser and navigate to the IP PBX… | |
| − | + | #Input into the browser IP Address Bar the IP Address of your IP PBX | |
| − | + | <ul style="margin-left: 40px;"> | |
| − | + | <li>Use the notation:</li> | |
| − | + | <li>http://''<your pbx ip>''/ippbx</li> | |
| − | + | </ul> | |
You will see the Login screen pictured here | You will see the Login screen pictured here | ||
| − | + | <ol start="3"> | |
| − | + | <li>Input the User Name and Password for your extension.</li> | |
| − | + | </ol> | |
| − | + | <ul style="margin-left: 40px;"> | |
| − | + | <li><span style="font-size: 12px;">Your User Name will always be your extension number</span><span style="font-size: 12px;"> </span></li> | |
| + | <li><span style="font-size: 12px;">If you haven’t yet changed your password it is also your extension number.</span></li> | ||
| + | </ul> | ||
| [[File:Login.png]]<br/> | | [[File:Login.png]]<br/> | ||
|- | |- | ||
| − | | | + | | <ol start="4"> |
| − | + | <li>The SPC (Smart Personal Console) interface is now shown</li> | |
| − | + | <li>Click on the My Account icon at the top</li> | |
| − | + | <li>Once on the My Account page, click on the link: </li> | |
| − | + | </ol> | |
| − | + | <ul style="margin-left: 40px;"> | |
| − | + | <li>My Phone Settings</li> | |
| − | + | </ul> | |
| [[File:Myaccount.png]]<br/> | | [[File:Myaccount.png]]<br/> | ||
|- | |- | ||
| − | | 7 | + | | <ol start="7"> |
| + | <li>This opens the Edit Phone Configuration screen of the PBX</li> | ||
| + | </ol> | ||
| + | |||
| [[File:Phoneconfigscreen.png]]<br/> | | [[File:Phoneconfigscreen.png]]<br/> | ||
|- | |- | ||
| − | | | + | | <ol start="8"> |
| − | <span style="font-size: 12px;"> | + | <li><span style="font-size: 12px;">There are five categories that can be programmed from this interface:</span></li> |
| − | + | </ol> | |
| − | + | <ul style="margin-left: 40px;"> | |
| − | + | <li>Key Settings</li> | |
| − | + | <li>Audio Settings</li> | |
| − | + | <li>SIP/Networking Settings</li> | |
| − | + | <li>Display Settings</li> | |
| − | + | <li>Expansion Modules</li> | |
| − | 9 | + | </ul> |
| − | + | <ol start="9"> | |
| − | + | <li>This guide concerns only the first: Key Settings</li> | |
| + | <li>Use your mouse and keyboard to input values for each of the keys you wish to program</li> | ||
| + | </ol> | ||
| <br/> | | <br/> | ||
| Line 276: | Line 244: | ||
| | ||
| − | | + | |
| − | = | + | = Assigning labels for the keys = |
| − | The keys on the IP410 in this example are: Park, BLF:Park701, BLF:Park702, BLF:Park703, BLF:Extension 2212, BLF:Extension 2208, BLF:Extension 2210, and Record… some key type choices will automatically fill the Label data field when the key choice is selected, others require that you input the label you wish to print in that key position.<br/>Note: The name/definition input here will print on the actual label. | + | The keys on the IP410 in this example are: Park, BLF:Park701, BLF:Park702, BLF:Park703, BLF:Extension 2212, BLF:Extension 2208, BLF:Extension 2210, and Record… some key type choices will automatically fill the Label data field when the key choice is selected, others require that you input the label you wish to print in that key position.<br/>'''Note: The name/definition input here will print on the actual label.''' |
| + | <ul style="margin-left: 40px;"> | ||
| + | <li><span style="font-size: 12px;">Program keys and input names/definitions as you wish.</span></li> | ||
| + | </ul> | ||
| − | + | = Printing one label for one telephone = | |
| − | + | {| border="1" cellspacing="1" cellpadding="1" style="width: 900px;" | |
| − | |||
| − | {| border="1" cellspacing="1" cellpadding="1" style="width: | ||
|- | |- | ||
| | | | ||
| − | + | #When you have set all the keys and entered all the label information you wish, click on | |
| + | #Doing so opens the dialog box: Position | ||
| + | # “Position” refers to the actual position on the label sheet that will be printed with this extenison’s key label. | ||
| − | + | In the case of the IP410 telephone there are 8 positions available.<br/>For the label that we are printing in this example, we’ve selected position “1”. This means that this extension’s label will print in the upper left-hand corner position. | |
| − | |||
| − | |||
| [[File:Extension positions.png]]<br/> | | [[File:Extension positions.png]]<br/> | ||
|- | |- | ||
| − | | | + | | <ol start="4"> |
| − | + | <li>When the position is selected, click on "GO" your print-ready page will open in a new browser window. The printed format is PDF so that it is portable to most printers.</li> | |
| − | + | <li>Use the File-Print function to print the page.</li> | |
| − | + | <li>Be sure to disable scaling, shrink to fit, rotation and other page altering printer parameters… the page must print in its native format to align properly with the sheet labels.</li> | |
| − | + | </ol> | |
| − | |||
| | ||
| Line 316: | Line 284: | ||
<u>Printing notes:</u> | <u>Printing notes:</u> | ||
| − | * | + | *Use plain paper first and practice so that the orientation of the page and face-side is known before using the perforated label sheets. |
| − | * | + | *The pre-fabricated perforated sheet size is A5. |
</div> | </div> | ||
| − | | [[File:Printedpagesmaller.png|border]]<br/> | + | | [[File:Printedpagesmaller.png|border|Printedpagesmaller.png]]<br/> |
|- | |- | ||
| − | | | + | | <ol start="7"> |
| − | + | <li>When you are finished printing, close the PDF (printed page) window.</li> | |
| − | + | <li>Remove the printed labels from the sheet by carefully tearing the label at the edges along the perforation.</li> | |
| − | + | <li>Exit the Print Label Dialog by clicking on the encircled “X” in the upper right-hand corner.</li> | |
| − | + | </ol> | |
| − | |||
| | ||
| Line 351: | Line 318: | ||
| | ||
| − | = | + | = Printing multiple telephone labels = |
From the Administration interface it is possible to program multiple telephones at one time. Doing so requires entering into the Administrator’s Extension Settings : Destination/Extension page under the View tab. | From the Administration interface it is possible to program multiple telephones at one time. Doing so requires entering into the Administrator’s Extension Settings : Destination/Extension page under the View tab. | ||
| Line 363: | Line 330: | ||
[[File:Telephonemodels.png]] | [[File:Telephonemodels.png]] | ||
| − | + | #To program the Keys for multiple phones, click on the title bar of the phone models to be programmed… <span style="font-size: 12px;">In this case, we clicked on the IPitomy 4XX bar.</span>[[File:Click on title bar.png]] | |
| + | #Click on the checkbox in the left-hand column of each phone that is to be programmed or if all are to be programmed, click on the checkbox at the top left and all will be selected. | ||
| + | #Once the telephones to be programmed are selected, click on the "'''Edit Phone Settings'''" button at the right of the model bar. | ||
| + | #Doing so opens the same Key Settings interface seen from SPC except that all of the extensions selected are shown at the top indicating those to be programmed.[[File:Multiple extension editingsmall.png]] | ||
| + | # Program those Keys desired for all of the extensions selected. | ||
| + | <ul style="margin-left: 40px;"> | ||
| + | <li><span style="font-size: 12px;">Note 1: If programming is different on various extensions they must be programmed in like-groups or one-at-a-time.</span></li> | ||
| + | <li>Note 2: When extensions of like model have different key programming the labels can still be printed in multiples by first programming the keys on the various extensions and then proceeding to the View – Model programming above.</li> | ||
| + | <li>Note 3: Keys that indicate “Do Not Change” indicate those keys that will not be affected by the programming in progress. This is helpful to retain unique programming on various keys while making changes to other keys in multiples.</li> | ||
| + | </ul> | ||
| + | <ol start="6"> | ||
| + | <li> When key programming is complete, click on "'''Print Labels'''"</li> | ||
| + | <li>Doing so opens the dialog box: Position</li> | ||
| + | <li>At the time of this release this dialog box has no effect on the positioning of printed labels. <span style="font-size: 12px;">Regardless of the position selected, the printout was always the same – starting in the upper left-hand corner of the printed page. (At Position “1”).</span></li> | ||
| + | <li>Click on "'''GO'''" your page will open in a new browser window. The printed format is PDF so that it is portable to most printers.</li> | ||
| + | <li>Use the File-Print function to print the page.</li> | ||
| + | <li> Be sure to disable scaling, shrink to fit, rotation and other page altering printer parameters… the page must print in its native format to align properly with the sheet labels.</li> | ||
| + | </ol> | ||
| + | <span style="font-size: 12px;">Our printed page appears as:</span> | ||
| + | <span style="font-size: 12px;"> </span>[[File:Printedpageappearsas.png]]<span style="font-size: 12px;"> </span> | ||
| − | + | Since 9 extensions where selected a second page is printed with a single extension label. | |
| + | <ul style="margin-left: 40px;"> | ||
| + | <li>Note1: Depending on your printer, the sheet may only be useful for one or two prints.</li> | ||
| + | <li>Note2: Once labels are removed from the sheet, the sheet may not go through the printer as well… printers differ from one model to the next.</li> | ||
| + | <li>Note 3: It may be best to print several phones on one sheet before removing labels from the sheet.</li> | ||
| + | </ul> | ||
| − | + | <u>Printing notes:</u> | |
| − | + | <ul style="margin-left: 40px;"> | |
| − | + | <li>Use plain paper first and practice so that the orientation of the page and face-side is known before using the perforated label sheets.</li> | |
| − | + | <li>The pre-fabricated perforated sheet size is A5.</li> | |
| − | + | </ul> | |
| − | + | <ol start="12"> | |
| − | + | <li>When you are finished printing, close the PDF (printed page) window.</li> | |
| − | + | <li> Remove the printed labels from the sheet by carefully tearing the label at the edges along the perforation.</li> | |
| − | + | <li>Exit the Print Label Dialog by clicking on the encircled “X” in the upper right-hand corner.</li> | |
| − | + | </ol> | |
| − | |||
| − | |||
| − | |||
| − | |||
| − | |||
| − | |||
| − | |||
| − | |||
| − | |||
| − | |||
| − | |||
| − | |||
| − | |||
| − | |||
| − | |||
| − | |||
| − | |||
| − | |||
| − | |||
| − | |||
| − | |||
| − | |||
| − | |||
| − | |||
| − | |||
| − | |||
| − | |||
| − | |||
| − | |||
| − | |||
| − | 12 | ||
| − | |||
| − | |||
| − | + | [[File:Clickonx.png]] | |
| | ||
Latest revision as of 16:35, 21 May 2013
HD Phone Key Labeling
About
Designation labels for the programmable buttons on IPitomy HD phones can be printed using plain 8.5”X11” paper or the perforated sheets that are included with each phone. The IPitomy HD series SIP telephones are packaged with designation label sheets that can be used to label the programmable keys in a professional manner. Each telephone and the IPX32 Expansion Module are shipped with one label sheet. Label sheets have multiple labels so that they can be used to print labels for multiple telephones. The perforated sheet size is A5; when printing on plain paper, use 8.5"X11". Each Sheet can be used to print more than one label:
|
Telephone model |
Sheet Part Number |
Quantity Labels per sheet |
|
IP320-P |
SH320-1 |
6 |
|
IP410-P |
SH410-1 |
8 |
|
IPX32 |
SHX32-1 |
2 |
Sheets can be ordered in quantities using the following part numbers:
|
Telephone model |
Part Number |
Quantity of sheets |
|
IP320-P |
SH320-25 |
25 |
|
IP410-P |
SH410-25 |
25 |
|
IPX32 |
SHX32-25 |
25 |
Sheets can be used in most laser and ink-jet type printers. This requires setup practice to find the best paper positioning for your specific printer. You must learn top/bottom and face/reverse side printing characteristics for your printer. The IPitomy IP PBX equipped with Firmware version 4.2.x and above provides for printing of labels directly from the programming interface and from the user’s SPC interface.
This guide will help you setup and utilize the label printing utility in the IPitomy IP PBX.
Revision History
|
Revision |
Changes |
Date |
|
Initial Revision |
n/a |
Oct 2011 |
|
|
|
|
|
|
|
|
Label Printing Overview
Programming the HD SIP Telephone Keys
Assigning labels for the keys
Printing one label for one telephone
Choosing the position of the label on the sheet
Printing multiple telephone labels
Programming the HD SIP Telephone Keys
Programming labels is the same interface from either the user interface – SPC (Smart Personal Console) or from the administrator’s interface – PBX Administration. This guide will focus on the user interface for programming of the keys.
Administrators have the added advantage of being able to print multiple labels at one time for multiple extensions. This setup information is provided following the SPC instructions.
To print labels you must be able to access the IP PBX. Doing so requires a web browser – like Microsoft Internet Explorer, Mozilla Firefox or Google Chrome.
Programming Steps:
You will see the Login screen pictured here
|
 |
|
 |
|
 |
|
Assigning labels for the keys
The keys on the IP410 in this example are: Park, BLF:Park701, BLF:Park702, BLF:Park703, BLF:Extension 2212, BLF:Extension 2208, BLF:Extension 2210, and Record… some key type choices will automatically fill the Label data field when the key choice is selected, others require that you input the label you wish to print in that key position.
Note: The name/definition input here will print on the actual label.
- Program keys and input names/definitions as you wish.
Printing one label for one telephone
In the case of the IP410 telephone there are 8 positions available. |
 |
Our printed page appears as the image on the right.
Printing notes:
|
 |
|
 |
Printing multiple telephone labels
From the Administration interface it is possible to program multiple telephones at one time. Doing so requires entering into the Administrator’s Extension Settings : Destination/Extension page under the View tab.

Once View is selected go to the telephone model for which labels are to be printed. Only one model phone can be printed at one time when multiples are printed.
- In this example we have 8 – IP320’s and 9 – IP410’s installed.

- To program the Keys for multiple phones, click on the title bar of the phone models to be programmed… In this case, we clicked on the IPitomy 4XX bar.
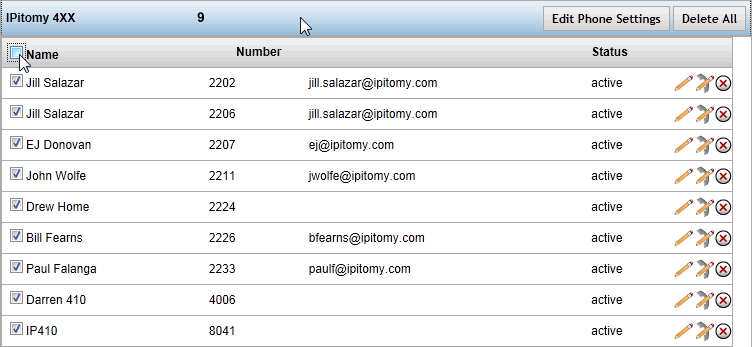
- Click on the checkbox in the left-hand column of each phone that is to be programmed or if all are to be programmed, click on the checkbox at the top left and all will be selected.
- Once the telephones to be programmed are selected, click on the "Edit Phone Settings" button at the right of the model bar.
- Doing so opens the same Key Settings interface seen from SPC except that all of the extensions selected are shown at the top indicating those to be programmed.

- Program those Keys desired for all of the extensions selected.


- Note 1: If programming is different on various extensions they must be programmed in like-groups or one-at-a-time.
- Note 2: When extensions of like model have different key programming the labels can still be printed in multiples by first programming the keys on the various extensions and then proceeding to the View – Model programming above.
- Note 3: Keys that indicate “Do Not Change” indicate those keys that will not be affected by the programming in progress. This is helpful to retain unique programming on various keys while making changes to other keys in multiples.
- When key programming is complete, click on "Print Labels"
- Doing so opens the dialog box: Position
- At the time of this release this dialog box has no effect on the positioning of printed labels. Regardless of the position selected, the printout was always the same – starting in the upper left-hand corner of the printed page. (At Position “1”).
- Click on "GO" your page will open in a new browser window. The printed format is PDF so that it is portable to most printers.
- Use the File-Print function to print the page.
- Be sure to disable scaling, shrink to fit, rotation and other page altering printer parameters… the page must print in its native format to align properly with the sheet labels.
Our printed page appears as:

Since 9 extensions where selected a second page is printed with a single extension label.
- Note1: Depending on your printer, the sheet may only be useful for one or two prints.
- Note2: Once labels are removed from the sheet, the sheet may not go through the printer as well… printers differ from one model to the next.
- Note 3: It may be best to print several phones on one sheet before removing labels from the sheet.
Printing notes:
- Use plain paper first and practice so that the orientation of the page and face-side is known before using the perforated label sheets.
- The pre-fabricated perforated sheet size is A5.
- When you are finished printing, close the PDF (printed page) window.
- Remove the printed labels from the sheet by carefully tearing the label at the edges along the perforation.
- Exit the Print Label Dialog by clicking on the encircled “X” in the upper right-hand corner.