Difference between revisions of "IP PBX Manual PBXSetup Voicemail"
| Line 1: | Line 1: | ||
{{IP_PBX_Manual|sortkey=Voicemail Global}} | {{IP_PBX_Manual|sortkey=Voicemail Global}} | ||
| + | |||
== Voicemail Setup == | == Voicemail Setup == | ||
| Line 8: | Line 9: | ||
Used to configure global mailbox settings that are not found elsewhere in the PBX. | Used to configure global mailbox settings that are not found elsewhere in the PBX. | ||
| − | [[File: | + | [[File:Vmailgensettings.png|center|Vmailgensettings.png]] |
{| style="border-spacing:0" | {| style="border-spacing:0" | ||
| Line 47: | Line 48: | ||
Configure settings that an individual voicemail box can follow globally. | Configure settings that an individual voicemail box can follow globally. | ||
| − | [[File: | + | [[File:Vmailmenu.png|center|Vmailmenu.png]] |
{| style="border-spacing:0" | {| style="border-spacing:0" | ||
| Line 82: | Line 83: | ||
#From the '''PBX Setup->Voicemail Setup '''page, locate the '''Voicemail Menu '''section. | #From the '''PBX Setup->Voicemail Setup '''page, locate the '''Voicemail Menu '''section. | ||
#Set the '''Voicemail''' '''E-mail''' parameters base on your business requirements. Typically the default setting will work. | #Set the '''Voicemail''' '''E-mail''' parameters base on your business requirements. Typically the default setting will work. | ||
| − | #Click the [[File: | + | #Click the [[File:Savechanges.png]] button to save the settings. |
#Click on the '''Apply Changes''' link at the top of the page to save the information and commit the changes to the database. | #Click on the '''Apply Changes''' link at the top of the page to save the information and commit the changes to the database. | ||
=== E-mail Settings Section<br/> === | === E-mail Settings Section<br/> === | ||
| − | This section is used to define the email address and server the PBX will use to send out Unified Messaging and notification emails. Unified Messaging allows a user to receive emails whenever they receive new voicemail messages. If the PC where you check your email has the capacity to play .wav files, the you will be notified when an email is received, and will be able to listen to the new message directly from the email. Notification emails are sent out for features like Log Watch/Ban. | + | This section is used to define the email address and server the PBX will use to send out Unified Messaging and notification emails. Unified Messaging allows a user to receive emails whenever they receive new voicemail messages. If the PC where you check your email has the capacity to play .wav files, the you will be notified when an email is received, and will be able to listen to the new message directly from the email. Notification emails are sent out for features like Log Watch/Ban. [[File:Vmailemailsett.png|center|Vmailemailsett.png]] |
| − | [[ | + | |
| Line 150: | Line 151: | ||
Use this section to view which mailboxes currently have voicemail messages, and to download, upload, or erase the voicemail messages archived on the PBX. | Use this section to view which mailboxes currently have voicemail messages, and to download, upload, or erase the voicemail messages archived on the PBX. | ||
| − | [[File: | + | [[File:Vmailarchive.png|center|Vmailarchive.png]] |
{| style="border-spacing:0" | {| style="border-spacing:0" | ||
| Line 205: | Line 206: | ||
#Click on the file that you want to upload. The file directory will appear in the box next to the '''Browse''' button. | #Click on the file that you want to upload. The file directory will appear in the box next to the '''Browse''' button. | ||
#Click on the '''Upload '''button to initiate the upload process. You should receive a message stating that the upload was “'''Successful'''”. If the upload process failed you will receive an “'''Error'''” message indicating what failed during the process. | #Click on the '''Upload '''button to initiate the upload process. You should receive a message stating that the upload was “'''Successful'''”. If the upload process failed you will receive an “'''Error'''” message indicating what failed during the process. | ||
| − | #Click the [[File: | + | #Click the [[File:Savechanges.png]] button. |
#Click on the '''Apply Changes''' link at the top of the page to save the information and commit the changes to the database. | #Click on the '''Apply Changes''' link at the top of the page to save the information and commit the changes to the database. | ||
==== View Voicemail Listing (Usage Space) ==== | ==== View Voicemail Listing (Usage Space) ==== | ||
| − | [[File: | + | |
| − | '''STEPS:''' | + | [[File:Vmaillisting.png|center|Vmaillisting.png]] '''STEPS:''' |
#From the '''PBX Setup->Voicemail Setup '''page, locate the '''Voicemail Archive '''section. | #From the '''PBX Setup->Voicemail Setup '''page, locate the '''Voicemail Archive '''section. | ||
#Click the '''List Mailboxes Using Space''' link. A listing of the Mailboxes (extensions) and number of messages for each mailbox appears. | #Click the '''List Mailboxes Using Space''' link. A listing of the Mailboxes (extensions) and number of messages for each mailbox appears. | ||
#Click on the '''Hide Mailboxes Using Space''' link to close the listing. | #Click on the '''Hide Mailboxes Using Space''' link to close the listing. | ||
| + | |||
| + | === Using a Gmail Account === | ||
| + | Many times the email account provided by the end user won't work, or is giving difficulty. Its been our experience its best to not waste time trying to figure out something you don't have control over. In these cases, its advisable to create a gmail account and use that for Unified Messaging. Below is an overview of how this would be configured. | ||
| + | |||
| + | *From Address: <gmail email address> | ||
| + | *Voicemail Server: Ext | ||
| + | *Server Address: smtp.gmail.com | ||
| + | *SSL Support: Yes | ||
| + | *Server Port: 465 | ||
| + | *Authentication Required: Yes | ||
| + | *User Name: <gmail email address> | ||
| + | *Password: <gmail password> | ||
Revision as of 17:45, 31 May 2013

Voicemail Setup
This page is used to configure global voicemail box settings, interact with the voicemail archive, as well as configuring the PBX to send out email notifications.
General Settings Section
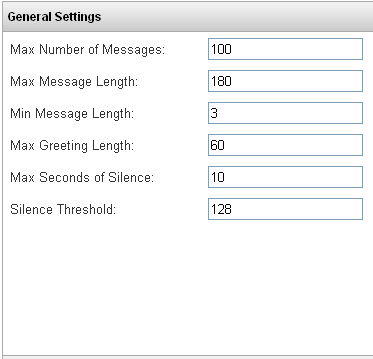
Used to configure global mailbox settings that are not found elsewhere in the PBX.
| Max Number of Messages |
Maximum number of messages allowed for a voicemail box. Default value is 100. |
| Max Message Length |
Maximum length of a message in seconds. Default value is 180. |
| Min Message Length |
Minimum length of a message in seconds. Default value is 3. |
| Max Greeting Length |
Maximum length of a greeting in seconds. Default value is 60. |
| Max Seconds of Silence |
Maximum seconds of silence before the message is considered complete. Set this to zero for an infinite time period. Default value is 10. |
| Silence Threshold |
When using the maximum Seconds of Silence setting, it is sometimes necessary to adjust the silence detection threshold to eliminate false triggering on background noise. The higher the number, the more background noise is needed to break the silence. Default value is 128. |
Set General Voicemail Settings
STEPS:
- From the PBX Setup->Voicemail Setup page. Scroll to find the General Settings section.
- Set the General Voicemail parameters base on your business. In most scenarios, the default settings are fine.
- Click the Save button to save the settings.
- Click on the Apply Changes link at the top of the page to save the information and commit the changes to the database.
Voicemail Menu Section
Configure settings that an individual voicemail box can follow globally.
| Play Envelope Message |
Play the envelope message (date/time) before playing the voicemail message. Default value is Yes. |
| Say Caller ID |
Play the Caller ID information prior to the message, if available. Default value is Yes. |
| Skip ms on playback |
This setting defines an interval in milliseconds to use when skipping forward or reverse while a voicemail message is being played. Default value is 3000. |
| Max Failed Login Attempts |
The number of retries a user has to enter voicemail passwords before the PBX will disconnect the user. Default value is 3. |
| On Delete, play next msg. |
Defines if the PBX will automatically play the next message after deleting a voicemail message. Default value is Yes. |
| Allow Review Mode |
Global setting that defines if callers are able to listen to a message they left, and then decide if they want to re-record it or leave it as it is. Default value is No. |
| Allow Operator |
Global setting in regards to if a voicemail box allows callers to press “0” to reach the System Operator |
Set Voicemail Menu Options
STEPS:
- From the PBX Setup->Voicemail Setup page, locate the Voicemail Menu section.
- Set the Voicemail E-mail parameters base on your business requirements. Typically the default setting will work.
- Click the
 button to save the settings.
 - Click on the Apply Changes link at the top of the page to save the information and commit the changes to the database.
E-mail Settings Section
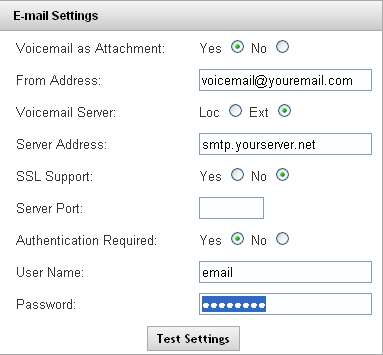
This section is used to define the email address and server the PBX will use to send out Unified Messaging and notification emails. Unified Messaging allows a user to receive emails whenever they receive new voicemail messages. If the PC where you check your email has the capacity to play .wav files, the you will be notified when an email is received, and will be able to listen to the new message directly from the email. Notification emails are sent out for features like Log Watch/Ban.
| Voicemail as Attachment |
Defines if new voicemail messages will be attached and set in an email. |
| From Address |
The email address to be used in the From address of the voicemail message. . Note: Most providers require that this is set to the address of the account used for sending the messages. |
| Voicemail Server |
Allows voicemail services to be provided by an external server. It is not recommend to use the “Loc(local)” setting. This setting will be removed in a future release. |
| Server Address |
This is the mail server address. Enter either a fully qualified host name or an IP address. |
| SSL Support |
Enable if the email server uses SSL encryption. |
| Server Port |
If the email server uses a port other than 25, define that port here. |
| Authentication Required |
Defines if the email server requires a username and password to gain access and send messages. |
| User Name |
The user name associated with the use of the external email server. |
| Password |
The external email server password. |
Set E-mail Settings
STEPS:
- From the PBX Setup->Voicemail Setup page, scroll to find the Email Settings section.
- Set the Voicemail E-mail parameters base on your business requirements or what is recommended by IPitomy.
- Click the Save button to save the settings.
- Click on the Apply Changes link at the top of the page to save the information and commit the changes to the database.
Test Settings Button
STEPS:
- From the PBX Setup->Voicemail Setup page, locate the E-mail Settings section.
- Located at the button of the E-mail Settings section is the Test Settings button. Click on this button to generate a test of the email settings entered.
- The “Email to send a Test message to:” window appears. Enter the email address that you want the test message sent to then click the OK button.
- If the email setting and address is valid, you will receive a “SENDEMAIL Successful!” message at the button of the Test Settings button. The email recipient that was entered will also receive an email with a subject titled “Voicemail Server Test”.
- If the email setting test failed, you will receive an “Error!” message at the button of the Test Settings button. Check the message for hints as to what caused the failure (ie. SSL enabled but not needed).
- Reconfigured the email parameters per the Set Email Settings steps above, then test again.
Refer to the Extension Settings Section for information on configuring email addresses for Unified Messaging. Refer to the PBX AdminGeneral Section for information on configuring email addresses for Log Watch/Ban.
Voicemail Archive Section
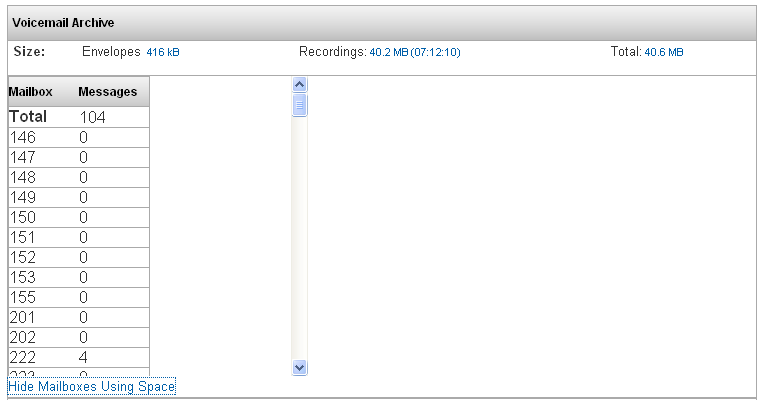
Use this section to view which mailboxes currently have voicemail messages, and to download, upload, or erase the voicemail messages archived on the PBX.
| Size |
Displays the amount of space being used on the PBX for voicemail messages (Envelopes), greetings (Recordings), and the total. | ||
| List Mailboxes Using Space | Clicking on this box will display the list of mailboxes and the number of voice messages stored for each. | ||
| Download Button |
This allows you to download a backup of all user voicemail messages, message envelopes and greeting files to your computer. | ||
| Erase Button |
Deletes all user voicemail data on the PBX, including personal greetings. | ||
| Upload Button |
Used to upload a previously downloaded voicemail archive. |
Download Voicemail Archive Settings
STEPS:
- From the PBX Setup->Voicemail Setup page, locate the Voicemail Archive section.
- Click on the Download button. Select Save File if prompted by your browser.
- Define the location you wish to save the file if prompted by your browser.
Erase Voicemail Archive Settings
STEPS:
- From the PBX Setup->Voicemail Setup page, locate the Voicemail Archive section.
- Click on the Erase button. The warning message “This will delete all Voicemail recordings and user greeting. If you are sure you want to do this, click OK.”
- Click the OK button to continue. The system performs the erase and returns you to the Voicemail Setup page.
Upload Voicemail Archive Settings
STEPS:
- From the PBX Setup->Voicemail Setup page, locate the Voicemail Archive section.
- Click on the Browse button to search for the file location of the file you want to upload.
- Click on the file that you want to upload. The file directory will appear in the box next to the Browse button.
- Click on the Upload button to initiate the upload process. You should receive a message stating that the upload was “Successful”. If the upload process failed you will receive an “Error” message indicating what failed during the process.
- Click the
 button.
 - Click on the Apply Changes link at the top of the page to save the information and commit the changes to the database.
View Voicemail Listing (Usage Space)
STEPS:
- From the PBX Setup->Voicemail Setup page, locate the Voicemail Archive section.
- Click the List Mailboxes Using Space link. A listing of the Mailboxes (extensions) and number of messages for each mailbox appears.
- Click on the Hide Mailboxes Using Space link to close the listing.
Using a Gmail Account
Many times the email account provided by the end user won't work, or is giving difficulty. Its been our experience its best to not waste time trying to figure out something you don't have control over. In these cases, its advisable to create a gmail account and use that for Unified Messaging. Below is an overview of how this would be configured.
- From Address: <gmail email address>
- Voicemail Server: Ext
- Server Address: smtp.gmail.com
- SSL Support: Yes
- Server Port: 465
- Authentication Required: Yes
- User Name: <gmail email address>
- Password: <gmail password>


