Edit Phone Settings
Edit Phone Settings
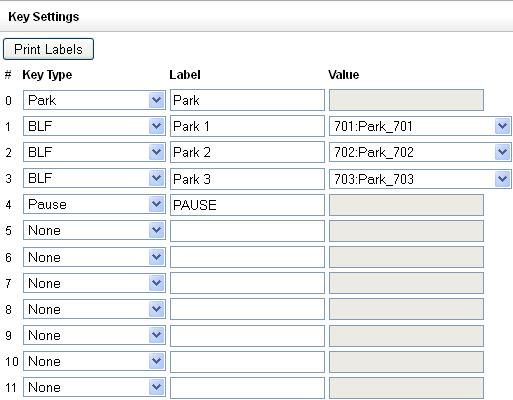
To access the Phone settings, Navigate to Destinations - Extensions and then select the Phone settings Icon. This is the Icon with the Pencil/Handset. When moused over it will have a mouse over popup which indicates it is the Phone settings Icon. The first page is the Key Settings Page. From this page the Technician may set key settings for the phone in question and also print labels for the DESI as indicated.
A description of all key types and their uses may be found in the Manual Appendices. And may also be found by following this link.
http://wiki.ipitomy.com/wiki/IP_PBX_Manual_Appendix_1_Key_Types
Also found within the Manual Appendices is the full Designation Print Guide. Which may also be accessed at this link
http://wiki.ipitomy.com/wiki/Print_hd_labels
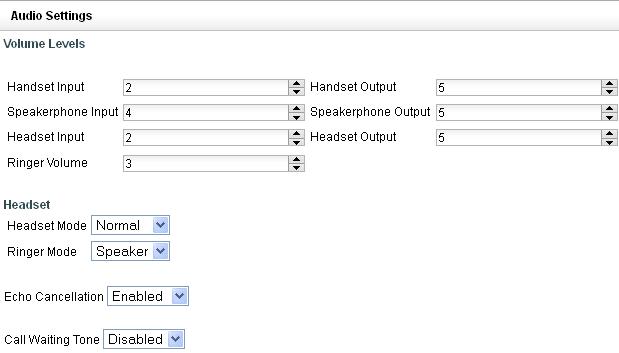
The next tab on the Phone Settings page is Audio Settings. This is the are where default audio settings may be accessed.
STEPS:
- From the Extensions=>Destination page, find the extension you want to edit.
- Click on the icon to the right of the extensions name. The Edit Phone Settings page appears.
- Make the necessary changes to the settings for the phone the click the Save & Configure Phone button.
- The PBX will update the configuration file and reboot the phone so that it can download the updated information for the keys.
| Handset Input |
Adjusts handset microphone volume. Default is 5. |
| Handset Output |
Adjusts handset speaker volume. Default is 5. |
| Speakerphone Input |
Adjusts speakerphone microphone volume. Default is 5. |
| Speakerphone Output |
Adjusts speakerphone speaker volume. Default is 5. |
| Headset Input |
Adjusts headset microphone volume. Default is 5. |
| Headset Output |
Adjusts headset speaker volume. Default is 5. |
| Ringer Volume |
Adjusts ringer volume. Default is 3. |
| Headset Mode |
Toggles functionality of making and answering calls. Default is Normal.
Normal: Primary method for making and answering calls will be the Handset and Speaker, depending on if the hookswitch is pressed. Headset: Primary method for making and answering calls will be the Headset. Press the Headset key to wait for calls without an open line. After that, pressing a Line key will open a line on the headset or answer an inbound call on the headset, as will pressing the Ans softkey for an inbound call. The hookswitch will not be functional. |
| Ringer Mode |
Toggles between Headset and Speaker for inbound ringing. Default is Speaker.
Speaker: Inbound calls ring on the speaker. Headset: Used in conjunction with Headset Mode, this will have inbound calls ring to the headset instead of the speaker. |
| Echo Cancelation |
Toggles the phones echo cancelation. The default setting is No. |
Call Waiting Toggles Call Wating on and off. Default is Yes
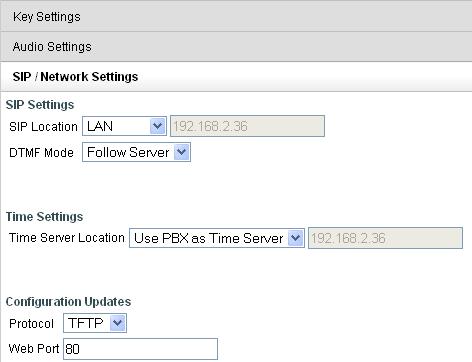
Sip Network Setting is the Next Tab on Phone settings.
SIP / Network Settings
|
SIP Settings – SIP Location |
LAN = Local Area Network located telephone, no unauthorized security measures required (LAN IP Address of the IPPBX will be shown) WAN = Wide Area Network located telephone, unauthorized security measures apply (WAN interface – Public IP Address is shown) |
|
SIP Settings – DTMF Mode |
Follow Server – follows settings stored in PBX settings for this phone RFC2833 – use RFC2833 (regardless of PBX settings for phone) SIP Info – use SIP Info (regardless of PBX settings for phone)(SIP Info is SIP Header information included in SIP Packets) Inband – use Inband (regardless of PBX settings for phone) Auto – use Auto Detect (regardless of PBX settings for phone) |
|
Time Settings – Time Server Location |
Use PBX as Time Server – uses the PBX clock for sync Use PBX Time Server – use the same timer server as defined in the PBX Custom – identify the time server to be used |
|
Configuration Updates – Protocol |
TFTP – Trivial File Transfer Protocol (used for LAN phones) HTTP – Hypertext Transfer Protocol (used for WAN phones) |
|
Configuration Updates – Web Port |
When HTTP is used the Port assignment will usually be 80, however any valid port number can be assigned in this field. |
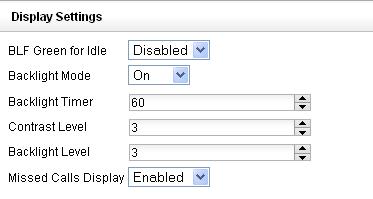
The next tab in Phone settings is the Display Settings Tab
Display Settings
| Sections/ Fields |
Description |
| BLF Green for Idle |
Toggles if BLFs for idle phones will light green, or not light at all. Default is disabled. |
| Backlight Mode |
Toggles between backlight always On, always Off, or on a timer. Default is on. |
| Backlight Timer |
Defines the interval when Backlight Mode is set to Timer. Default is 60 sec. |
| Contrast Level |
Controls the screen contrast. Default is 3. |
| Backlight Level |
Controls the backlight brightness. Default is 3. |
The last tab on Phone settings is the Expansion Module Tab. This will only appear on Phone Models which support an Expansion Module.
Expansion Module Settings
| Sections/ Fields |
Description |
| Number of Modules |
Defines how many expansion modules the phone is using. Once configured, you can select each module and set their keys. |
| Print All Labels |
Prints labels for all configured expansion modules. |
| Print Labels |
Prints labels for the expansion module that is currently displayed. |
| Key Type |
Key type determines what function a key performs. A dropdown list shows which key types are available to the phone model you are working with. |
| Label |
This is the label associated with this key. If configured for a key around the LCD screen, this is what will display. |
| Value |
The value completes a key’s function. It may contain a number to dial special codes or allow you to select an extension from a dropdown list. Most key types do not require you to enter a value. For example, the Voicemail key does not require a value because the System Administrator determines it for the end user.
Incoming' – A call is ringing the extension |
STEPS:
- From the Extensions=>Destination page, find the extension you want to edit.
- Click on the icon to the right of the extensions name. The Edit Phone Settings page appears.
- Make the necessary changes to the settings for the phone and click the Save & Configure Phone button.
- The PBX will update the configuration file and reboot the phone so that it can download the updated expansion module settings.


