Difference between revisions of "Grandstream FXS"
Jump to navigation
Jump to search

| Line 28: | Line 28: | ||
#Click the Update button at the bottom of the page. | #Click the Update button at the bottom of the page. | ||
<div><br/></div><div>[[File:FXS pic 3.png]]<br/></div><div><br/></div><div><div>10. Click the Reboot button at the bottom of the page.</div><div>Once the Grandstream 4024 has rebooted, any configured extensions should be registered and</div><div>functional. No other fields NEED to be changed for regular use.</div><div><br/></div><div><br/></div><div>If the Grandstream 4024 is intended for use with a FAX Machine, the following change should be</div><div>made.</div><div>1. Navigate to Profile 1.</div><div>2. Set Jitter Buffer Type to Fixed.</div><div>3. Click the Update button at the bottom of the page.</div><div>4. Click the Reboot button at the bottom of the page.</div><div><br/></div><div>[[File:FXS pic 4.png]]<br/></div><div><br/></div><div><br/></div></div></div></div> | <div><br/></div><div>[[File:FXS pic 3.png]]<br/></div><div><br/></div><div><div>10. Click the Reboot button at the bottom of the page.</div><div>Once the Grandstream 4024 has rebooted, any configured extensions should be registered and</div><div>functional. No other fields NEED to be changed for regular use.</div><div><br/></div><div><br/></div><div>If the Grandstream 4024 is intended for use with a FAX Machine, the following change should be</div><div>made.</div><div>1. Navigate to Profile 1.</div><div>2. Set Jitter Buffer Type to Fixed.</div><div>3. Click the Update button at the bottom of the page.</div><div>4. Click the Reboot button at the bottom of the page.</div><div><br/></div><div>[[File:FXS pic 4.png]]<br/></div><div><br/></div><div><br/></div></div></div></div> | ||
| − | |||
| − | |||
| − | |||
| − | |||
| − | |||
| − | |||
| − | |||
| − | |||
| − | |||
| − | |||
Revision as of 20:47, 29 November 2012
Grandstream 4024 FXS Quick Guide
The Grandstream 4024 FXS Gateway allows you to integrate up to 24 Analog Stations to the
PBX over SIP. Configuration of the Grandstream 4024 FXS Gateway is as simple as following
the steps below.
- Create an Extension in the PBX as you would normally.
- Copy the SIP password and note the Extension Number, as they will be used later.
- Connect the Grandstream 4024 to the network via the LAN port.
- Power the Grandstream 4024 with the power supply provided.
- Discern the IP address of the Grandstream 4024.
- Connect an analog phone to any FXS port on the Grandstream 4024.
- Dial * * * from the analog phone.
- Enter 002 in the menu, and the Grandstream 4024 will tell you its IP address.
- Log into the Grandstream 4024 GUI.
- Enter the IP address for the device in your web browser.
- Enter the password <admin> to begin configuring the Grandstream 4024.
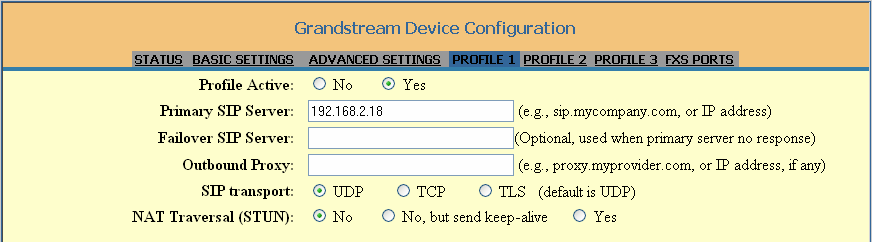
- Configure the Server.
- Navigate to Profile 1.
- Enter the IP address of the PBX under Primary SIP Server.
- Click the Update button at the bottom of the page.

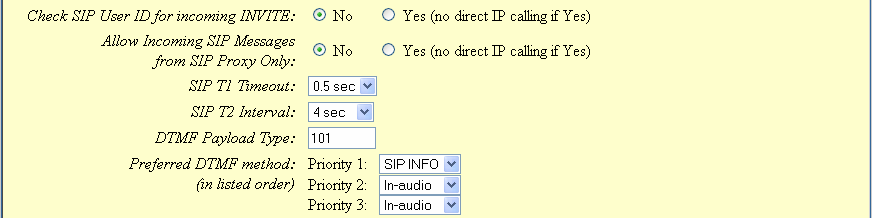
8. Configure DTMF Method.
- Navigate to Profile 1.
- Set Preferred DTMF: Priority 1 to SIP Info (assuming the extension created in the PBX is set to Info, otherwise ensure this field matches what is set for the extension).
- Click the Update button at the bottom of the page.

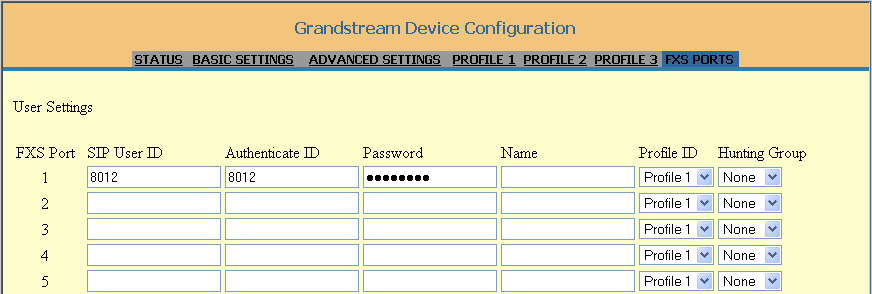
9. Configure the Extensions.
- Navigate to FXS Ports.
- For each extension you will use one port, and enter the following data which was noted or copied under step 2.
- SIP User ID = <extnum>
- Authenticate ID = <extnum>
- Password = <SIP Password>
- Click the Update button at the bottom of the page.

10. Click the Reboot button at the bottom of the page.
Once the Grandstream 4024 has rebooted, any configured extensions should be registered and
functional. No other fields NEED to be changed for regular use.
If the Grandstream 4024 is intended for use with a FAX Machine, the following change should be
made.
1. Navigate to Profile 1.
2. Set Jitter Buffer Type to Fixed.
3. Click the Update button at the bottom of the page.
4. Click the Reboot button at the bottom of the page.
