Difference between revisions of "IP PBX Manual Destinations Groups"
| Line 454: | Line 454: | ||
#From the list of existing agents, click on the box (placing a checkmark) to the left of the Agent(s) that you want to delete. Click the '''DELETE SELECTED''' button. | #From the list of existing agents, click on the box (placing a checkmark) to the left of the Agent(s) that you want to delete. Click the '''DELETE SELECTED''' button. | ||
#The agent selected is removed from the list. | #The agent selected is removed from the list. | ||
| − | #Click [[File: | + | #Click [[File:savechanges.png]] button to save the changes. |
#Click the '''Apply Changes''' link located at the top right hand corner of the page, to commit the changes to the database. | #Click the '''Apply Changes''' link located at the top right hand corner of the page, to commit the changes to the database. | ||
Revision as of 15:41, 23 May 2013
.gif)
Groups
A Group is a logical grouping of extensions and their privileges. Each Group is associated with a set of PBX features and call routing strategies. It is advised to build the extensions in the PBX first, allowing the groups to be populated at the time of creation.
These Groups allow incoming calls to be distributed to a group of extensions rather than just one extension. Within the Groups, different distribution strategies may be selected based on the call coverage required by the application. Groups also provide off-hook paging functionality. By dialing the intercom button or code followed by the group number, extensions in the group will receive the page over the intercom. Groups are a set of extensions that are related either because they:
- Serve a similar business function.
- Work within the same department.
- Are located in proximity to each other.
For example, a business might create a few user Groups in an IP telephony network, e.g. Sales, Marketing, Administration, Accounting, Engineering, etc. Groups may also be created for people in similar locations like a plant floor, the north section of a building or the front office. The goal of a group is to ring telephones based on the incoming routing logic (e.g. DIDs, Auto Attendant selected by the incoming caller, or time of day). Note that calls routing to an extension from a ring group will ignore that phones PBX forwarding settings. Some phones have forwarding settings which are independent of the PBX (not set through the PBX Web GUI). These settings will still be applied.

Ring Group Examples
Ring groups define a set of extensions (people) that answer calls. Ring groups can be created for departments (e.g. Sales, Engineering) or buisiness regions (e.g. north, south, etc), or areas of a business (e.g. a warehouse or plant floor). These ring groups can appear on an Automated Attendant (menu). When the group is selected from a Menu, the call is routed to the group. These calls will be distributed to the member extensions based upon the ring strategy for the group. The ring strategy for the group can be set from the drop-down list. Available call distribution options are:
- Ring AllRing all extensions in the group simultaneously
- Round RobinTake turns ringing each extension, starts at the first extension for each new call
- Round Robin (with memory)Take turns ringing each extension, starts where the last call left off
- Least RecentRing extensions in order of which was least recently called by the queue. If using agents, logging out will reset the call counter so the next time that agent logs in, they will be at the top of the list for queue calls.
- Fewest CallsRing extension in order of which has the fewest completed calls from the queue
- RandomRandomly ring one extension at a time
Example Ring Group 1Departmental Grouping
Ring group definitions can be found in the Add a New Ring Group section of this guide. If a business has the following departments and people: This business can setup the following ring groups supporting business operations.
| GROUP 1 - Sales | Ext. | GROUP 2Customer Services | Ext. |
| Cathy Caldwell | 123 | Gretchen Goodall | 134 |
| David Dawson | 124 | Peter Polk | 135 |
| Susan Smith | 125 | ||
| Robert Reed | 126 |
Using this ring group scenario the Menu would look like:
- Sales (Destination - Group 1).
- Customer Service (Destination - Group 2).
- Office Manager (Destination - Ext. 113).
The menu prompt (message) for this menu and group arrangement would read as follows:
“Thank you for calling CompanyA, a leading manufacturer of cable assemblies and wiring harnesses. If you know the extension of the party you would like to reach you may dial it at any time.”
- For Sales, press 1.
- For Customer Service, press 2.
- For Accounting, press 3.
Once a call is sent to Sales, member extension will be rang according to the ring group strategy.
Example Ring Group 2Regional Sales Grouping
| GROUP 1 East Coast Sales | Ext. | GROUP 2 -West Coast Sales | Ext. | GROUP 3 Customer Service | Ext. |
| Cathy Caldwell | 123 | Susan Smith | 125 | Gretchen Goodall | 134 |
| David Dawson | 124 | Robert Reed | 126 | Peter Polk | 135 |
Using this ring group scenario the Menu would look like:
- East Coast Sales (Destination - Group 1).
- West Coast Sales (Destination - Group 2).
- Customer Service (Destination - Group 3).
- Office Manager (Destination - Ext. 113).
The menu prompt for this menu and group arrangement would read as follows:
“Thank you for calling CompanyA, a leading manufacturer of cable assemblies and wiring harnesses. If you know the extension of the party you would like to reach you may dial it at any time. For”
- East Coast Sales, press 1.
- West Coast Sales, press 2.
- Customer Service, press 3.
- Accounting, press 4.
Calls sent to these groups might use different ring strategies. The East Coast Sales group might answer calls Round Robin, distributing the calls to each Sale Representative consecutively. If a sales person is missing from the West Coast team this group might set phones to Ring All in the group so that calls don’t get missed. The Customer Service team may get high volumes of calls during a specified period of time, so this group may be set to ring Least Recent.
Add/Edit New Ring Group

The following table describes the parameters (fields) on the Edit Ring Group page and their descriptions and recommended settings.
| Name |
The name associated with this ring group. |
| Group Number (to dial group) |
The number dialed to access this ring group. Must be 3 or 4 digits. |
| Allow Paging with **+Group Number |
If enabled (checked), this will allow **+ group number to page this ring group |
| Ring Strategy |
This defines how calls are distributed to member extensions. Options are:
Ring All - Ring all extensions in the group simultaneously Round Robin - Ring extensions consecutively. Delivers a new call to the first person in the group only after the last person in the group has taken a call. If an extension is busy the call will automatically be routed to the next extension in the group. Round Robin (with memory) - Ring extensions consecutively. Delivers a new call to the first person in the group only after the last person in the group has taken a call. Remembers where the last call was taken and distributes new calls to the next extension in the rotation. Least Recent - Ring extensions in order of which was least recently called by the queue. Fewest Calls - Ring extension in order of which has the fewest completed calls from the queue Random - Distributes calls randomly to the group. |
| Failover Destination |
This defines where a call will be sent when it goes unanswered for a duration that matches the Timeout for the group. |
| Timeout |
Defines, in seconds, the total time a call will spend in the ring group before being sent to the Failover Destination |
| Allow Recording |
Determines if feature code recording is allowed for calls in this queue.
If YES = enables the recording feature. If NO = disables the recording feature. |
| Agent Ring Time |
Defines, in seconds, how long the queue will ring a particular agent. If using the Ring All strategy, this value should match the Timeout. For other strategies, this should be set to how long an extension should ring before moving on to the next. |
| Autofill |
This deals with how the queue handles multiple concurrent calls. If set to NO the queue will wait until the first call is answered before ringing phones with the second call. If set to YES the queue will ring phones for all calls as they come in. Note this setting has a different effect with ring all that may not be desirable. When autofill is yes and ring strategy is 'ringall' the group will still deliver the calls in the order they are received and in order to prevent calls from being lost by phones that have too few lines for the number of calls in the queue, the group will only deliver a single additional call when Ring In Use is set to yes. If someone who's phone is ringing rejects the call, the group will deliver the next call in line to all members. This means the the rejected call is no longer ringing the member's phone that rejected the call, however it is still ringing all of the other members. At the same time the 2nd call in line comes in and rings everyone. |
| Ring In use |
If YES = Distribute calls to group members if they are already on a call
If NO = Do NOT distribute calls to group members if they are already on a call |
The following outlines the steps to add/edit ring group settings.
STEPS:
- From the Destinations=>Group page, click the ADD Group button. The Edit Ring Group page appears.
- In the Name field, enter a name for the group.
- In the Group Number field, enter a number for the group. This number must be three or four digits in length.
- Check the Allow Paging with **+ the Group Number to enable the setting.
- Select the desired Ring Strategy from the drop-down list.
- Select the desired Failover Destination from the list of available options.
- Enter the time for the Timeout parameter.
- Select “Yes” if you want to enable the Allow Recording setting. Otherwise, set it to “No”.
- Enter the time for the Agent Ring Time parameter.
- Select “Yes” if you want to enable the Autofill setting. Otherwise, set it to “No”
- Select “Yes” if you want to enable the Ring in use setting. Otherwise, set it to “No”
- Click
 the button.
 - From the Members section of the Edit Ring Group page, select the extension number from the list of extensions that you want to add to the ring group. Click the ADD button.
- A second list appears next to the Members list displaying the selected extension. Repeat step 13 until all extensions that you want to add are on the list. Additionally, Shift or Control click functionality works for adding multiple extensions at once.
- To remove an item from the list of additions, select the extension number then click the REMOVE button.
- Define Priorities for the extensions, if needed. The scale ranges 0 thru 9 (0 is the highest priority).
- Click the button to save the changes.
- Click the Apply Changes link located at the top right hand corner of the page, to commit the changes to the database.
Ring Group Advanced Settings

The following table describes the parameters (fields) on the Advanced Settings for Ring Groups page and their descriptions and recommended settings.
| Caller Ring Settings | Defines what a caller will hear while they are waiting for someone to pick up a call from the call group. Callers can either hear:
RingingThe phone continues to ring while the caller is waiting. Music on HoldThe caller hears music while waiting for a group member to pick up the call. The dropdown list displays the MOH playlists that are on the PBX. Select a playlist and it will play the sound files found in the playlist. | |
| Queue Dial String | OBSOLETE and will be removed in a future release. | |
| Ring Tone | When Caller Ring Settings are set to Ringing, use this to define the ring cadence. | |
| Use | Defines what method, if any, you wish to use to override Inbound CID. The options are:
System Default, Name, Number, Name and Number | |
| Name | This is the name of the caller that will be displayed when a call is received. | |
| Number | This is the number of the caller that will be displayed when a call is received. | |
| Prepend | Selecting Prepend will enter the text you put in the field, followed by the original CID. If not prepending, the override eliminates the original information. | |
Edit Advanced Ring Group Settings
STEPS:
- Select Destinations=>Groups. The Ring Groups page appears.
- Select the Ring Group you want to edit by either select the
 icon to the right of the group name or click on the blue Group Name link.
 - The Edit Ring Group page appears. Scroll down the page and click on the Advanced link. The Advanced Ring Group Settings section is displayed.
- Make the necessary changes to the settings then click button to save the changes.
- Click the Apply Changes link located at the top right hand corner of the page, to commit the changes to the database.
Edit Custom Caller ID Settings
STEPS:
- Select Destinations=>Groups. The Ring Groups page appears.
- Select the Ring Group you want to edit by either select the icon to the right of the group name or click on the blue Group Name link.
- The Edit Ring Group page appears. Scroll down the page and click on the Advanced link. The Custom Caller ID section is displayed.
- Make the necessary changes to the settings then click button to save the changes.
- Click the Apply Changes link located at the top right hand corner of the page, to commit the changes to the database.
Edit Members/Agents

| Members | This is the list of available extensions that are in the database. |
| Agents | This is the list of available agents that are in the database. |
| Priority | This field allows you to set the priority level for the members or agents. The lower the number, the higher the priority. |
| ADD | This button will add the select item on the list to the right of the available members or agents. Shift and Control click functionality works for adding more than one at a time. |
| REMOVE | This button will remove the item(s) that have been selected from the list of available members or agents. Shift and Control click functionality works for adding more than one at a time. |
Add Agents/Members to the Group
STEPS:
- Navigate to the Destinations=>Groups=>Edit Group page.
- Select from the left hand column which agents/members to add to the group.
- Click the Add button.
- Click button to save the changes.
- Click the Apply Changes link located at the top right hand corner of the page, to commit the changes to the database
Delete Agents/Members from the Group
STEPS:
- STEPS: Navigate to the Destinations=>Groups=>Edit Group page.
- Select from the right hand column which agents/members to remove from the group.
- Click the Add button.
- Click button to save the changes.
- Click the Apply Changes link located at the top right hand corner of the page, to commit the changes to the database
Automatic Call Distribution (ACD)
Systems licensed to use ACD will have access to additional functionality pertaining to Ring Groups. ACD allows for more flexibility and control over the queuing in a Ring Group, as well as allowing the creation of Agents who can be added to the Ring Group.

| Agent Retry Timer | This defines, in seconds, how long the queue will wait before attempting to ring an agent again. |
| Weight | The priority of the queue in relation to other queues in the system. |
| Wrap-up Time | This defines, in seconds, how long the queue will wait after an agent has ended a call before flagging then as an active agent ready to accept more calls. |
| Autopause | This will place an agent in a pause state in relation to this queue when they ignore or answer a call. To become an active member of the queue again unpause using the 1* feature code a phone or 1*+agent# for an agent. |
| Maximum # of people in queue | Defines how many callers can join the queue before it is considered full. |
| Announce Frequency | Must be set for Announce Holdtime to function. This pertains to how often the caller will hear the hold time announcement, in seconds |
| Periodic Announce Frequency | This defines how much time passes between playing the recording that was set for this queue under Periodic Announcement. |
| Announce Holdtime | If set to YES this will announce a caller’s status in the queue with regards to their expected hold time, pending the hold time is estimated to be over 1 minute. If the hold time is less than one minute, this will announce the caller’s position in the queue. A period of time is needed for the algorithm to ‘learn’ and estimate hold times accurately. This message will not play for the first caller in the queue. Caller Ring Settings must be set to a MOH file in order for this message to play. |
| Join Empty Queue | Controls if a caller can join a queue.
YES = Callers can join the queue with no members or whose members are busy. NO = Callers can only join the queue with active, non-busy members. STRICT = Callers can join the queue as long as there are active members, be they available or busy. |
| Leave Empty Queue | Controls if a caller will leave an empty queue.
YES = Callers will leave the queue if there are no active members, or all members are busy. NO = Callers will not leave the queue even if there are no active members, or all members are busy. STRICT = Callers will leave the queue if there are no active members, but will remain in the queue if all members are busy. |
| Report Hold Time | Set to YES if you want the person answering the queue call to hear a message indicating how long the call they just answered was in the queue |
| Member Delay before connect | Delay, in seconds, before a member is connected to the queue. |
| Timeout Restart | If set to YES the ring group timeout will reset after attempting to ring an agent/member. When set to NO, time taken to ring an agent/member will be subtracted from the ring group time, and when the timer ends the group will send the caller to the Failover Destination |
| Service Level | Set this to the time, in seconds, that defines the acceptable level of service for the queue. The Live Queue Data page will track the percentage of calls answered within the allotted time. |
| Exit Status: FULL
Exit Status: JOINEMPTY Exit Status: LEAVEEMPTY Exit Status: JOINUNAVAIL Exit Status: LEAVEUNAVAIL |
These are the destinations where calls will go based on the exit strategy defined. If no one in the group accepts the call this is the destination to which the call will be sent. Destinations can be extensions, other ring groups, a menu or a voicemail box. |
| Intro Announcement | Define what prompt to play to the caller just before they enter the queue. (Previously “Announce Filename”) |
| Agent Announcement | Defines what prompt to play to the agent/member who answers the queue call. This setting is set per Queue and therefore can be used to identify what Queue is being answered (for agents handling calls from multiple Queues. |
| Periodic Announcement | Defines what prompt to play to the caller at the Periodic Announce frequency interval. This will not play for the caller in the first position of the queue. Caller Ring Settings must be set to a MOH file in order for this message to play. |
| Exit Menu | Set this to a menu. Key presses while in this group will send people the corresponding destination from that menu. |
Table 39Edit Ring Group ACD Agents Settings and Descriptions
Edit Automatic Call Distribution (ACD) Settings
STEPS:
- From the Destinations=>Groups=>Edit Group page, scroll to the ACD Settings section.
- Make the necessary updates to the ACD settings.
- Click button to save the changes.
- Click the Apply Changes link located at the top right hand corner of the page, to commit the changes to the database.
Add Automatic Call Distribution (ACD) Agents

| Name | Enter a name that will identify this agent. |
| ID | Enter a unique 3-4 digit number to identify this agent. This number is used to log in/out. |
| PIN | Enter a minimum of 4 digits for the PIN. This is the password used to log in/out with the agent. |
Table 40Add/Edit Agent Features and Descriptions
STEPS:
- From the Destinations=>Groups=>Edit Group page, scroll to the ACD Settings section.
- Click on the blue Agents link to the right of the words ACD Settings. The Agents page appears.
- Click on the ADD button to add a new agent. A box with the name, ID and PIN field appears. Enter the information for the new agent.
- Click button to save the changes.
- Click the Apply Changes link located at the top right hand corner of the page, to commit the changes to the database.
Edit Automatic Call Distribution (ACD) Agent
STEPS:
- From the Destinations Groups Edit Group page, scroll to the ACD Settings section.
- Click on the blue Agents link to the right of the words ACD Settings. The Agents page appears.
- Update the necessary information for agent(s) then click the SAVE CHANGES button. The changes that you made will appear in the updated list.
- Click the Apply Changes link located at the top right hand corner of the page, to commit the changes to the database
Delete Automatic Call Distribution (ACD) Agent
STEPS:
- From the Destinations=>Groups=>Edit Group page, scroll to the ACD Settings section.
- Click on the blue Agents link to the right of the words ACD Settings. The Agents page appears.
- From the list of existing agents, click on the box (placing a checkmark) to the left of the Agent(s) that you want to delete. Click the DELETE SELECTED button.
- The agent selected is removed from the list.
- Click button to save the changes.
- Click the Apply Changes link located at the top right hand corner of the page, to commit the changes to the database.
Multicast Paging Group
A Multicast Paging Group provides a way to page a large number of phones, while keeping the burden on the network and PBX to a minimum.
NOTE: IPitomy recommends using multicast paging for groups of 10 or more phones that are paged frequently.


The following table describes the fields (parameters) on the Multicast Edit Paging Group window and the recommended settings.
| Name | This is a name of the multicast paging group. |
| Local Number | This is the number that will be dialed to launch the multicast paging to the defined group. This is the unique 3-4 digit number. |
| Multicast Address | This should be a valid multicast IP for a Multicast Address<ref name="ftn1">224.0.0.0 to 239.255.255.255, with many addresses reserved.</ref>. We recommend 225.5.5.5. You can use the same IP for each group, so long as you assign them different ports. |
| Multicast Port | This must be a valid, unused port Multicast Port.
NOTE: This must be a port below 6535. |
| Time to Live | Time to Live is a counter that decreases by 1 each time a packet passes through a router. When the counter reaches 0, the packet is considered dead and will not pass to any other networks. This can be left blank or configured as needed for your particular install.
NOTE: Leaving it blank the packet will not pass to another network. |
| Members | The Members section allows you to add the extensions to be paged within the group when a page is sent. |
| Add/Remove | The Add and Remove button allows you to add or remove members (extensions) from the paging group. |
| Create/Update | Depending on the process that is being performed, this button will appear (be labeled) as either Create or Update. This will create a new member or process the changes made. |
| Close Window | This link will close the Edit Page Group window and return you to the Ring Groups page. |
The following section outlines the steps to add a new Multicast Paging Group.
Add Multicast Paging Group
STEPS:
- Navigate to the Destinations=>Group page
- Locate to the Multicast Paging Groups section (at the bottom of the page).
- Click on the Add Groups button. The Edit Page Group page appears.
- Enter the necessary information for the new paging group.
- From the Members section of the Edit Page Group window, select the members (extensions) that you want to include in the paging group.
Use the CTRL or SHIFT button to select multiple or a range of extensions from the list.
- Click on the ADD button to add the selected members to the group.
- Click the CREATE button to save the changes. The “Group Created” message appears. Close the window (click on the “X”). The system returns you to the Ring Groups page.
- Click the Apply Changes link located at the top right hand corner of the page, to commit the changes to the database
- Re-boot the phones that correspond to extensions that were added to the Multicast Paging Group. Once all the phones have been re-booted, you will be able to utilize this feature by simply dialing the Local Number that was just created.
Edit Multicast Paging Group
STEPS:
- Navigate to the Destinations=>Group page
- Locate the Multicast Paging Groups section (at the bottom of the page).
- Click on icon to the right of the Name of the paging group you want to update. The Edit Page Group page appears.
- Enter the necessary information for the paging group.
- Click the UPDATE button to save the changes. Close the window (click on the “X”). The system returns you to the Ring Groups page.
- Click the Apply Changes link located at the top right hand corner of the page, to commit the changes to the database
- Re-boot the phones for all the extensions that were involved in the Multicast Paging Group.
Delete Multicast Paging Group
STEPS:
- Navigate to the Destinations=>Group page
- Locate the Multicast Paging Groups section (at the bottom of the page).
- Click on
 icon to the right of the Name of the paging group you want to delete. The group is removed from the Multicast Paging Group page.
 - Click the Apply Changes link located at the top right hand corner of the page, to commit the changes to the database
- Re-boot the phones for all the extensions that were involved in the Multicast Paging Group which was deleted.
Live Queue Data
The Live Queue Data page displays current call statistics for ACD queues. The page will refresh every 10 seconds, allowing a manager to monitor the activity in the queue as it happens.

| <queue selection box> | In the queue selection box the Queue or Queues to be displayed can be selected. Use the Control key (Command on Mac) to select multiple queues for display. | |||||||||||||||
| <queue statistics box> | The Queue Statistics box has been reformatted in SW release 3.4.1 to allow its use on call center wall boards (large PC displays).
Each queue is encapsulated with a thin-line box. Queue statistics are color-coded for quick orientation on wall boards. Since this data is presented in GUI format it can be easily resized to accommodate large displays. The top line of the queue display presents the Queue Name and the date. Statistics are a running total and will reset to zero whenever Apply Changes is clicked (as is the case of the screen capture above). | |||||||||||||||
| Time in Q | This is the average time that callers have waited in queue before being answered by a queue member/agent. | |||||||||||||||
| Calls in Q | This is the number of calls that are waiting in the queue. | |||||||||||||||
| Answered | This is the number of calls answered by members/agent of this queue. | |||||||||||||||
| Abandoned | This is the number of calls that have not been answered and the caller abandoned the queue. | |||||||||||||||
| Target Time | Displays the service level set for this ACD queue. The Service Level is the arbitrary time allocated by the queue administrator which is set as a gauge by which all calls should be answered. | |||||||||||||||
| % in Target | This is the percentage of answered calls measured against the service level. (The percentage of calls being answered within the set Target Time.) | |||||||||||||||
| <Member/Agent field> | At the right side of the Queue Statistics box the agents and queue members are listed. There are two maximum columns and the window will resize to accommodate all members and agents registered to this queue.
Member/Agent status is available at a glance with color-codes as follows:
Also in the Member/Agent data are two numeral fields. The first number represents the Priority of this Member/Agent in this queue. The second number is the total calls taken by this Member/Agent. |
Live Queue Data Wallboard
Software version 3.4.1 and above allows the use of call center wall boards with Live Call Queue. This function is facilitated using a special user name and password via Smart Personal Console.
Activate Live Call Queue Wallboard
STEPS:
- Navigate to the PBX Setup=>General page
- Locate to the General Settings section (second section from the top).
- Locate the SPC Reports User Password field (bottom of section)

- It may be helpful to change this to a user-friendly password. If you change the password be sure to and Apply Changes.
- Make a note of this password.
- On the PC that will be used for the wallboard display, open a web browser and navigate to the IPitomy PBX login screen
- Using the right sideSmart Personal Console (User Login) input the word “reports” as the user name and the password saved in step 3.
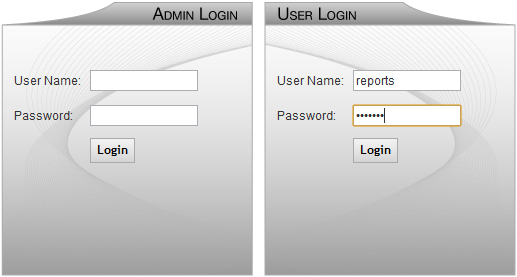
- Click on Login .
- The CDR-Report page is opened. On this page is a button to select Live Queue.
- Click on Live Queue.
- The same display presented in PBX Administration is displayed. Simply select the group or groups that you wish to display on the wallboard.
- Size this web page data output for the monitor in use by pressing and holding the Cntrl key (PC, Command key on Mac) and press “+” or “-“ until the data is sized as you wish.

<references/>