Difference between revisions of "IPitomy SIP Trunk Configuration"
| Line 69: | Line 69: | ||
*From the connected analog phone, dial ***129 to enable WAN HTTP Access. | *From the connected analog phone, dial ***129 to enable WAN HTTP Access. | ||
*Set a static WAN IP, subnetmask, gateway, and DNS on the Basic Settings Page. This needs to be done as you will need to set up the standard remote SIP port forwards (5060, 10000-20000) in the router to this IP address. | *Set a static WAN IP, subnetmask, gateway, and DNS on the Basic Settings Page. This needs to be done as you will need to set up the standard remote SIP port forwards (5060, 10000-20000) in the router to this IP address. | ||
| − | + | ||
| + | [[File:Grandstream for IPitomy SIP 0.jpg|File:Grandstream for IPitomy SIP 0.jpg]] | ||
| + | |||
| + | *Note: The gateway has a static LAN IP of 192.168.2.1, if your networks is in the same subnet, you'll also need to modify the LAN DHCP Base IP so its on a different subnet or the device will not function correctly. | ||
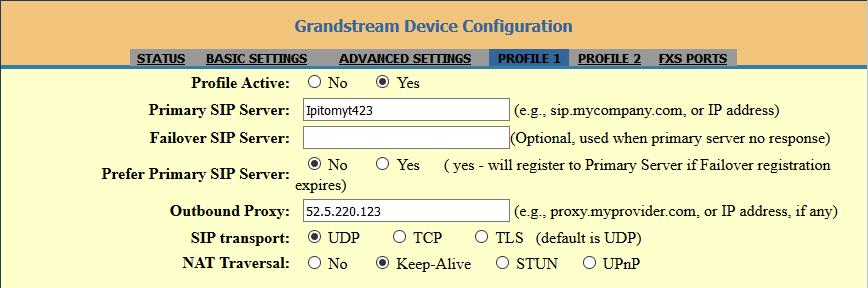
*Under Profile 1 you will need to configure the following: | *Under Profile 1 you will need to configure the following: | ||
**Set Primary SIP Server to the Domain provided for your Authenticated SIP Trunks | **Set Primary SIP Server to the Domain provided for your Authenticated SIP Trunks | ||
**Set the Outbound Proxy to the Host provided for your SIP Trunks | **Set the Outbound Proxy to the Host provided for your SIP Trunks | ||
| + | **Set NAT Transversal to Keepalive | ||
| + | **[[File:Grandstream for IPitomy SIP 1.jpg|File:Grandstream for IPitomy SIP 1.jpg]] | ||
**Set Use NAT IP to your sites static public IP | **Set Use NAT IP to your sites static public IP | ||
| + | **[[File:Grandstream for IPitomy SIP 2.jpg|File:Grandstream for IPitomy SIP 2.jpg]] | ||
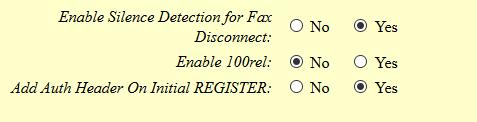
**Set Add Auth Header On Initial REGISTER to Yes | **Set Add Auth Header On Initial REGISTER to Yes | ||
| + | **[[File:Grandstream for IPitomy SIP 3.jpg|File:Grandstream for IPitomy SIP 3.jpg]] | ||
*Under FXO Ports configure the following: | *Under FXO Ports configure the following: | ||
**For Port 1, set SIP User ID and Authenticate ID to the Username provided for your Authenticated SIP Trunks | **For Port 1, set SIP User ID and Authenticate ID to the Username provided for your Authenticated SIP Trunks | ||
| Line 81: | Line 88: | ||
**For Port 1, set Hunting Group to Active. Also set Enable Port to Yes. | **For Port 1, set Hunting Group to Active. Also set Enable Port to Yes. | ||
**For the other ports (based on how many active lines you want to use) set Hunting Group to 1. This will allow one registration to roll over to additional lines. Be sure to set Enable Port to Yes for each port you want to use. | **For the other ports (based on how many active lines you want to use) set Hunting Group to 1. This will allow one registration to roll over to additional lines. Be sure to set Enable Port to Yes for each port you want to use. | ||
| + | **[[File:Grandstream for IPitomy SIP 4.jpg|File:Grandstream for IPitomy SIP 4.jpg]] | ||
*Update and Apply on each page, then Reboot the device when finished and you should be registered on FXS1 on the Status Page. | *Update and Apply on each page, then Reboot the device when finished and you should be registered on FXS1 on the Status Page. | ||
*Connected an analog phone, test inbound and outbound calls. Once its all working, you can connect the gateway to the FXO ports on your traditional system. | *Connected an analog phone, test inbound and outbound calls. Once its all working, you can connect the gateway to the FXO ports on your traditional system. | ||
Revision as of 17:57, 6 November 2015
NOTE: All calls must go out these trunks as 11 digits, so be sure to add Prefix Digits to the trunks for the 7-Digits and 10-Digit routes.
NOTE: When naming the SIP trunk, do not use any spaces, hyphens, underscores, or special characters.
NOTE: When configuring the SIP ACL to allow IPitomy trunks to communicate to the PBX be sure to add the following: 8.38.53.40/30 so it includes 8.38.53.41 and 8.38.53.42 (for our Legacy server); also add in 52.5.220.123/32 and 54.200.236.200/32 (for our new regional redundant server, East and West respectively).
NOTE: Moving forward, we will be building accounts only on the new regional redundant servers. Whether using IP Bound or Registration method, you'll need to add TWO SIP Providers, one for east and one for west. If using Registration method, you'll use the same Username and Password, but will need to change the HOST field in the registration string to reflect the correct server (sip-e1.ipitomy.com for East, sip-w1.ipitomy.com for West).
Testing International
If you have Intl Rate Plan 1 you can call Mexico, Canada, and Puerto Rico. Here is a number to a hotel in Mexico to test: 011 52 664 633 3900
If you have Intl Rate Plan 2, you have access to many more countries, including Australia. (See your order form for a complete list). The following is a number to the automated date/time service in Australia you can use to test: 011-613-966-94916
E911
By default, when you get an IPitomy SIP Trunk it supports one CID and one Address. To ensure that E911 is getting the correct CID, make sure the SIP Provider has the correct Outbound CID set, and ensure that under your Emergency and Emergency Test routes (Call Routing=>Outgoing) have Disable EXT CID set to Yes. If you need to have more than one CID and Address due to multiple locations, you'll need to specify this when you are ordering the trunks.

Migration
We have upgraded our infrastructure and have two new redundant regional servers we are using. If you have not done so already, the following link will take you to instructions on how to get this process started.
File:IPitomy SIP Trunk Migration.doc
IP Bound Method
If the site that needs trunks has a static IP address, you will most likely be using the IP Bound Method to authenticate. This is going to be the easiest to set up.
- NOTE:: Currently Qualify should be set to 0 to ensure the trunks work consistently. We know that monitoring the status of the trunk is an important tool for our dealers and we are working on changing this.
- NOTE:: Currently Qualify should be set to 0 to ensure the trunks work consistently. We know that monitoring the status of the trunk is an important tool for our dealers and we are working on changing this.
Please be sure to configure one SIP Provider for IPitomySIPEast, and one for IPitomySIPWest, to ensure you are fully taking advantage of our redundant infrastructure.


Registration Method
If the site that needs trunks has a dynamic IP address, you will most likely be using the Registration Method to authenticate. While this takes a little more programming, it will work just as well. You should have documentation for the trunk listing the Host, Username, Password, and Domain to be used to fill in the variables in the example screenshot below: Please be sure to configure one SIP Provider for IPitomySIPEast, and one for IPitomySIPWest, to ensure you are fully taking advantage of our redundant infrastructure.


Avaya Configuration
We received the following information from one of our dealers. To our understanding this will get IPitomy SIP Trunks working with an Avaya.
All Worx
We received the following images from one of our dealers. To our understanding this will get IPitomy SIP Trunks working with an Avaya.
Grandstream FXS
In the rare instance the site does not have a VoIP PBX you may want to use a Grandstream FXS gateway to register to our SIP trunks, then connect the analog ports to the FXO ports on your traditional system. Here is what needs to be done to get the Grandstream registered to the IPitomy SIP Trunks.
- Connect the WAN port of the gateway to your network.
- Connect an analog phone to FXS port 1 and dial ***02 to find out the IP address of the Grandstream. You can also check in the router ARP table to find the IP.
- From the connected analog phone, dial ***129 to enable WAN HTTP Access.
- Set a static WAN IP, subnetmask, gateway, and DNS on the Basic Settings Page. This needs to be done as you will need to set up the standard remote SIP port forwards (5060, 10000-20000) in the router to this IP address.

- Note: The gateway has a static LAN IP of 192.168.2.1, if your networks is in the same subnet, you'll also need to modify the LAN DHCP Base IP so its on a different subnet or the device will not function correctly.
- Under Profile 1 you will need to configure the following:
- Set Primary SIP Server to the Domain provided for your Authenticated SIP Trunks
- Set the Outbound Proxy to the Host provided for your SIP Trunks
- Set NAT Transversal to Keepalive
- Set Use NAT IP to your sites static public IP

- Set Add Auth Header On Initial REGISTER to Yes
- Under FXO Ports configure the following:
- For Port 1, set SIP User ID and Authenticate ID to the Username provided for your Authenticated SIP Trunks
- For Port 1, set Password to the Password provided for your Authenticated SIP Trunks
- Note: Once saved, the field will blank out, this is just the way the gateway works so that it is not showing how long the password is.
- For Port 1, set Hunting Group to Active. Also set Enable Port to Yes.
- For the other ports (based on how many active lines you want to use) set Hunting Group to 1. This will allow one registration to roll over to additional lines. Be sure to set Enable Port to Yes for each port you want to use.

- Update and Apply on each page, then Reboot the device when finished and you should be registered on FXS1 on the Status Page.
- Connected an analog phone, test inbound and outbound calls. Once its all working, you can connect the gateway to the FXO ports on your traditional system.


