Difference between revisions of "QOS Setup Guide"
Paul Falanga (talk | contribs) |
Paul Falanga (talk | contribs) |
||
| Line 14: | Line 14: | ||
For reference only the QOS setting in the PBX is shown: | For reference only the QOS setting in the PBX is shown: | ||
| − | [[file:PBX GUI - SIP Advanced.gif]] | + | <blockquote>[[file:PBX GUI - SIP Advanced.gif]]</blockquote> |
Notice the SIP TOS and RTP TOS are set to "CS3"... this is a reference to make QOS programming easier. | Notice the SIP TOS and RTP TOS are set to "CS3"... this is a reference to make QOS programming easier. | ||
Revision as of 16:13, 8 August 2012
QOS will enhance the function of Voice on the network in most cases. There are cases where the use of managed switches will likely not impact the performance of voice over the network but these are exceptions and IPitomy recommends using a Managed Switch on all commercially deployed implementations of voice products.
The implementation of QOS varies greatly from one switch manufacturer to another and therefore we have decided to post this guide for one of the switches for which we have experience, the Netgear FS728TP. (Note: many switch manufacturers set CS3 {IPitomy Default} to Low or Normal Priority. When the switch manufacturer states "QOS is ON at default" do not assume you can just plug it in and it'll do what you hope it will do.)
The Netgear FS728TP product specs are available at: http://www.netgear.com/business/products/switches/smart-switches/FS728TP.aspx
We like the switch because it is cost-effective and efficiently performs the tasks required to optimize a network for voice traffic.
For best performance, ports on a switch should be designated for either non-voice data (PC's, printers, etc.) or voice-data. This isn't always possible but since QOS can be set as part of the packet header, its efficiency can still be realized.
In the FS728TP QOS is set as follows:
For reference only the QOS setting in the PBX is shown:

Notice the SIP TOS and RTP TOS are set to "CS3"... this is a reference to make QOS programming easier.
The type of service (TOS) field in the IPv4 header has had various purposes over the years, and has been defined in different ways by five RFCs[1]. The modern redefinition of the TOS field is a six-bit Differentiated Services Field (DS field)[2] field and a two-bit Explicit Congestion Notification (ECN) field.[3] While Differentiated Services is somewhat backwards compatible with TOS, ECN is not. (Source: Wikipedia http://en.wikipedia.org/wiki/Type_of_Service)
- Step 1.
- Navigate to the switch (we recommend setting the switch or switches to Static IP Address assignments since these are infrastructure devices that must be maintained and often require remote access. (The setting of Static IP Addressing for the switch is not covered in this guide but is very easily done under the heading of System - Management - IP Configuration.)
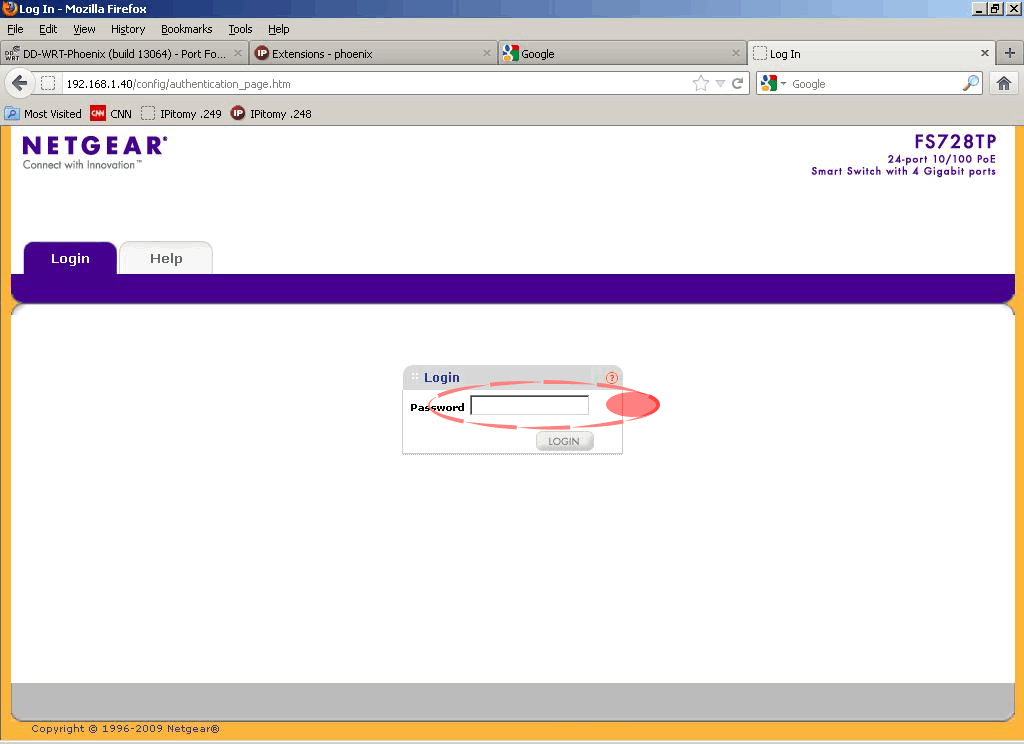

- Step 2.
- Input the password ("password' at default)
- Step 3.
- Navigate to the QOS tab
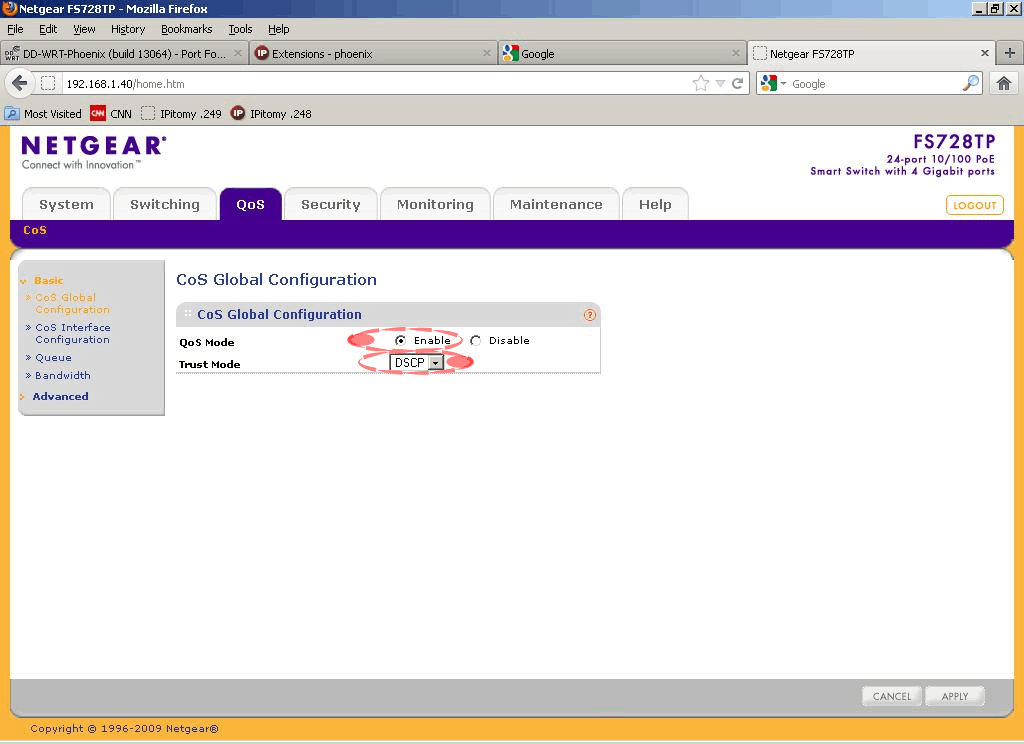
- Step 4.
- Navigate to Basic - CoS Global Configuration
- Step 5.
- Enable QoS
- Step 6.
- Set the trust mode to DSCP (Differentiated Services Code Point)

- Step 7.
- Navigate to Advanced - DSCP to Queue Mapping
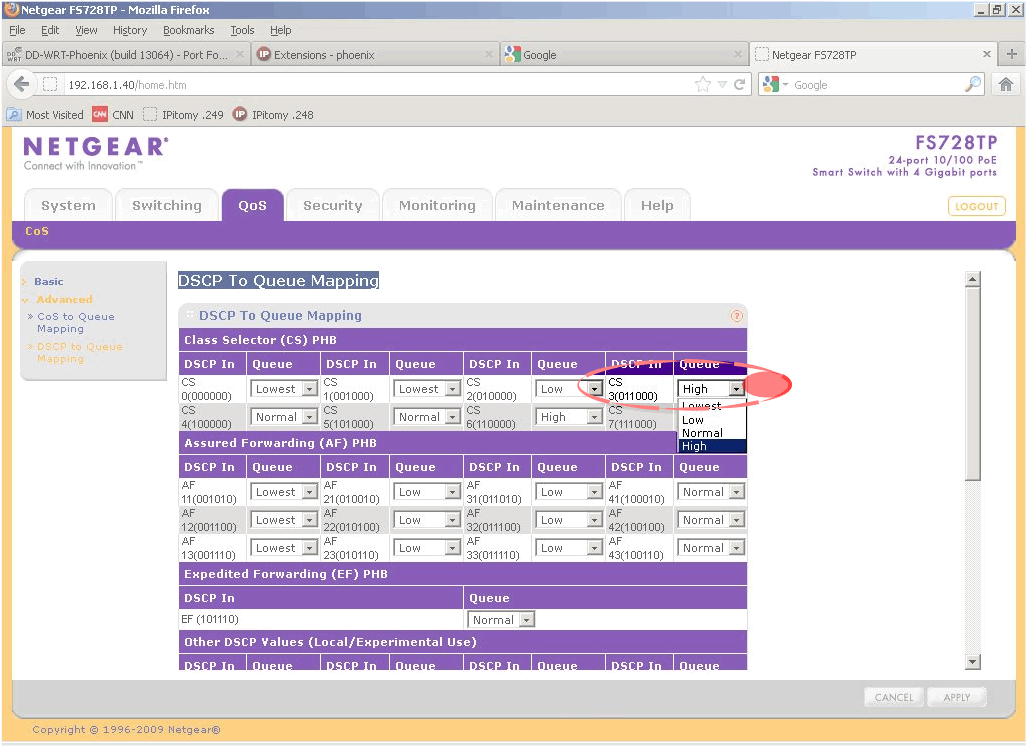

- Step 8.
- Under Class Selector (CS) PHB select the queue priority High from the list for CS3
- Step 9.
- Select Apply
That's it! QOS is now set on this switch to prioritize voice traffic over non-voice traffic.