Training:Application Solution
IPitomy Technical Training – Basic
Application Solution
The application is the result of a properly designed PBX Solution that meets the requirements of the customer. The most effective way of accomplishing the customer specific application is to get all of the information from the customer and use that information to populate your IPitomy setup worksheet. In the preceding modules we’ve covered the preliminary ground work needed to ask the questions that will allow you to build the application.
The IPitomy worksheet is an excellent place to start this process and provides the written backup that is very often a needed fail-safe plan to reconstruct the application in the absence of a good backup. This module covers the basic system application.
Database Building:
Building the database is best done when well planned. Planning assures that the solution intended is delivered. Obtaining the information prior to the date of installation provides you with the data you need to install professionally and with the least amount of unbillable call backs.
IPitomy has a web based administration interface that makes programming and setup of the application simple. IPitomy does not come with a default database, so it is necessary to create the database in the proper sequence to build the elements necessary for successful call flow.
IPitomy has a very simple setup philosophy.
- Destinations - provide a destination within the PBX to route calls to like an automated attendant or an extension.
- Providers are the elements that route calls into the system and out of the system (Trunks). Once you set up the destinations, you can set up the providers and implement the design requirements for call routing.
The Sequence:
First- create the extensions. This can be accomplished in several ways. The module on auto provisioning covers this in detail.
Extension Facts:
- Extensions can be 3 or 4 digits in length
- The number of Extension is subject to the license. If additional extensions are required, they can be purchased through the license expansion.
- IPitomy extensions are for IPitomy phones.
- Open licenses are for devices not manufactured by IPitomy. Open extension licenses cost a little more than IPitomy extension licenses.
- Auto Provisioning is available for IPitomy Phones.
- Importing all of the users names, email addresses and extension numbers is a quick way to enter in the data and create all of the extensions at once. or,
- Extensions can be manually created and the data entered one at a time
- Mass editing of the extensions saves time and allows quick changes and is possible at any time after the creation of extensions.
- IPitomy is compatible with a wide variety of SIP devices like conerence phones, soft phones and anything that is SIP compatible.
- IPitomy phones can be used as intercom paging between extensions or groupd of extension.
Second- Create Groups of extensions. Groups are used to ring a group of phones all at once or in a sequence. Groups are also used in paging.
- Groups are groups of extension that will ring all at once or in a round robin or other strategy
- Groups have advanced functionality for exceptional flexible call coverage
- Group members can be assigned a priority so individuals can be automatically assigned incoming calls during busy times.
- Timeout can be programmed to send calls to another destination automatically after a programmed amount of time.
- Agent ring time can be programmed to restart the ring sequence to include members who may have just wrapped up another call.
- Groups are typically used to route incoming calls to so a group of phones in a department will ring.
- Groups can be used as paging zones
Third- Create menus and record prompts - These are automated attendants with a single digit dialing menu like - Press 1 for sales, 2 for service etc.
- Menus are single digit dialing automated attendant destinations
- Prompts can be easily recorded using the prompt recording utility in the administration interface.
- The prompts should be recorded before the menus are created
- The prompts should be planned out in advance so onsite configuration is simplified.
Once you have created the proper elements for your application, then you can create the call routing and setup and configure your trunks. It is really quick and simple if you take the time to plan out the application in advance.
Review and confirmation
- Extension number range
- Device Types
- Network layout
- Router type, knowledge of its capabilities – this has been covered in previous modules. The point here is KNOW it before moving on.
- Data Switch type(s), knowledge of their capabilities
- Cabling certified and known condition – this has been covered in previous modules. All devices known and IP Addresses known
- Access to the Router GUI or relationship with IT personnel to get access when needed
- IP PBX IP Address cleared for use on the network – does not conflict with any existing device AND is guaranteed not to become in conflict with any network device
- Known condition of network
- End-user acceptance of their ownership of network performance… and readiness to accept any requirement to bring their network up to “spec” should an unknown disclosed issue arise.
Application development
Email
Once the email settings are properly configured for sending emails, all that is required is to add the users email address in the extension. Omitting the email address turns off the email feature in each extension.
- Email – email is a recognized component of everyday business activity. Adding voice mail messages to emails provides an important dimension to business where voice messages can now available as an email in email applications as well as mobile phones. Email integration is an absolute requirement in delivering the full unified communications solution.
Email can be a useful tool for the VAR as well – by putting your credentials in front of the user on a continual basis.
</ul>
</ul>
</ul>
</ul>
- Sent From
- We suggest creating an Email account for the Voice mail system (vmail@company.com) using your company Email System and deploy its use in the Sent From portion of database programming. Doing so will result in all email deliveries (voice mail attachments and system event messages) being delivered with your company email tag as the Sent From email address.
- If you have no email server, consider creating one on Google GMail (vmail.company@gmail.com) or another service where your name will become part of the domain listed in the email delivery. Be sure to prepare for this in advance and have an email account and password ready when you go to do the installation. If you neglect to do this, it will add to your installation time.
Call Groups/ACD
- Call Groups Defined – Call Groups are a powerful communications resource in the IPitomy IP PBX and for your customer. Since there is no limit to the number of call groups possible in IPitomy, the use is unrestricted. ACD will be discussed in the Advanced training course.
</ul>
</ul>
</ul>
</ul>
</ul>
- Ring Strategy
- Go to the IPitomy WIKI at http://wiki.ipitomy.com
- Select the IPitomy PBX Plus Administration Guide
- Select Groups or search for - Ring Stategy - The WIKI will have all of the information required to set up ring groups.
- Members – those in the group with physical telephones. Members are permanent devices in the Queue. Members have the ability to place their device into Pause thereby removing themselves from queued calls, however this also eliminates all incoming calls except Page Announce Call
- Agents – those in the group with no specific telephone or wanting the ability to Log On to the Queue and Log Off the Queue separately from telephone-based functions. Agents can log in from any phone. - Requires ACD Option
- Failovers (Queue Timeout destinations) Where the call is directed to after the timeout expires. This can be any destiniation in the system.
- Will a menu be associated to any Call Groups (ACD Feature – callers in an ACD - Call Group queue can interact with options available while waiting in queue and select a new system destination)
- Use theIPitomy WIKI at http://wiki.ipitomy.com to search for any of the subjects above to learn about how to implement the powerful features of Call Groups and ACD.
Menus
- Menus defined
</ul>
</ul>
</ul>
</ul>
</ul>
- Auto Attendant, and subsequent menus must be planned in advance and well organized to allow for a streamlined installation of that portion of the application.
- Get prompts scripts – write them or have them prepared for you by the user
- Get Destination selections for one-digit dialing
- Determine if extension dialing will be allowed and at what menus
- Determine Menu overflow Destinations – where callers will be routed when they dial:
- nothing
- incorrectly
Schedules
- Determine schedules
</ul>
</ul>
</ul>
</ul>
- Day Hours of operation
- Lunch Hour
- Night Hours of operation
- The “Attendant” assigned telephone may be given the ability to select the Day/Night mode of operation
</ul>
Branch Office
- If a Branch Office is to be part of this application the numbering plan and menus must be known for that system and it must be deployed with equal attention to detail.
- Determine:
</ul>
</ul>
</ul>
</ul>
- If extension numbering at the branch office is to be transparent to the users (users may dial any extension number regardless of branch location or local PBX location with no special coding or prefix erquired). If so, the extension number scheme at the branch office must not conflict with extension numbering at this PBX or any other branch office.
- Shared Name for the Branch – this name will be applied to both PBX locations to allow them to meet (connect) over the interlinking network (Internet usually)
- Code for branch access – this code can be mirrored at each branch and used to access the paired branch
- Branch Password – this password will be applied to both PBX locations to allow them to meet (connect) over the interlinking network (Internet usually)
</ul>
Remote Phone(s)
- If remote phones are to be used, assure that the router has been programmed to allow BOTH UDP and TCP Packet forwarding (Port 5060 should be configured for UDP and Ports 10,000-20,000 should be configured for UDP)
- Assure that the bandwidth at the remote phone location is adequate to handle call traffic for each telephone – especially when multiple phones are deployed at remote locations. (Plan for 200kb/s for each, two-way voice call.)
- If more than five remote phones are to be used at any remote site concurrently, consider installing an IP PBX at that location as a Branch Office instead.
- QOS is essential to all lans with VoIP traffic. We recommend setting QOS if possible to make voice call traffic a higher priority than other data traffic.
- Disable ALG (Application Layer Gateway). This router function can be powerful but a nuisance to voice traffic.
- If a Sonicwall is in use, review notes in IPitomy’s Sonicwall Configuration guide at:
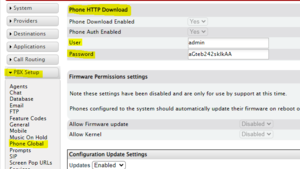
http://www.ipitomy.com/webrelease/Sonicwall/Sonicwall%20Quick%20Guide.pdf - Go to PBX Setup=>Phone Global
- enable Phone Download Enabled
- enable Phone Auth Enabled
- note the user and pass to be manually entered later (since the phone is already remote)
- Click Save and Apply Changes
Edit the Phone settings for the extension (pencil with handset)
- Change the Configuration Updates protocol to HTTP
- Click Save & Configure Phone button (were the phone local, the correct values would be sent to the phone)
Manually Changing in phone
- Log into phone via IP Address (user: root, pass: root)
- Navigate to Phone Maintenance=>Autoprovision
- Change Protocol to HTTP
- Enter Username and Password from earlier Phone Global steps
- Change the Software Server URL to: http:///ippbx/phonecfg/ - - Click Submit and wait for the phone to become idle
- Refer to this section of the manual : Remote_Phones
Below is how you include the remote phones section:
.gif)
Phone Configuration
When configuring a phone through the PBX, the MAC of the device is assigned to the extension allowing the creation of a config file which is downloaded to the phone, telling it how to be programmed. There are two methods to configure a phone to the PBX:
Auto Provisioning
This method involves some PBX programming and selections at the phone itself to configure the phone.
- Create an extension in the PBX and set Phone Type to the model of phone you wish to provision; Save and Apply Changes
- Navigate in the PBX to PBX Setup=>General; ensure that Autoprovisioning is Running (click ON if it is currently Stopped)
- At the phone, press Menu
- Select System Settings
- Select Advanced Settings
- Press OK when prompted for a password as there is no password
- Select SIP
- Select Auto Prov
- Navigate to Extension Number and press the softkey for Modify
- Enter the Extension Number
- Press OK
- Press Done
Auto Discovery
This method involves scanning the network with AutoDiscovery and assigning the extensions to the phones from the PBX.
- Create an extension in the PBX
- Navigate to Destinations=>Extensions
- Select AutoDiscovery=>Scan Network
- Find the MAC of the phone you wish to configure
- Change the Assigned dropdown from None to the extension you want to configure to that phone
- Put a check mark in the box next to this phone
- Select the Commands tab at the top of the page
- Click Assign, Configure, and Restart button
Manual
This method involves programming from the phone manually and should be avoided if possible due to the time involved. It is always best to program the phone from the PBX via one of the methods mentioned above.
- Create an extension in the PBX
- Log into the IP address of the phone
- Click Config Guide
- Click Next which takes you to the network page, no changes should be necessary on this page
- Click Next which takes you to the Account page
- Username = Extension Number
- Password = SIP Password
- SIP Server = IP address of the PBX
- Click Finish and the phone will be configured to the PBX in a basic manner
- Navigate to Advanced=>Phone Setting
- Set Called No Answer Time to 99, then uncheck the box
- Set Pickup Code to 99
- Set Message to 923
- Change Set Time Mode to SNTP
- Select Manual for SNTP Time Server and enter the IP address of the PBX or a time server such as time.nist.gov
- Set Daylight Savings, Time Format, and Time Zone accordingly
- Set BLF Light to Off
- Click Submit
- Manually Program keys as per the users desire.
Manually Programming Keys
- Park
- speed dial ##700# Account 1
- Park 701-720
- BLF park orbit # Account 1
For any feature codes program the feature code as a speed dial like park button above and set Account to Account 1.
Remote Phones
For Premise Based IP1100/IP1150/IP1200/IP2000/IP5000:
- Configure the PBX Site router with port forwards of 5060 UDP and 10k-20k TCP/UDP. The port forwards should point at the LAN address of the PBX
- Navigate to PBX Setup=>SIP and enter the Public IP address of the PBX under External IP, Save
- Navigate to System=>Access Control=>Access Control List
- Configure so that the IP address for the remote phone can communicate to the PBX in one of two ways:
- Add the Public IP address of the remote location if its static (eg. 75.124.65.8/32)
- Delete the SIP service from the Access Control List if the remote phone will not have a static IP. If you use this method, we advise to enable Log Watch & Ban after you have verified the remote phone works.
- Navigate to the PBX Settings for the Extension
- Click the blue Advanced link
- Change the Location from LAN to WAN, Save and Apply Changes
- Navigate to PBX Setup=>Phone Global (Needed for HTTP download of files from remote)
- Ensure that Phone Download Enabled and Phone Auth Enabled are set to Yes (Needed for HTTP download of files from remote)
- Navigate to the Phone Settings for the Extension (click the Pencil w Handset)
- Under Configuration Updates change from TFTP to HTTP (Needed for HTTP download of files from remote) NOTE:The port set must be forwarded to the PBX, typically 8080 or 80.
- Click Save and then Apply Changes
Manual Configuration Settings in Phone for HTTP (required for phones registering to a Cloud PBX)
Sometimes it may be necessary to program a phone for remote operation when it is at the remote site. (You weren't able to do the previous steps while at the PBX location.) Use these steps as a guide:
FOR IPITOMY PHONES
- Open a browser and navigate to the Phone GUI
- Navigate to Phone Maintenance -> Advanced -> Auto Provision
- Change Protocol to HTTP
- Change Software Server URL: to
http://<pbx public ip>/ippbx/phonecfg/
- Set the Username to admin (default value)
- Set the Password to the unique password located in PBX Setup > Phone Global in the Phone HTTP Download section.
- Uncheck Auto Download Kernel
- Uncheck Auto Download Personal Phonebook
- Click Submit
- Click Autoprovision Now
FOR YEALINK PHONES
- Open a web browser and log into the web interface of the phone using it's IP address [Yealink default username:admin password: admin]
- Navigate to Settings -> Auto Provision
- In the Server URL field enter:
http://<pbx public ip>/ippbx/phonecfg/
- In the User Name field enter: admin [default value]
- In the Password field ,set the Password to the unique password located in PBX Setup > Phone Global in the Phone HTTP Download section.
- Click the "Confirm" button
- Click the "Auto Provision Now" button

'NOTE: In order for their to be a config file for th'e phone to download, the MAC address of the phone must be entered under the extension in the PBX. Also, you must remove the <> as they are not part of the software URL.
For this to work, you must navigate in the PBX to PBX Setup=>General; ensure that Autoprovisioning is Running (click ON if it is currently Stopped)
Upload Custom Ring Tones
You can send and store a music file on the IPitomy HD phone for playback during ringing. To do so the file MUST be formatted properly. IPitomy does not recommend doing this because it requires the phone to no longer pair to the PBX for its config file, and because its difficult to find a file that fits the parameters.
File Format
Wave file (*.wav), 711-aLaw, 8KHz, 64kbps, Mono, and less than 300kb size, file name should be small (mine is 8-characters)
Upload File
- Once the file is created (I like Goldwave Audio Editing software.) Load it onto the telephone:
- Open browser
- Navigate to the phone IP (this operation cannot be done from the PBX)
- Navigate to Phone Maintenance / Auto Provisioning
- Uncheck the box at Auto Download Config File (this will keep the PBX from loading setting that don't include your loaded file)
- Click Submit
- Navigate to Audio
- Click the Browse button
- locate your wav file on your PC and select it (Windows/MAC, command)
- Click Upload
- If it doesn't succeed, fix the problem.
- Navigate to Audio (again)
- Under Audio / Ring / Ring Type select the file which should appear in the list
- Click Submit
- Call the phone - it should play your file as ring tone
A Note on Changing the Global Template
Due to the current implementation of the global template, if you wish to update your configuration file with new parameters provided in a PBX software update, you will need to reset your template and then make your configuration customizations again after the update. Note the template only currently changes on PBX software upgrades, not on phone firmware updates. Be sure to check if your customizations are now supported in a feature in the release notes, as this may effect how your customizations are applied.
It is our goal to support new parameters in the configuration files by supporting ensuring that their absence in the configuration file results in the feature using a default value which should ensure no change in behavior due to the presence of the feature.
Note that omitting a node from a configuration file will result in the default values for settings defined therein being used. If you change these values through the phone and they are not present in the global template, then they should not be changed by downloading a configuration file. However, you cannot delete a setting that is being set specifically by the server as it will simply replace it. (These settings should be obvious like, sip user, proxy, and other settings on the phone configuration page).
Global Template
Under PBX Setup=>Phone Global you will find buttons that allow you to reset the Global Template for the HD phones to default, or to modify the template itself. The template is what is used to create configuration files for each phone that is provisioned to the PBX. The template itself is in XML format and contains all of the settings available in the phone. Making incorrect changes could cause issues with phones functioning correctly. If you are unsure or have any questions about making changes to the global template, you are encouraged to contact IPitomy Technical Support for assistance. If you feel you have made changes that are incorrect, you can always click the Reset to Default button.
HD Phone WATTS (current draw expressed in WATTS)
| Phone Model | Phone Only | With 1 IPX32 | With 2 IPX32 | With 3 or more IPX32 | |
|---|---|---|---|---|---|
| IP210 | 4 | na | na | na | |
| IP220 | 4 | na | na | na | |
| IP320 | 4 | na | na | na | |
| IP330 | 4 | 7 | 9 | Use PS346 | |
| IP410 | 5 | 7 | 9 | Use PS346 | |
| IP620 | 5.5 | 7.5 | 9.5 | Use PS346 |
HD Phone FAQ
I have an IP330 on a gigabit switch and I am periodically having issues with connectivity from a PC connected through the phone. Is there anything I can do to resolve the issue?
On some older Network cards we have had reports of trouble when they go to sleep. This is apparently a common problem with an older RealTek network cards.
Here are the things that we have seen work in the field:
- Replace the cable with a gigabit cable. There are greater requirements upon the quality of the cable when supporting gigabit.
- In the hardware properties of the network card in windows, disable sleep. (In Win7 this is under Power Management -> Allow computer to turn off this device to save power).
- Set the speed to a fixed value in the PC, try 1000 or 10/100
How can I download logs from the HD phone?
Sometimes IPitomy will require you to get the logs from your phone so we can investigate an issue more deeply. Steps to accomplish this are:
- Log into the IP address of the phone (username: root/password: root)
- Navigate to Phone Maintenance=>HTTP Upgrade
- Click the Download button next to All Config File:
NOTE:It may take a few minutes to download all of the files, be patient.
How do I configure my my HD Phones to use VLANs?
Setting up VLAN from the PBX
This guide requires a managed switch and knowledge of how to set up VLANs on it, which is outside of the scope of this guide. This is only to show how to set up VLAN on the pbx, and enable it for all phones. This requires your PBX to be on software version 5.1.5-5 or higher. All network switch ports that will have a phone on it should have its port tagged for the appropriate vlan.
WARNING: DO NOT SET VLAN IP ADDRESS ON THE SAME NETWORK AS STANDARD NETWORK INTERFACE! This will lock up the pbx and cause it to become PERMANENTLY inaccessible. Example, if your standard network is 192.168.1.x, your vlan network CANNOT be the same.

- Define the VLAN under System=>VLAN. It must be enabled.
- Set VLAN IP Address to the IP address that you would like to give the PBX on that vlan, which will also hand out DHCP on the vlan to the phones (This MUST be a different IP address from the main IP address set under system=>networking)
- Set the VLAN Subnet mask to define the network just as you would on standard network settings. 255.255.255.0 is generally going to suffice.
- Set the VID to the actual VLAN ID tag. This must match the VLAN in the switch that you are assigning the ports to.
- Set DHCP Start and End addresses as desired
- Save
NOTE: If your phones are on a vlan, autodiscovery will not find them with the default settings. To scan the vlan network instead of normal network, go to destinations->auto discovery like normal, choose scan or don't scan as desired, and go under View Settings -> Advanced Scan Settings, and change the Scan Network box to the network (CIDR notation) that you wish to scan for the phones.

- Navigate to PBX Setup=Phone Global
- Set Apply VLAN Config to Phones to Enabled
- Set Phone VLAN Enable to Enabled
- Set Phone VID to match VID from step 4 above
- If needed, set PC VLAN settings according to network.
- Save
- Apply changes
- Reboot phones. They should pick up vlan config and be on the vlan network correctly.
This process replaces the need to set vlan in the phone global template. Using the phone global template to assign vlan is no longer necessary as of 5.1.5-5
LLDP
Warning: Do not follow this guide unless you know for certain you need LLDP. Incorrectly implementing this protocol MAY lead to undesired network functionality.
This guide applies to Cisco switches, and the screenshots are specifically from a SG300 28 port switch. Some options may be named differently, or not exist at all on other brands of network equipment.
In the switch:
LLDP Status: Enabled
TLV Advertise Interval: 60

LLDP MED Network Policy
Create 2 policies as follows
Application Voice, VLAN ID 2, VLAN Tagged
Application Voice Signaling, VLAN ID 2, VLAN Tagged

LLDP MED Port Settings
Add Voice and Voice signaling applications to desired ports

VLAN Management=>Voice VLAN=>Properties
Dynamic Voice VLAN: Disabled

Create VLAN: VlanID 2, name Voice

Port to VLAN
Set desired ports for voice traffic (any port that will have a phone plugged in, plus the port that will handle voice dhcp, if needed), to VLAN 2: Tagged

In the PBX
Ensure all phones have LLDP enabled. You can set this on each phone individually in the menu under Settings=>Advanced=>Network=>LLDP, but we would recommend following the instructions listed at http://wiki.ipitomy.com/wiki/HD_Phone_FAQ#How_do_I_Enabled_LLDP_Globally_for_the_Phones to set LLDP globally if you need it for all phones.
Helpful Links
Virtual Local Area Networks (VLANs)
http://www.practicalnetworking.net/stand-alone/vlans/
All Credit and Thanks go to networking guru Ed Harmoush at Practical Networking
Routing Between VLANs
http://www.practicalnetworking.net/stand-alone/routing-between-vlans/
All Credit and Thanks go to networking guru Ed Harmoush at Practical Networking
How do I Enabled LLDP Globally for the Phones
In the Global Template (PBX Setup=>Phone Global) you can search for LLDP and will see LLDP="0", this designates that LLDP is disabled. In order to enable you will need to change the 0 to a 1. You will also need to add the following LLDPInterval="60" .
When all is set the entry in the Global Template will look like this:
LLDP="1" LLDPInterval="60"
Click this link for general instructions on setting up LLDP in the switch.
How can I set my Phone to use a static IP address?
IPitomy supports configuring phones using DHCP and this is the best option for almost every network. If you would like to statically set IP addresses, we recommend that you use DHCP reservations to do this. In the vast majority of routers and DHCP servers there is an ability to assign a static IP address to a MAC address. While this process of assigning may be tedious, it is no less so than going to each individual phone and manually configuring the IP address (Static IP). In the end it eliminates any difficult modifications that you will need to make to configuration files and is just a way easier method to use for accomplishing the same task.
If having this information, the phone still must be manually set to static IP addresses then you will need to understand the following information. You have several options for performing this configuration:
Configure then Disable Configuration Updates
- Automatically Configure the phones using DHCP
- Go to phone's web page (root/root to log in) Navigate to Phone Maintenance->Auto Provision and uncheck the box that says Auto Download Config File.
- set the IP address to the desired static address
- The phone should keep it's original configuration and any changes made to phone configuration will now have to be done through the phone web interface. The exception to this is that you can change the phone keys in this configuration, just do NOT press Save and Configure. Press Save then Apply changes. The phone will update the keys at night when it downloads it's key configuration.
Change Configuration File Template
Please read the section of the Documentation [Note on Changing the Global Template] to understand the implications of using this method.
The second option is more difficult to initially configure but is easier because you can still change phone settings. You should only do this if you are familiar with XML as you can break the configuration files by making changes here that lead to invalid XML.
- Go to PBXSetup->Phone Global
- Under "HD Phone Configuration Template" click "Reset Template to Default"
- Now click Edit Template. Under Networks - delete the entire Node called "network"
- Now phones should keep whatever you manually set them to.
- Note with this method that when you upgrade the PBX software you should be aware that we may make changes to the default template and you may have to reset the template and remake the changes in order to support additional functionality that is added in future releases.
The final option here is to just manually configure the phone. This works but if you call tech support with an issue they will probably have you default and reconfigure the phone through the PBX as we change a number of options when we provision the phones to the PBX.
Can I use HD Phones with my IP1000?
YES. HD phones will function normally as most other SIP phones with your IP1000.
In order to configure the phone you must use Manual Phone Configuration.
My BLF won’t light on my phone?
If you have a phone where a BLF will not come on when it is supposed to, there are several things you can do. The most important thing is to understand is how a BLF is turned on or off. When a phone goes off hook and connects with a call, it sends out a short status packet to the PBX. The packet simply says that the status has changed from available to busy. The PBX then updates all of the phones that have a subscription to the BLF with a status packet indicating that the status has changed to busy.
The packet ether got there or it didn’t. If it didn’t, the status will not update. The status should update automatically every 30 minutes or so. If the packet was missed, everything should be back to normal the next time the phone re-subscribes (about every 30 minutes automatically).
What can go wrong?
The packet might have been lost. What do I do? Why would the packet get lost in the first place? Is it magic? Is it being controlled by “The Force”? Probably not. The packet may have not arrived due to many factors. Most likely the flow of normal packets was disrupted. In the world of SIP, signaling packets have a very short life. They become stale if they are not delivered on time. The SIP packets are delivered using UDP. This protocol does not ask for a positive acknowledgement when a packet is received. It is assumed that it has been received. There are several things that can cause a packet to be delayed on a LAN. All these things have the same symptom.
Here is a short troubleshooting guide:
- Perhaps you have recently restarted all services or rebooted your PBX. You phones lose their BLF subscriptions when this occurs. The phones will resubscribe automatically in time. If you wish to have the BLFs work immediately then you will need to reboot the effected phones.
- The packet might not be the culprit; maybe your lamp is broken. Test this by going to the button on the phone and select diagnostics. Select the option lights. Did the light come on? If it did, it’s not the light.
- To narrow this down a little further, it is best to remove all doubt. Restore the phone to factory defaults and reprogram it. Test it and see if the problem happens again. If it does, go to the next step.
- Troubleshoot the network. See this guide for assistance Network Troubleshooting
There is no such thing as black magic. The BLF did not turn on for a good reason. If you want to go with the percentages, it breaks down like this:
Less than 1% light is out. Check it anyway in diagnostics. It does not take any time.
Less than 1%The phone is broken. This is very unlikely for a BLF
85%Cabling – Loose connector – bad patch cord
13%QOS not set up or set up wrong
Moral of the story:
Carry a known good patch cable and some tools to re-connect the wall jacks. Rule this out first and you will save a lot of time over the long run.
I am using a Plantronics headset and experience buzzing at my phone.
Dealers have found that installing a PLANTRONICS 70584-01 RFI Filter resolved this issue.
3 Way Conference alternate functionality
Sometimes an end user will want the ability to create a 3-way conference call at a phone, hang up, but have the other parties remain connected. This can be accomplished by modifying the Global Template for the phones, thereby modifying the behavior in each phone:
- Navigate in the PBX to PBX Setup=>Phone Global
- Click the button to Edit Current Template
- Find
ConfEndMethod="0" - Change the 0 to a 1
- Save the Template
- Apply Changes
- The next time the phone downloads it config (either on reboot or at 1am), the phone will have the new functionality.
Alternatively, you could log into a phone on a case by case basis, navigate to Advanced=>Phone Settings, and change the setting for Conference Exit Result: from Disconnect All to Others Remain Connected. You will need to disable AutoDL config if you make this change manually, otherwise at 1am it will get its config from the PBX and undo your manual changes.
Locked up Phone Recovery - Defaulting without a Network Connection
We've found that in some instances a phone may download an improperly formatted config file. This could result in sporadic symptoms of the phone becoming locked or unresponsive, being unable to press any keys, etc. In this state the phone will often display the time but not respond to key presses. If this occurs, try the following to resolve:
- Disconnect the phone entirely from the network
- Power via brick
- Default the phone
- Press Menu
- Choose Settings
- Choose Advanced Settings
- Press OK (no password)
- Select Load Default Settings
- Choose OK
- Reboot phone
- If the phone was supposed to be upgrading to a newer firmware version when the phone entered the locked up state then perform the following operations on the newly defaulted phone.
- Reconnect Phone to Network
- Autodiscover + Configure and Restart Phone
- Wait 5 minutes after phone appears to be registered it is important that you do not make any calls during this time as the phone is repairing the corrupted files. Note that phone may not display upgrading firmware for 1-2 minutes.
- After phone upgrades it's firmware it should reboot automatically and be usable immediately.
The extension name is displaying incorrectly on phones since the name of that extension was changed, the Enterprise Phonebook does not seem to be updating
- Navigate to PBX Setup=>Phone Global and enable Enterprise Phonebook (Download and Generate).
- Go to PBX Setup=>Services and click the blue link TFTP Files.
- Find and delete enterprise_phonebook.xml, then Apply Changes.
- When Apply Changes completes, reboot the phones that are displaying the wrong names. This should resolve your issue.
How do I make the second call ringing to my phone get my Busy VM greeting instead of my NoAnswer greeting?
- One method to do this would be to have the user press the Reject key on their phone when the second call comes in.
- Alternatively, you can log into the IP address of the phone, navigate to Phone Settings=>Basic and set Call Waiting to Off. In this configuration the phone will auto DND a second incoming call while you are on the phone. This causes the busy greeting to play any time a second call is sent to the phone. NOTE: you will need to turn off automatic configuration updates in any phones that you want to have this setting on or change it globally in the phone configuration template.
Side Tone
Side tone is an old TDM feature where you hear yourself back when you speak. We do not advise to enable this, as side tone can cause issues with SIP If your end user insists on having side tone, here is how you add it to the default template instead of having to manually enable it in each phone. Rev 1 phones will not support this at all, so they will need Rev 2 or later phones.
- Edit the Default Phone Template found under PBX Setup=>Phone Global
- Find the section pertaining to SIP DSPs (this should be near the top)

- Add in
SideTone="1"to this section. A setting of 1 means enabled, a setting of 0 means disabled. - Save, Apply Changes, and then reboot the phones so they can download their updated config.
I accidentally entered http:// in the SIP Server field and now my phone is locked up
If you are manually configuring a phone and have accidentally entered http:// in the SIP server field, followed by an IP address, the phone will lock up. The display will show Xs and you will be unable to access the phone's WebGUI. If this has happened, we have an easily method to recover the phone.
- Disconnect the LAN cable and power up with a power brick. If already on a brick, reboot after removing the cable.
- Once booted, default the phone via the phone menu.
How do I access the Multiple Key Pages on the new IP620
(Does not work on IP620PE)
To program the extra pages, you need to add an Expansion Module through the PBX programming. 32 keys = 4 pages of 8. Once programmed, you will use the left and right directional key on the phone to navigate to the extra pages. An indicator at the bottom of the screen will show you what pages is displaying.
- NOTE:: There is currently a known issue where after the phone has downloaded its config it needs a reboot in order to display the new pages of keys.

How do I use the EHS/Bluetooth Dongle function on the new IP620B and IP320 rev2.3.0
EHS functionality will require an EHS module that plugs into the back of the phone. Once installed, you can use a standard wireless or wireless Bluetooth headset. The following guide will go over installation.
Once installed and paired, calls will ring to the headset. To answer, press the button on the headset once. To hang up, press the button on the headset once.
NOTE: The phones need to be on version 2.3.2.4 or greater for the EHS to work.
If the EHS button does not answer/hang up the phone, you may need to toggle bluetooth on and back off again to engage it. Do so on the phone itself, on menu>phone settings>basic>bluetooth
A note about Bluetooth headsets with a UC Base unit:
Here are some models of headset reported to work by dealers or used here in our office:
- Delton X10
- BackBeat 903
- Plantronics Voyager Pro 510
- Plantronics PLT- D655
- Motorola 537X
- Plantronics M100
- Plantronics Discovery 600
- Inland ProHT Bluetooth Headset
- Jabra 920 (be sure to disable Missed Calls Display on the pbx under Destinations=>Extensions=>Edit PHONE settings=>Display Settings/Call Control or it will play a tone that sounds like ringing when you miss a call) Note: Also enable auto-sleep mode in the headset.
- http://www.amazon.com/Bluetooth-Microphone-Headphone-Rechargable-Cancelling/dp/B013QV6UZ8/ref=sr_1_64?s=wireless&ie=UTF8&qid=1446722675&sr=1-64&keywords=AGPtek
- http://www.amazon.com/gp/product/B008HLVWH4?psc=1&redirect=true&ref_=oh_aui_search_detailpage
If you encounter any trouble with a headset not triggering the EHS when the "One Touch" button is pressed: use the phone menu and go to System Settings -> Phone Settings and turn bluetooth on, and then turn it off again.
How do I load a new background image on the IP620BG?
You will need to log into the phone via its IP address. Once there, navigate to Phone Settings=>Wallpaper. The standard idle background in the phone is the Standby image, and must be a file that is 272x384.
If you have loaded a bad image file and want to return to the background shipped with the phone, here is the file:

IP290 Wall Mount Solution
If you would like to wall mount your IP290 phone, the following guide will give a functional option. The switch plate needed is available at most big box stores.
General Troubleshooting
- The key to isolating new issues is to change one thing at a time and see what fixes the issue. The possible causes are 1) Hardware defect 2) Configuration defect 3) Network Issue 4) Software defect
- What is the background / history of the issue? For example: This phone is Bob the IT guy's home phone. It has worked for 6 months without an issue, and now we are seeing an issue. Or we have done an install and everything is working except one phone?
- Isolate the Issue. The easiest way to do this is to swap the phone with one that is working fine and has not demonstrated the issue. If the problem follows the phone, it is most likely a configuration or hardware issue. If the problem happens on the other phone in this same location, the problem is probably on the segment of the LAN. After this has been tested, try swapping the ports on the data switch. It could be a bad port on the switch. Another option is to swap cabling, or switch from POE to a power brick for testing.
- Ensure the phone is on current firmware. If you have two phones on the same firmware, and only one experiences the issue, we can fairly confidently rule out a software defect.
- Try defaulting and reprogramming the phone, this should eliminate any configuration issues.
- Once all this is done, we would have found the cause of the problem or eliminated the majority of possible issues. At this time we would investigate the network. Troubleshooting Network
Hearing Aid
IPitomy phones do not come equipped with a magnetic coupling coil. That may not work with many hearing aids anyway. Ploycom phones are compatible with IPitomy PBX Systems and do have the coil. There are many other analog phones designed for different types of hearing aids and hearing loss. Clarity is a well-established brand that may offer a solution based on the users specific needs. http://shop.clarityproducts.com/ Analog phones require a SIP gateway to connect to IPitomy. Clarity also has a handset amplifier that may solve the problem if extra volume is needed.
IP620 fails to obtain an IP address using Power over Ethernet (PoE)
There is a known issue where an IP620 may fail to obtain an IP address when plugged into PoE. This specific issue can be identified if that same phone successfully obtains an IP address when used in conjunction with an AC power supply (12v 1A). It is caused by a failed capacitor on the main system board of the phone. Aside from our standard return and repair processes, we are now publishing a quick guide on replacing this capacitor for those who are familiar with soldering and circuit boards.
DCM (Desktop Call Manager)
- Desktop Call Manager is a PC-based, Windows Application that can be loaded onto user computers to gain a high level of control of communications for their telephone. DCM is licensed per user and can be installed at on a single PBX or multiple PBX’s that are branched together with the Multisite DCM License.
- Since Desktop Call Manager integrates a Chat Client, DCM links the desktop to the world of chat and SMS Texting.
- Presence – DCM enables a presence indication via its integrated Chat client.
- DCM Provides the user with:
</ul>
</ul>
</ul>
</ul>
- Ability to monitor selected extensions on the IP PBX and Branch Office IP PBX’s
- Monitor call traffic at the monitored extensions
- Interact with call traffic at the monitored extensions
- Listen
- Whisper
- Barge
- Record calls in progress at that extension (Recordings via DCM are stored in the DCM application)
- Interact with callers in voicemail
- Screen caller leaving messages in voice mail
- Pick up (retrieve) callers from voice mail
- Record calls in progress at their own extension (Recordings via DCM are stored in the DCM application)
- Monitor Park Locations
- Monitor Trunks
- Utilize DCM-based Speed Dial
- Send and Receive Text Messages (a Chat server is required – any may be used)
- Monitor Conference Rooms 901 902… and other if licensed/programmed
- DCM may be used to invoke PBX functions:
- Dial
- Transfer
- Park
- Hang up
- Call and Extension
- Page an Extension
- Call Forward – DCM can be used to monitor PC activity and invoke pre-programmed call forward scenarios when a PC user is inactive for 15 minutes
- Interact with callers in voicemail
Multisite Desktop Call Manager
- Both sites must be Multi Site Licensed and Multi Site Enabled
</ul>
</ul>
</ul>
</ul>
</ul>
</ul>
</ul>
</ul>
- MUST be enabled in the Branch office settings
- You MUST Port Forwards Ports 5048 and 5038 to the IP of the PBX at each router
- You must set up the ACL in the IP PBX to allow the mated branch office to connect on Ports 5038 and 5048. (The default only allows for local IPs).
Questions:
- T/F, A Branch Office extension can be dialed directly without a branch office code regardless of which extension and branch where the extension is installed.
- What benefit comes from setting up a Sent From email address.
a. puts the Sent From email address in front of the user each time an email from the IP PBX is received.
b. puts the Sent From email address in front of the user each time an email is received.
c. The email address set as Sent From becomes the server for all emails that are IP PBX generated
d. The Sent From email address defines which email that are received are valid. - T/F, When DCM is used at a branch office a Multisite license must be purchased at only the IP PBX that is the Branch Office IP PBX.
- T/F, A Menu can be assigned to a ACD Group so that callers may dial a single digit and while waiting in queue and be directed to another system destination.
Where on the WWW can you go to find the IPitomy Installation and Maintenance Manual?
http://wiki.ipitomy.com