Difference between revisions of "Multitech Fax Finder"
Drew Harrell (talk | contribs) |
|||
| (5 intermediate revisions by 2 users not shown) | |||
| Line 9: | Line 9: | ||
**The DP Digits should correspond to the User that was created in the Fax Finder. This way, when the Fax Finder answers, the PBX plays the digits into the line and the Fax Finder can email the fax to the correct recipient. | **The DP Digits should correspond to the User that was created in the Fax Finder. This way, when the Fax Finder answers, the PBX plays the digits into the line and the Fax Finder can email the fax to the correct recipient. | ||
| − | ==Multitech SIP Fax Finder IP For PBX Software Versions 5.0X and Higher== | + | == Multitech SIP Fax Finder IP For PBX Software Versions 5.0X and Higher == |
NOTE: You must be on Version 5.0X and higher for this instruction set to work. | NOTE: You must be on Version 5.0X and higher for this instruction set to work. | ||
| − | The Multitech Fax | + | The Multitech SIP Fax Finder IP will register as an Extension to the PBX. Each Fax user will need to also have an additional Fax extension created in the PBX. |
1) Create an Extension in the PBX for the Fax Finder. This Extension should have the Host field set as the IP of the FAX Finder. Also there should be nothing in the Qualify field. And additionally there is no SIP password so you must blank this field. And these Extensions should all be set to Is Fax Extension - yes. You may have as many Fax Extensions as you have Open licenses to accommodate. | 1) Create an Extension in the PBX for the Fax Finder. This Extension should have the Host field set as the IP of the FAX Finder. Also there should be nothing in the Qualify field. And additionally there is no SIP password so you must blank this field. And these Extensions should all be set to Is Fax Extension - yes. You may have as many Fax Extensions as you have Open licenses to accommodate. | ||
| − | + | [[File:Multitech sip 5.jpg|File:Multitech sip 5.jpg]] | |
| − | + | 2) In the Multitech SIP Fax Finder IP navigate to Fax Configuration - SIP T.38 And set the SIP Proxy /Gateway to the IP of the PBX. | |
| − | + | [[File:Multitech sip 1.jpg|File:Multitech sip 1.jpg]] | |
| − | ==Multitech SIP Fax Finder For PBX Software Versions prior to Version 5.0X== | + | |
| + | |||
| + | Under Inbound Routing, set up a Recipient account for each FAX extension created. All that is needed in the recipient information is the Name and Extension Number and to define a User. To define the user you must create a Fax User account, under Users - Multitech SIP Fax Finder IP Users. | ||
| + | |||
| + | |||
| + | |||
| + | [[File:Multitech sip 2.jpg|File:Multitech sip 2.jpg]] | ||
| + | |||
| + | |||
| + | |||
| + | Configure each user with a Name, Password, Email Address and Phone number. This information is primarily used for outbound. | ||
| + | |||
| + | |||
| + | |||
| + | [[File:Multitech sip 3.jpg|File:Multitech sip 3.jpg]] | ||
| + | |||
| + | |||
| + | |||
| + | You must configure both a recipient and a Fax User. | ||
| + | |||
| + | |||
| + | |||
| + | [[File:Multitech sip 4.jpg|File:Multitech sip 4.jpg]] | ||
| + | |||
| + | 3) In the PBX Make sure that you have Fax Detect Set to yes on your PRI or Analog Card. Note: Fax detect does not work on inbound calls from a SIP trunk. | ||
| + | |||
| + | |||
| + | |||
| + | [[File:Multitech sip 6.jpg|File:Multitech sip 6.jpg]] | ||
| + | |||
| + | Once this is configured, you can set a DID to a Fax extension. And test Inbound to this extension. The Multitech SIP Fax Finder IP will receive the Fax and email to the respective email address. For outbound you will need to install the Fax Finder client software. This is were you will need to configure the User and Password for outbound use. Once installed this is used as a Printer on your PC. And you simply print to the Fax Driver. It will send using the credentials provided. | ||
| + | |||
| + | == Multitech SIP Fax Finder IP For PBX Software Versions prior to Version 5.0X == | ||
NOTE: This instruction set should be used only for systems which are prior to 5.0X | NOTE: This instruction set should be used only for systems which are prior to 5.0X | ||
| − | The Multitech SIP Fax Finder will register to the PBX as a SIP provider. | + | The Multitech SIP Fax Finder IP will register to the PBX as a SIP provider. Once configured, calls will be sent to the Fax Finder via an Outbound Dialing Route. The digits dialed outbound will be read by the Fax Finder to define the recipient of the fax. |
*Configure a SIP provider in the PBX to register to the Fax Finder | *Configure a SIP provider in the PBX to register to the Fax Finder | ||
Latest revision as of 18:07, 23 May 2019
Multitech Analog Fax Finder
The Multitech Analog Fax Finder will require an FXS Gateway to register as an extension on the PBX. Once configured, the fax finder will be connected to the FXS Gateway to receive and send calls. Inbound calls define their recipient by sending DP Digits inband when the Fax Finder answers the call.
- Register your FXS Gateway (Grandstream, PAP2, or IPr20) as an extension to the PBX.
- Ensure that the DTMF modes in the PBX and the FXS Gateway match
- Navigate to Call Routing=>Incoming
- Point the desired Fax DID to the extension created for the Fax Finder
- Click the box with ... to set DP Digits
- The DP Digits should correspond to the User that was created in the Fax Finder. This way, when the Fax Finder answers, the PBX plays the digits into the line and the Fax Finder can email the fax to the correct recipient.
Multitech SIP Fax Finder IP For PBX Software Versions 5.0X and Higher
NOTE: You must be on Version 5.0X and higher for this instruction set to work.
The Multitech SIP Fax Finder IP will register as an Extension to the PBX. Each Fax user will need to also have an additional Fax extension created in the PBX.
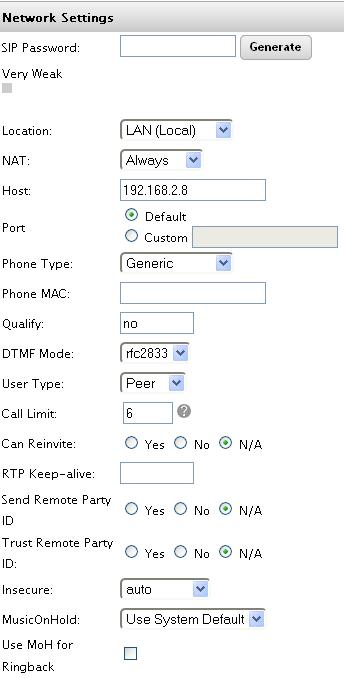
1) Create an Extension in the PBX for the Fax Finder. This Extension should have the Host field set as the IP of the FAX Finder. Also there should be nothing in the Qualify field. And additionally there is no SIP password so you must blank this field. And these Extensions should all be set to Is Fax Extension - yes. You may have as many Fax Extensions as you have Open licenses to accommodate.
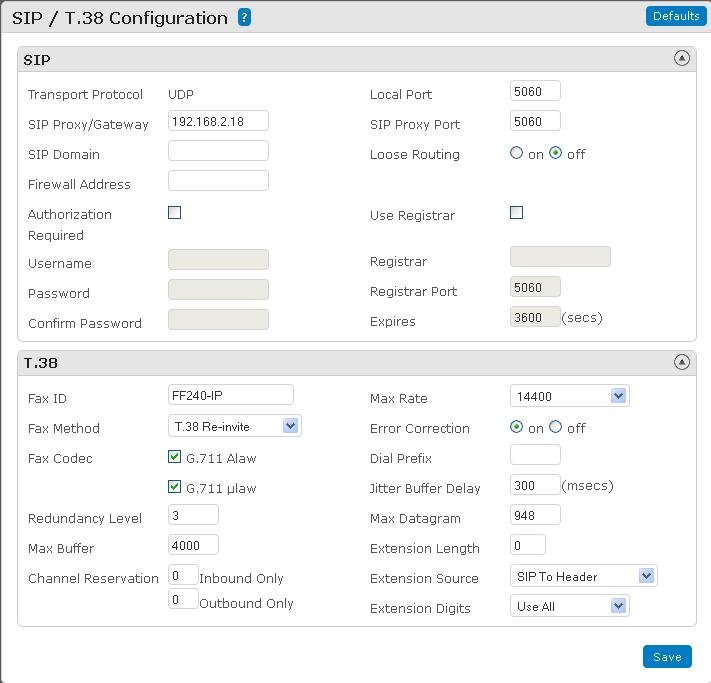
2) In the Multitech SIP Fax Finder IP navigate to Fax Configuration - SIP T.38 And set the SIP Proxy /Gateway to the IP of the PBX.
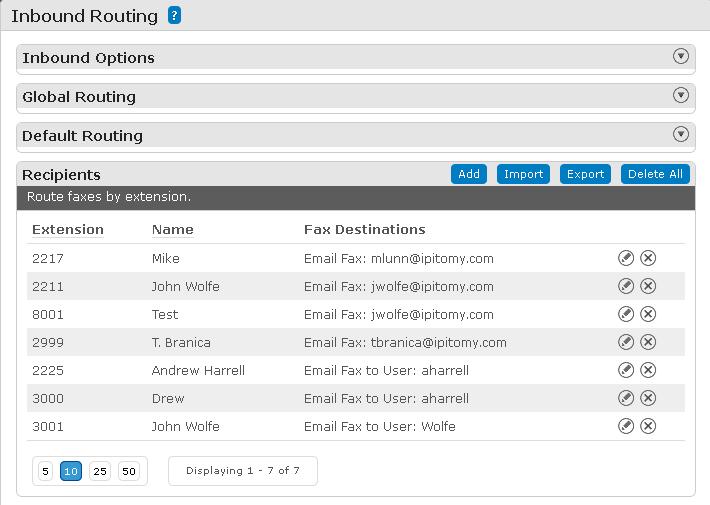
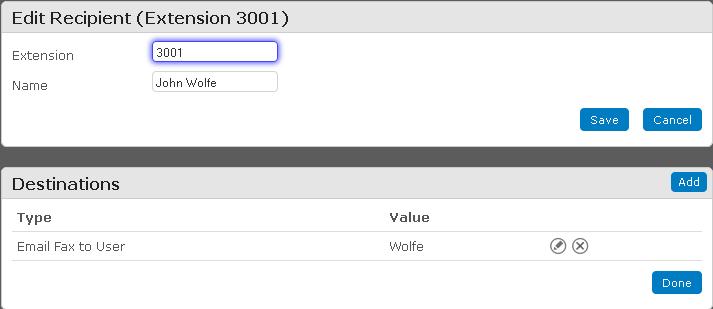
Under Inbound Routing, set up a Recipient account for each FAX extension created. All that is needed in the recipient information is the Name and Extension Number and to define a User. To define the user you must create a Fax User account, under Users - Multitech SIP Fax Finder IP Users.
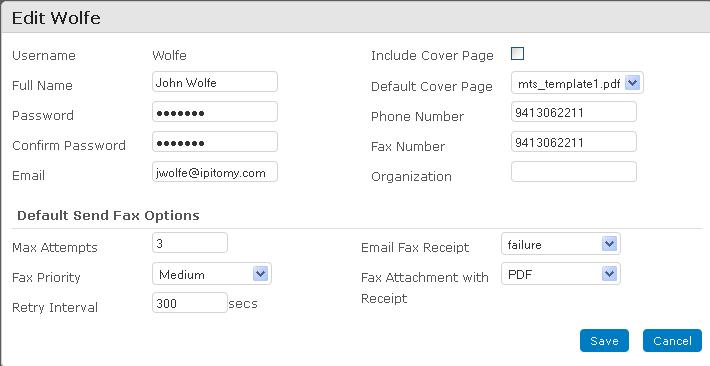
Configure each user with a Name, Password, Email Address and Phone number. This information is primarily used for outbound.
You must configure both a recipient and a Fax User.
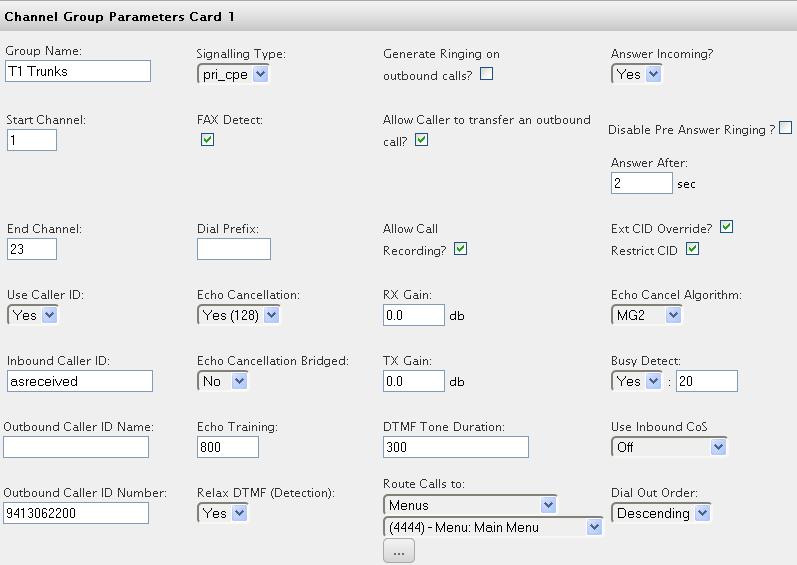
3) In the PBX Make sure that you have Fax Detect Set to yes on your PRI or Analog Card. Note: Fax detect does not work on inbound calls from a SIP trunk.
Once this is configured, you can set a DID to a Fax extension. And test Inbound to this extension. The Multitech SIP Fax Finder IP will receive the Fax and email to the respective email address. For outbound you will need to install the Fax Finder client software. This is were you will need to configure the User and Password for outbound use. Once installed this is used as a Printer on your PC. And you simply print to the Fax Driver. It will send using the credentials provided.
Multitech SIP Fax Finder IP For PBX Software Versions prior to Version 5.0X
NOTE: This instruction set should be used only for systems which are prior to 5.0X
The Multitech SIP Fax Finder IP will register to the PBX as a SIP provider. Once configured, calls will be sent to the Fax Finder via an Outbound Dialing Route. The digits dialed outbound will be read by the Fax Finder to define the recipient of the fax.
- Configure a SIP provider in the PBX to register to the Fax Finder
- Name: Fax Finder
- User Type: Peer
- DTMF Mode: Auto
- RFC2833 Compensate: No
- Host: IP Address of the Fax Finder
- Port: Default
- Register: No
- Authenticate: No
- Auth User: Default
- From User: Default
- From Domain: Default
- Realm: Default
- Outbound Proxy: Disabled
- Username: blank
- Secret: blank
- Inbound Caller ID: blank
- Outbound Caller ID Name: blank
- Outbound Caller ID Number: blank
- Call Limit: set to a value that will be able to handle the fax volume of the site
- Leave the rest of the fields at default
- Build a new Outbound Dialing Route with a start pattern of 55X, digits 6, exact length Yes.
- Add the Fax Finder SIP Provider to the new Outbound Route, click on the trunk and set Strip Digits to 2
- Be sure to add the route to the Class of Service being used by extensions on the PBX
- Create 4 digit IDs for each User in the Fax Finder
- Create a phantom extension for each User in the Fax Finder
- Enable Unconditional Call Forwarding in the extension, set to use PSTN number, and enter 55XXXX where the XXXX is replaced with the Fax Finder User ID
- Point each Users inbound DID to the correct Phantom Extension to ensure that faxes will be delivered to the correct recipient.
NOTE
In order for outbound faxing to work, a Custom Route must be built. The info that goes in will look like the text below, where trunk_8 must match the ID of the provider built for the fax finder. You can tell what trunk it is if you edit the provider and look in the address bar of your web browser.
[trunk_8](+) include => phone_XXXX
You must be running system software 4.8.0 and have Custom Routes enabled in your license for this to work
