Difference between revisions of "IPPBX IMM Scheduled Calls"
Jump to navigation
Jump to search
Scheduled Calling
Edit Scheduled Call
Bill Fearns (talk | contribs) |
|||
| Line 104: | Line 104: | ||
| style="border:0.0069in solid #0000ff; padding-top:0in; padding-bottom:0in; padding-left:0.075in; padding-right:0.075in" | Defines what destination the called party will be connected to. | | style="border:0.0069in solid #0000ff; padding-top:0in; padding-bottom:0in; padding-left:0.075in; padding-right:0.075in" | Defines what destination the called party will be connected to. | ||
|- | |- | ||
| − | | style="border-width: 0.0069in medium 0.0069in 0.0069in; border-style: solid none solid solid; border-color: rgb(0, 0, 255) -moz-use-text-color rgb(0, 0, 255) rgb(0, 0, 255); padding: 0in 0.075in; text-align: center" | '''Extension | + | | style="border-width: 0.0069in medium 0.0069in 0.0069in; border-style: solid none solid solid; border-color: rgb(0, 0, 255) -moz-use-text-color rgb(0, 0, 255) rgb(0, 0, 255); padding: 0in 0.075in; text-align: center" | '''Dial using Permissions of Extension:'''<br/> |
| − | | style="border:0.0069in solid #0000ff; padding-top:0in; padding-bottom:0in; padding-left:0.075in; padding-right:0.075in" | Set this to the extension number that is | + | | style="border:0.0069in solid #0000ff; padding-top:0in; padding-bottom:0in; padding-left:0.075in; padding-right:0.075in" | Set this to the extension number that is will be used by this Scheduled Call for calling permissions. Must be set whether doing internal or outbound calls. |
|- | |- | ||
| style="border-width: 0.0069in medium 0.0069in 0.0069in; border-style: solid none solid solid; border-color: rgb(0, 0, 255) -moz-use-text-color rgb(0, 0, 255) rgb(0, 0, 255); padding: 0in 0.075in; text-align: left" | '''Can Dial'''<br/> | | style="border-width: 0.0069in medium 0.0069in 0.0069in; border-style: solid none solid solid; border-color: rgb(0, 0, 255) -moz-use-text-color rgb(0, 0, 255) rgb(0, 0, 255); padding: 0in 0.075in; text-align: left" | '''Can Dial'''<br/> | ||
Latest revision as of 18:49, 21 January 2015
Scheduled Calling
This is a licensed feature that allows for periodic automated calls to be made by the PBX. This can be used for announcements, bells, alarms etc.

Enabling Scheduled Calling
STEPS:
- From the PBX Setup=>Services page, locate the Scheduled Calling section.
- Change the dropdown to Enabled.
- Click the button to save the changes.
- Click on the Apply Changes link at the top of the page to save the information and commit the changes to the database
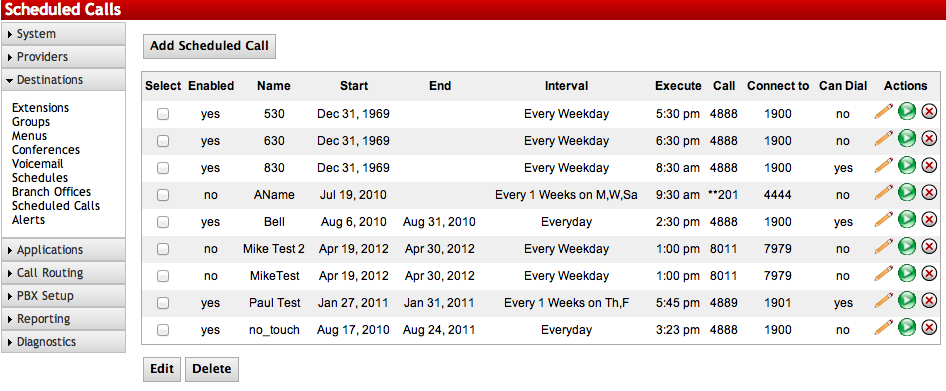
| Select |
Use this column to select which multiple entries to delete or edit. |
| Enabled |
Displays if the entry is active.
1: Enabled 0: Disabled |
| Name |
Displays the name of the Scheduled Call. |
| Start |
Displays the date which a particular entry is set to start. |
| End |
Display the date which a particular entry is set to end |
| Interval |
Displays information on when the Scheduled Call will take place. |
| Execute |
Shows the time the Scheduled Call will happen. |
| Call |
Displays the Number to Call as defined in the Scheduled Call. |
| Connect to |
Displays the Number to Connect as defined in the Scheduled Call. |
| Can Dial |
Event can be triggered by dialing a number |
| Click to edit individual entries. | |
| Click to test an individual entry. A call between the Target and Destination will be established. | |
| Click to delete individual entries. | |
| Edit |
Click to edit multiple entries if checked in the Select column. |
| Delete |
Click to delete multiple entries if checked in the Select column. |
| Add |
Click to create a new Scheduled Call. |
Edit Scheduled Call
Sections/Fields |
|
| Name |
Enter a name to identify this Scheduled Call. |
| Date/Time |
Define what date and time the Scheduled Call should start and end. Both of these are optional. Setting the Start date/time will enable the Scheduled Call at that time. Setting the End date/time will disable the Scheduled Call on that time. If you leave the start date/time blank, the Scheduled call will be enabled immediately. If you leave the end date/time blank, the Scheduled Call will continue indefinitely until manually disabled. |
| Recurrence |
Defines the interval the Scheduled Call will take place. Calls can be set to Daily, Weekly, or Monthly. See the Recurrence table below for more details. |
| Execute At |
Defines the time the call will take place for each Recurrence. |
| Call First |
Defines the entity that will be called. |
| Connect First Call to |
Defines what destination the called party will be connected to. |
| Dial using Permissions of Extension: |
Set this to the extension number that is will be used by this Scheduled Call for calling permissions. Must be set whether doing internal or outbound calls. |
| Can Dial |
Permits this scheduled call to be dialed. Checking the box enables this scheduled call to become a destination. |
| To trigger event Dial |
(Required) The number to dial to trigger this event. |
| Security PIN |
(Optional) Numbers only. If set, when the trigger number is dialed, the system will prompt for this PIN before executing the event. Leave blank if no PIN is needed. |
| Next Destination |
(Optional) The destination the call continues on to. Leave blank if you want to end the call when the event is triggered. |
| Enable/Disable |
Choose Enable for this Scheduled Call to be active, and Disable for it to be inactive. |
| Daily |
Everyday: Will call at the defined Time every day.
Every X Days: Will call at the defined Time every (1-1550) days. Every Weekday: Will call at the defined Time every M-F. |
| Weekly |
Every X Weeks on Y: Will call at the defined Time every (1-1550) weeks on the day defined. |
| Monthly |
Day: Will call at the defined Time every (1st-31st) day of the month.
The X Week on Y: Will call at the defined Time on the 1st, 2nd, 3rd, or 4th week of the month on the day defined. Every X Months: Will call at the defined Time every (1-31) months. |
Adding a New Scheduled Call
STEPS:
- From the PBX Setup=>Services page, locate the Scheduled Calling section.
- If enabled, click the button for Manage Calls, which will take you to the List of Scheduled Calls page.
- Click the Add button.
- Configure your new Scheduled Call. If errors are made, you can click Reset to start over.
- Click Submit to save.
- Click the blue link Back to Services to return to the PBX Setup=>Services page.
- Click the button to save the changes.
- Click on the Apply Changes link at the top of the page to save the information and commit the changes to the database
Edit a Scheduled Call
STEPS:
- Navigate to the List of Scheduled Calls page.
- Click the icon to edit an individual entry, or place a check next to multiple entries and click the Edit button.
- Make the necessary changes.
- Click Submit to save.
- Click the blue link Back to Services to return to the PBX Setup=>Services page.
- Click the button to save the changes.
- Click on the Apply Changes link at the top of the page to save the information and commit the changes to the database
Edit a Scheduled Call
STEPS:
- Navigate to the List of Scheduled Calls page
- Click the icon to delete an individual entry, or place a check next to multiple entries and click the Delete button.
- Click the blue link Back to Services to return to the PBX Setup=>Services page.
- Click the button to save the changes.
- Click on the Apply Changes link at the top of the page to save the information and commit the changes to the database
Test a Scheduled Call
STEPS:
- Navigate to the List of Scheduled Calls page.
- Click the button to test the call connection immediately.
- If the call does not work to your end users desires, reconfigure the Scheduled Call and test again.