Difference between revisions of "Router Info"
| Line 364: | Line 364: | ||
end | end | ||
| + | |||
| + | == Fortigate #3 == | ||
| + | |||
| + | |||
| + | '''For Fortigate Firewalls running OSv7 using IPitomy Cloud PBX''' | ||
| + | |||
| + | After testing the Fortigate series firewalls and working with Fortigate support, we have come up with these modifications to Fortigate Firewalls to ensure they work well with IPitomy Cloud PBX’s. | ||
| + | |||
| + | '''If the firewall is not correctly configured, users with these devices will run into the following issues using a Fortigate:''' | ||
| + | |||
| + | 1. Dropped calls | ||
| + | |||
| + | 2. One way or no way audio | ||
| + | |||
| + | 3. Poor Voice Quality/Clicking | ||
| + | |||
| + | 4. Potential device registration issues | ||
| + | |||
| + | 5. Duplicate SIP Ports and port shuffling which result in poor quality voice. | ||
| + | |||
| + | To mitigate some of these issues, '''Strict Register''' should be ''disabled (outlined below)'' to stop all phones from using a pinhole through port 65476 (external) and 5060 (internal), aka ALG management. That may be all you need to do with some PBX’s, especially premise. These instructions are designed for CLOUD IPitomy PBX’s. | ||
| + | |||
| + | '''''NOTE:''''' With FortiOS version 7 comes a change to profiles. It used to be that there was a default Security Policy for each Security Policy, and you could change it. With version 7 you cannot change the default policy, you must make a clone or use the premade clone called “Base”. | ||
| + | |||
| + | '''''ADDITIONALLY!''''' When editing Firewall policies, to add security profiles, the policy Inspection Mode MUST be set to Proxy-Based, otherwise you don’t see any Security policy except Default. | ||
| + | |||
= Cisco Pix 506/501/515 and Cisco ASA<br/> = | = Cisco Pix 506/501/515 and Cisco ASA<br/> = | ||
Latest revision as of 18:24, 30 November 2022
This page contains general information about port forwarding and disabling application layer gateways on particular routers.
Sonicwall
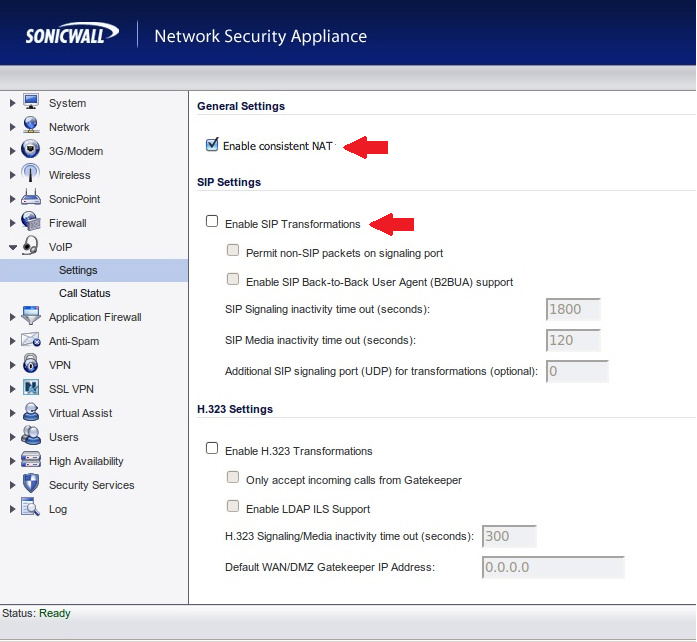
Disable SIP Header Transformations and Enable Consistent NAT
SonicWALL SIP ALG is called SIP Header Transformations, this should be Disabled and Consistent NAT should be Enabled:
Create Outbound NAT Policy and Disable Source Port Remap
In some cases the SonicWALL will remap the 5060 and 10000-20000 UDP source ports causing one way audio and calls dropping after 30 seconds.
To resolve this, create an inside to outside rule like the following:
|
Original Source: |
PBX Private IP |
After that go to the Advanced tab and check the box for "Disable Source Port Remap" and click OK.
File:Sonicwallspr.PNG
Once completed the PBX will always use the proper source ports on the WAN side.
Create Access Policy with Increased UDP Timeout
Most often seen in cloud deployments you will see phones going REACHABLE/UNREACHABLE with complaints of calls going directly to voicemail and BLFs not lighting properly.
To fix this add a LAN to WAN Access Policy as follows:
|
From Zone: |
LAN |
Navigate to the Advance tab and increase the UDP timeout to 300 seconds, once saved phones should remain REACHABLE.
Mikrotik
This router has an ALG that can be disabled with the following command
/ip firewall service-port disable sip
The info was found at the following two links Mikrotik Wiki Mikrotik Forum
Fortigate
Disable SIP ALG
Check the ID of the SIP session helper
 config system session-helper
     show
Among the displayed settings will be one similar to the following example:
edit 13
      set name sip
      set protocol 17
      set port 5060
    next
Here entry 13 is the one which points to SIP traffic which uses UDP port 5060 for signaling.
In this example, the next commands to remove the corresponding entry would be:
delete 13
    end
Note that it is not necessary for the SIP entry to be 13, so cross verify which entry has the sip helper settings.
Change the default–voip–alg-mode to disable SIP-ALG
By default, SIP-ALG is enabled, if you run "show full" you will find it is set to "proxy-based" as shown below:
config system settings
   set default-voip-alg-mode proxy-based
   end
Run the following command to disable SIP-ALG (proxy-based) and use SIP-helper (kernel-helper-based):
config system settings
   set default-voip-alg-mode kernel-helper-based
   end
Either clear sessions, or reboot the FortiGate to ensure changes take effect
- To clear sessions
Ideally, sessions related to VoIP traffic are deleted.
However, in the case of SIP, this means not only deleting the SIP control sessions but also all sessions opened to handle the audio (RTP) traffic. Knowing the port-range used for the audio traffic, sessions clear can be selected by first applying a filter as follows:
diagnose system session filter ...
The command to clear sessions applies to ALL sessions unless a filter is applied, and therefore will interrupt all traffic!
diagnose system session clear
- Alternatively, reboot the FortiGate using either GUI or CLI. The CLI command is:
execute reboot
Disable NAT on IPv4 Policy
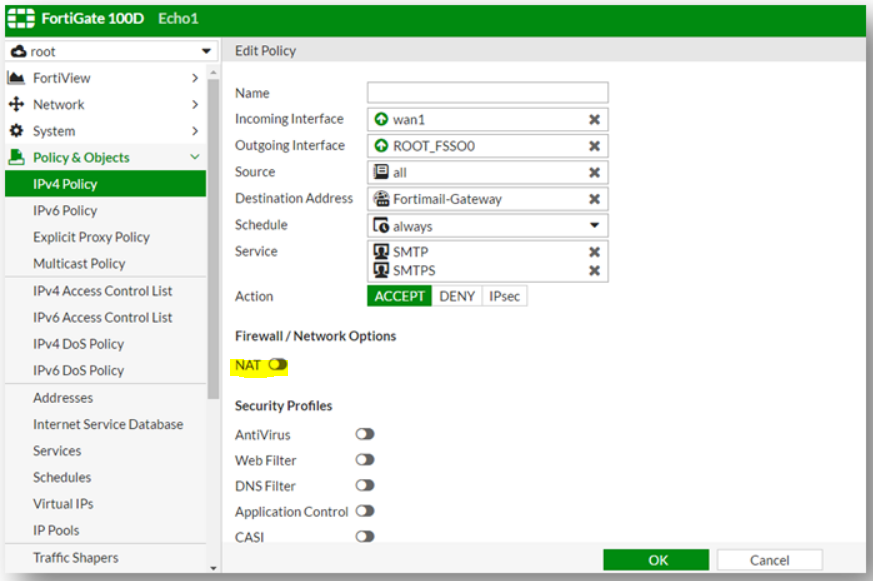
A common mistake is to create an IPv4 policy for UDP ports 5060 and UDP ports 10000-20000 and to leave the NAT switch on.
This makes all incoming traffic on those ports appear to come directly from the private IP address of the Fortigate.
If you see this behavior, disable the NAT switch on the IPv4 policy.
Ensure Outbound Traffic is Allowed from PBX
Many Fortigate configurations I've seen have most outbound traffic blocked.
In these configurations you will need to create an outbound rule allowing the PBX to talk to our SIP servers from source port 5060 UDP and 10000-20000 UDP.
Ideally you would allow the PBX to go outbound on any port it chooses so it can check for updates, provide web and SSH access, etc.
Fortigate #2
For Fortigate Firewalls running OSv6 using IPitomy Cloud PBX
After testing the Fortigate series firewalls and working with Fortigate support, we have come up with these modifications to Fortigate Firewalls to ensure they work well with IPitomy Cloud PBX’s.
If the firewall is not correctly configured, users with these devices will run into the following issues using a Fortigate:
1. Dropped calls
2. One way or no way audio
3. Potential device registration issues
4. Duplicate SIP Ports and port shuffling
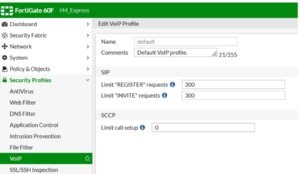
To mitigate some of these issues, Strict Register should be disabled (outlined below) to stop all phones from using a pinhole through port 65476 (external) and 5060 (internal), aka ALG management. After this is complete if issues persist, set the local SIP ports on each phone to unique port assignments.
Delete SIP Firewall
1. In the Command Line Interface (CLI) run the following commands:
· config system session-helper
2. Notice that edit 13 contains SIP.
3. Enter the following commands:
· delete 13
· end
Disable SIP Helper
1. Default setting is proxy, we want to turn that off
2. In the Command Line Interface (CLI) run the following commands:
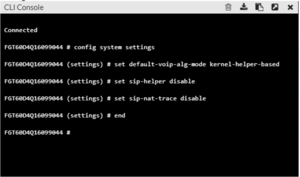
· config system settings
· set default-voip-alg-mode kernel-helper-based
· set sip-helper disable (or) set sip-expectation disable (depending on FortiOS)
· set sip-nat-trace disable
· end
If using the CLI Console:
3. Reboot the router using the web GUI under Status, or in the CLI with the following command:
· execute reboot
Configure Traffic Shaping and VoIP
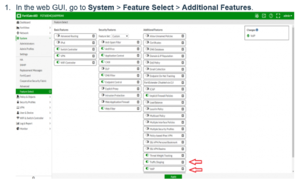
1. In the web GUI, go to System > Feature Select > Additional Features.
2. Toggle Traffic Shaping and VoIP on.
3. Click Apply.
Disable Strict Register
Strict Register forces VoIP devices through a pinhole at port 65476 and will cause duplicate porting to occur.
To disable this setting run the following command in the Command Line Interface (CLI):
· config voip profile
· edit <Profile_name>
· config sip
· set strict-register disable
· end
Note: The VoIP profile name can be found under Security Profile > VoIP > default. Please note if these settings do not persist through a reboot a factory reset or other troubleshooting steps may be needed on the Fortigate itself with Fortigate support.
Create SIP PBX Objects
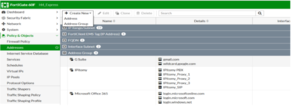
1. In the web GUI, go to Policy & Objects.
2. Find Addresses.
3. Click Create New, then click Address.
4. You will need to add each subnet in the format xxx.xx.xx.x/xx.
5. Do this for each of the related SIP PBX subnets that should be allowed.
6. Find the IP addresses the PBX’s can use and enter them like this: 216.15.137.21/21, or by range: 52.5.220.123-52.5.220.125 and 165.227.0.0/16
1. Allow the IP address for the specific IPitomy PBX, you can ping the FQDN or check in System > Networking for the public IP address.
1. You can enter it as a FQDN also.
2. You may want to verify these IP addresses with IPitomy support.
3. Allow SIP, IP’s:
1. 52.5.220.123-52.5.220.124
2. 54.200.236.200/30
4. Allow proxy for soft phones:
1. 165.227.0.0/16
2. 167.99.0.0/16
3. 159.65.0.0/16
Group the Telecom Networks
1. In the web GUI, go to Policy & Objects.
2. Select Objects, then Addresses.
3. Click Create New, then click Address Group.
4. Create a Group Name.
5. Click Members, click each subnet, then click OK.
Set High-Priority Traffic Guarantee
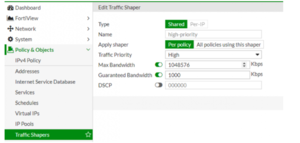
1. In the web GUI, go to Policy & Objects.
2. Select Traffic Shapers.
3. Edit the existing High Priority Traffic Shaper.
4. Set Type to Shared.
5. Set Apply Shaper to Per Policy.
6. Set Traffic Priority to High.
7. Check Max Bandwidth and set to 1048576 Kb/s.
8. Check Guaranteed Bandwidth and set to 1000 Kb/s.
9. Click OK.
Create a New Policy
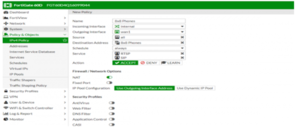
1. In the web GUI, go to Policy & Objects > Policy.
2. Select IPv4.
3. Create a new policy.
4. Set the following options:
· Incoming Interface: Internal
· Source Address: All
· Outgoing Interface: WAN
· Destination Address: Whatever you named the address Group
· Service: All
· Service: SIP, RTSP
5. Click OK.
6. Add additional Ports.
- You may need to add IAX2, the Asterisk Protocol and Queue Manager to services and include them in the above services
- IAX2 is port 4569 TCP & UDP
- Queue Manager is port 5048 TCP & UDP
Arrange Policy
1. In the web GUI, go to Policy & Objects > IPv4 Policy.
2. Double-click the new policy you just made.
3. Drag and drop the new policy to the top spot.
Verify Traffic
Start a call and download some large traffic https://www.nasa.gov/content/ultra-high-definition-video-gallery (e.g., shown below) or use a tool like iperf (https://iperf.fr/ )
Review Traffic Shaper Monitor
1. In the web GUI, go to Policy & Objects > Monitor.
2. Select Traffic Shaper Monitor.
3. Note that since the default traffic is left alone, it doesn’t show in the Traffic Shaper Monitor. Only the reserved traffic displays, in this case high-priority.
Additional Information:
Firmware updates may re-enable some system settings. After a firmware update if you begin to experience issues with the phones again, verify the firewall still has the proper configuration.
To validate the settings implemented are written successfully to the configuration file, download a back up of the existing configuration and verify the following information has been written:
config voip profile
edit "default"
set comment "Default VoIP profile."
config sip
set strict-register disable
set register-rate 300
set invite-rate 300
end
config firewall policy
edit
show
make note of the numbers of the policy(s) used by Voip, usually the main policy and the SIP policy
edit (policy number)
set inspection-mode flow
end
config system settings
set sip-nat-trace disable
set default-voip-alg-mode kernel-helper-based
set gui-voip-profile enable
end
To extend the time for ports and prevent one-way audio after 30 to 45 seconds:
config sys global
set udp-idle-timer 300
end
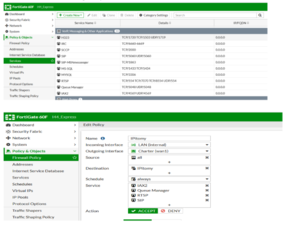
Fortigate #3
For Fortigate Firewalls running OSv7 using IPitomy Cloud PBX
After testing the Fortigate series firewalls and working with Fortigate support, we have come up with these modifications to Fortigate Firewalls to ensure they work well with IPitomy Cloud PBX’s.
If the firewall is not correctly configured, users with these devices will run into the following issues using a Fortigate:
1. Dropped calls
2. One way or no way audio
3. Poor Voice Quality/Clicking
4. Potential device registration issues
5. Duplicate SIP Ports and port shuffling which result in poor quality voice.
To mitigate some of these issues, Strict Register should be disabled (outlined below) to stop all phones from using a pinhole through port 65476 (external) and 5060 (internal), aka ALG management. That may be all you need to do with some PBX’s, especially premise. These instructions are designed for CLOUD IPitomy PBX’s.
NOTE: With FortiOS version 7 comes a change to profiles. It used to be that there was a default Security Policy for each Security Policy, and you could change it. With version 7 you cannot change the default policy, you must make a clone or use the premade clone called “Base”.
ADDITIONALLY! When editing Firewall policies, to add security profiles, the policy Inspection Mode MUST be set to Proxy-Based, otherwise you don’t see any Security policy except Default.
Cisco Pix 506/501/515 and Cisco ASA
- access-list 101 permit udp any host 64.238.XXX.XXX range 10000 20000
(Note: Replace 64.238.XXX.XXX with your public IP assigned to be forwarded to the IPitomy PBX) - access-list 101 permit tcp any host 64.238.XXX.XXX range 10000 20000
(Note: Replace 64.238.XXX.XXX with your public IP assigned to be forwarded to the IPitomy PBX) - static (inside,outside) 64.238.XXX.XX 172.16.2.129 netmask 255.255.255.255 0 0
(Note: Replace 64.238.XXX.XXX with users public IP, replace the 172.16.2.129 with users private IP that is assigned to the IPitomy PBX) - no fixup protocol sip 5060
- no fixup protocol sip udp 5060
Adtran
From a recent interaction with an AdTran tech, it was shown to us there is a setting for "proxy transparency" that needs to be enabled in order for all of the SIP traffic to pass unhindered. This was when the Adtran was the routing device at the remote site, but likely would need to be enabled when the Adtran is at the PBX site. Its worth trying for sure.
PepLink
Here is a document sent to a dealer from PepLink regarding configuration settings that may be required for Remote SIP to function properly:
FIOS ActionTec
We have found the following article that outlines some possible configurations that are available on the Actiontec Modem/Router combo that FIOS is installing. This gives some options on ways to configure to optimize VoIP and SIP traffic passing to remote.
http://www.dslreports.com/faq/verizonfios/3.0_Networking#16077
Comcast Modem
We have received some information from our dealers that if your site has a Comcast modem/router, you should request a SMC and not a Linksys, as the reports are that the SMC handles VoIP more consistently. Additionally, there may be issues with Comcast modem/routers ability to handle multiple concurrent NAT sessions, limiting the number of remote phones you can install at a remote site.
Sophos
Some Sophos models have a hidden SIP module that is not in any way indicated, nor accessible, from the webgui. It must be disabled from the command line console. If left enabled, it attempts to override any rules you may have in place for sip/rtp traffic and can result in one-way audio, and other issues with calls successfully connecting.
