Panasonic 550 Configuration
support@ipitomy.com | 941.306.2200
Description
Tech Bulletin 2011-005
IPitomy – Panasonic KX-TGP550T04
NOTE: If you have multiple handsets registering from the same base unit, and therefore with the same IP address, you need to change the User for the extensions from Peer to Friend.
Procedure – Login to the KX-TGP550T04 WEB interface
1. Activate the Web user interface. This is necessary every time you program features using a computer. (The Web user interface is deactivated after setting on the computer.) The default setting is “Off”.
Handset
a. {MENU} (centre of joystick){#}{5}{3}{4}
b. {V}/{^}: Select the desired setting.
c. {SAVE} {OFF}
Base Unit
a. {MENU} (middle soft key) {#}{5}{3}{4}
b. {V}/{^}: Select the desired setting.
c. {SAVE} {EXIT}
2. Obtain IP address from phone:
Handset:
a. {MENU} (centre of joystick) {#}{5}{0}{1}
b. Base unit (KX-TGP550 only):
c. {MENU} (middle soft key) {#}{5}{0}{1}
3. Log in to web page on phone: [http:// http://]<phone ip address>/user: admin password: adminpass
Procedure – SIP Settings
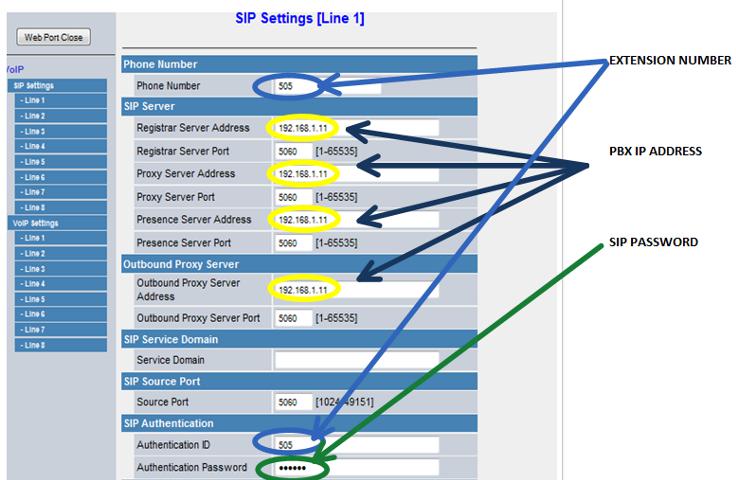
1. Navigate to VOIP -> SIP Settings ->Line 1
2. Set Registrar Server Address, Proxy Server Address, and Presence Server Address to the PBX IP address.
3. Set phone number and Authentication ID to the extension number.
4. Set Authentication Password to SIP Password for the extension.
5, Navigate to VOIP Sip Settings Sip user agent. This field should be populated with the Mac ID of the device.
Procedure – VoIP Settings
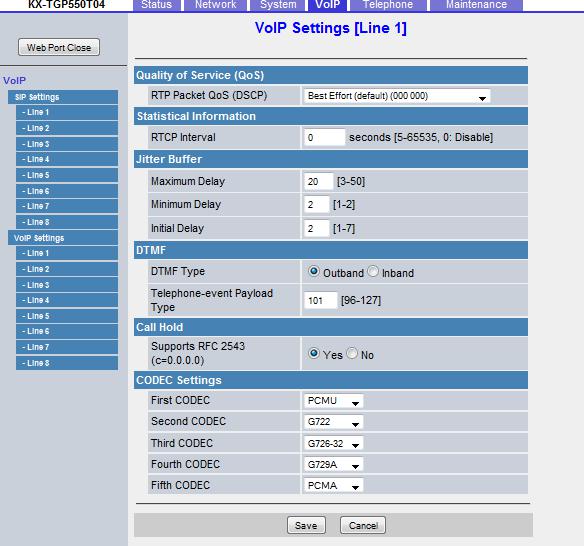
1. Navigate to VOIP->VOIP Settings-> Line 1.
2. Set the settings as listed in this screenshot:
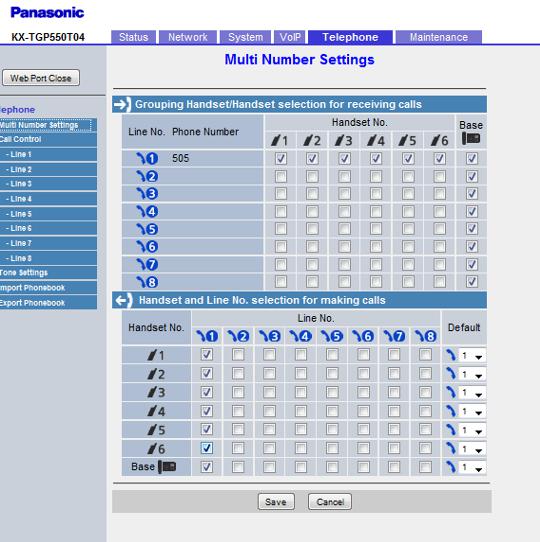
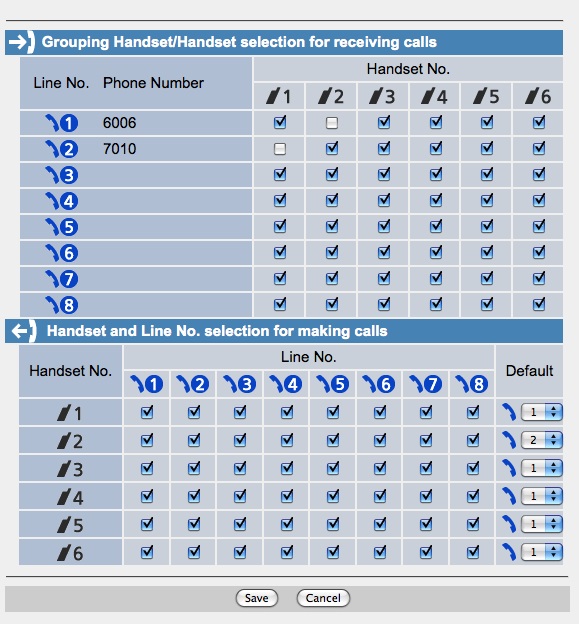
3. Navigate to Telephone-> Multi Number Settings.
4. The following would be a good default configuration for a single handset with a single SIP account. The defaults should allow things to work without making changes on this page.
This setup is fine for a single phone. However, something else worth noting is the Multi Number Settings menu located under the top-level telephone tab in the web admin portal. This is where you decide which handset rings when someone calls a particular line, and which lines each handset will have access to for outbound calls. By default, everything is checked, which obviously isn’t the most practical way to handle inbound and outbound calls for every business.
Overall, Panasonic made manual provisioning easy, though the web admin menu may be a little intimidating for first timers. It can get quite in-depth (different phonebooks for each handset, call control rules for each line, etc), which we can certainly appreciate. Changes we made within the web portal were pushed to the phone without any noticeable delay or the need to reboot the system.
