Difference between revisions of "Console Changing IP Address"
Jump to navigation
Jump to search
Drew Harrell (talk | contribs) (Created page with "=== Changing the IP Address === The Network Console allows you to view and change settings without requiring an external web browser or any network connection. ====STEPS====...") |
m (→STEPS) |
||
| (5 intermediate revisions by 2 users not shown) | |||
| Line 1: | Line 1: | ||
=== Changing the IP Address === | === Changing the IP Address === | ||
| − | The Network Console allows you to view and change settings without requiring an external web browser or any network connection. | + | The Network Console (keyboard and monitor - plugged directly into the PBX) allows you to view and change settings without requiring an external web browser or any network connection. |
| + | |||
| + | ==== STEPS ==== | ||
| + | |||
| + | #Plug a keyboard and monitor into the IP PBX. | ||
| + | #From this keyboard, press CTRL-ALT-F7 | ||
| + | #Follow the instructions displayed on the page to configure the IPs for the PBX. | ||
| + | [[File:Altf7.jpg|left|frameless]] | ||
| + | <br /> | ||
| + | |||
| + | |||
| + | |||
| + | |||
| + | |||
| + | |||
| + | |||
| + | |||
| + | |||
| + | |||
| + | |||
| + | |||
| + | |||
| + | |||
| + | |||
| + | |||
| + | |||
| + | |||
| + | |||
| − | |||
| − | |||
| − | |||
| − | |||
The options used are as follows. | The options used are as follows. | ||
| − | + | <br/>'''1''': Network Type Static or DHCP | |
| − | '''1''': Network Type Static or DHCP | ||
'''2''': IP address | '''2''': IP address | ||
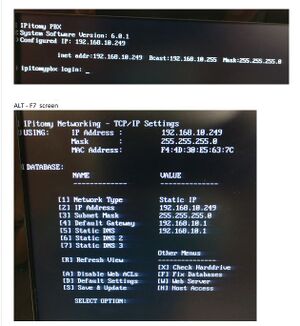
Latest revision as of 13:42, 28 April 2026
Changing the IP Address
The Network Console (keyboard and monitor - plugged directly into the PBX) allows you to view and change settings without requiring an external web browser or any network connection.
STEPS
- Plug a keyboard and monitor into the IP PBX.
- From this keyboard, press CTRL-ALT-F7
- Follow the instructions displayed on the page to configure the IPs for the PBX.

The options used are as follows.
1: Network Type Static or DHCP
2: IP address
3: Subnet Mask
4: Default Gateway
5: Static DNS
6: Static DNS 2
7: Static DNS 3
R: Refresh View
D: Default Settings
S: Save & Update
Once all values have been configured to match the install network, choose S to Save & Update.
Note: For further details on using the Net Console, please refer to Appendix 6.